
If you are looking for a first rate putting simulator, EXPUTT RG is the real deal. You can use it at home or take it along with you on the road. There are a ton of new features. Let’s take a detailed look.
Great new features include the ability to use mobile devices with it.
In the prior version, you hooked up the high-speed video camera to your television via HDMI cable.
With the new model, they’ve added a Mobile setup using an app on your tablet or phone.
My intent here is to go into detail. Maybe from a different perspective than is currently available online.
I am an end user. It’s for personal use.
I like the EXPUTT RG a lot. I would buy it again. ★★★★★
I’ve included quite a few photos and my version of how things run based on my use to date.
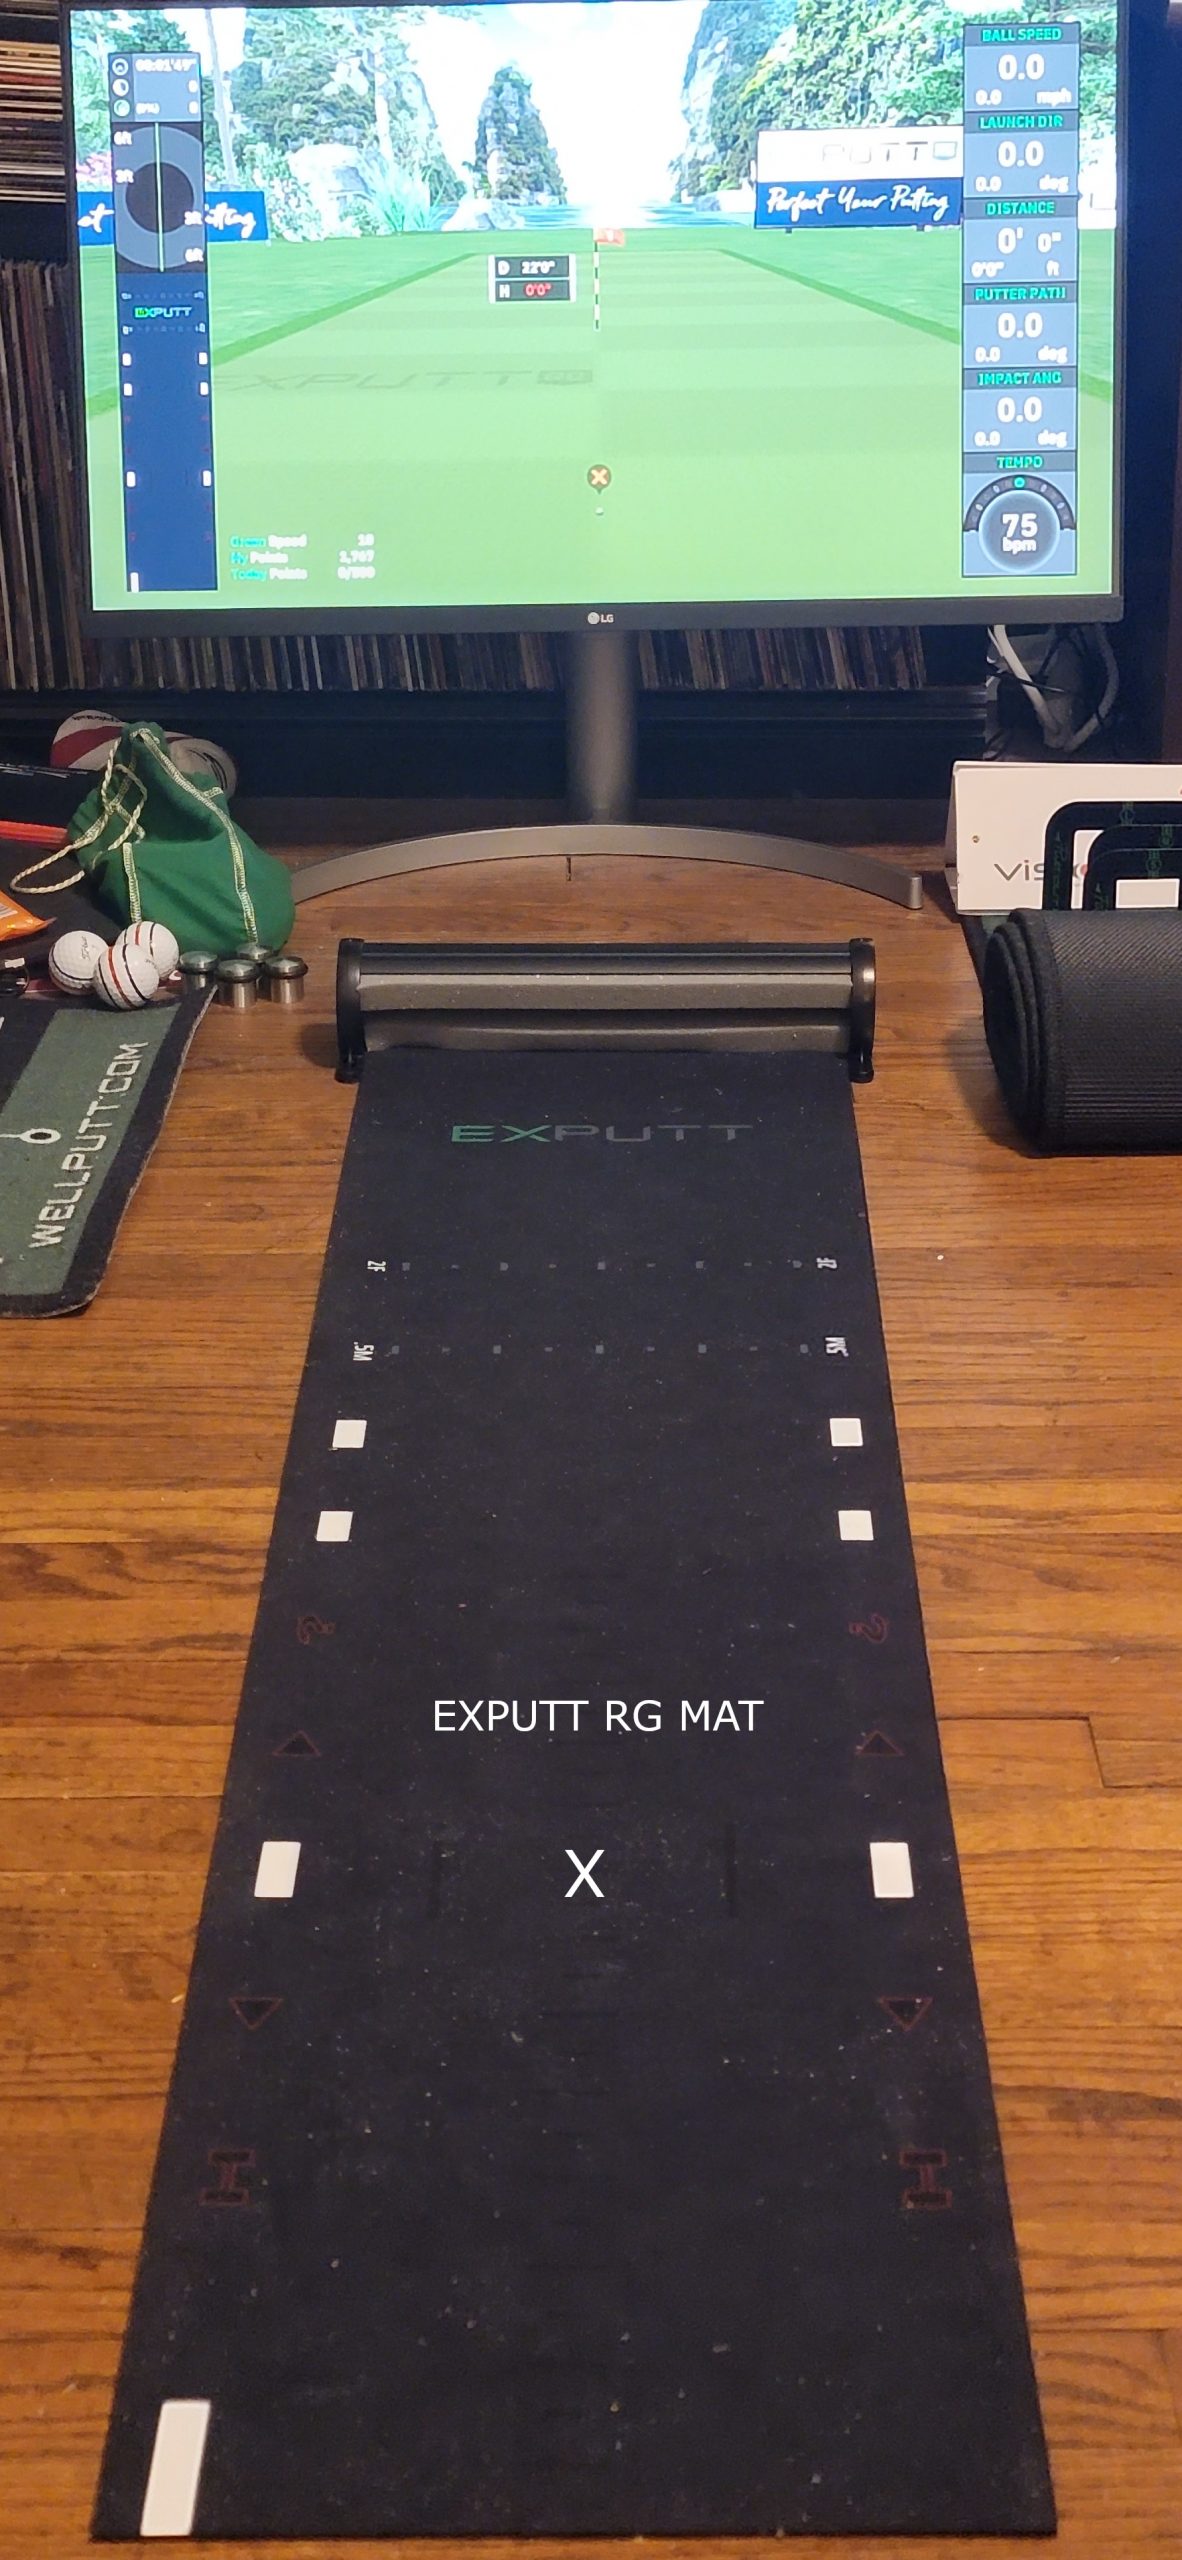
I have it hooked up to a 32 inch monitor instead of the TV. The camera is above the monitor on a bookshelf.
The camera must be able to see all the white lines on the mat to start.
Lighting can can be key for video cameras. I have the overhead light on. It needs to be used in a well lit room.
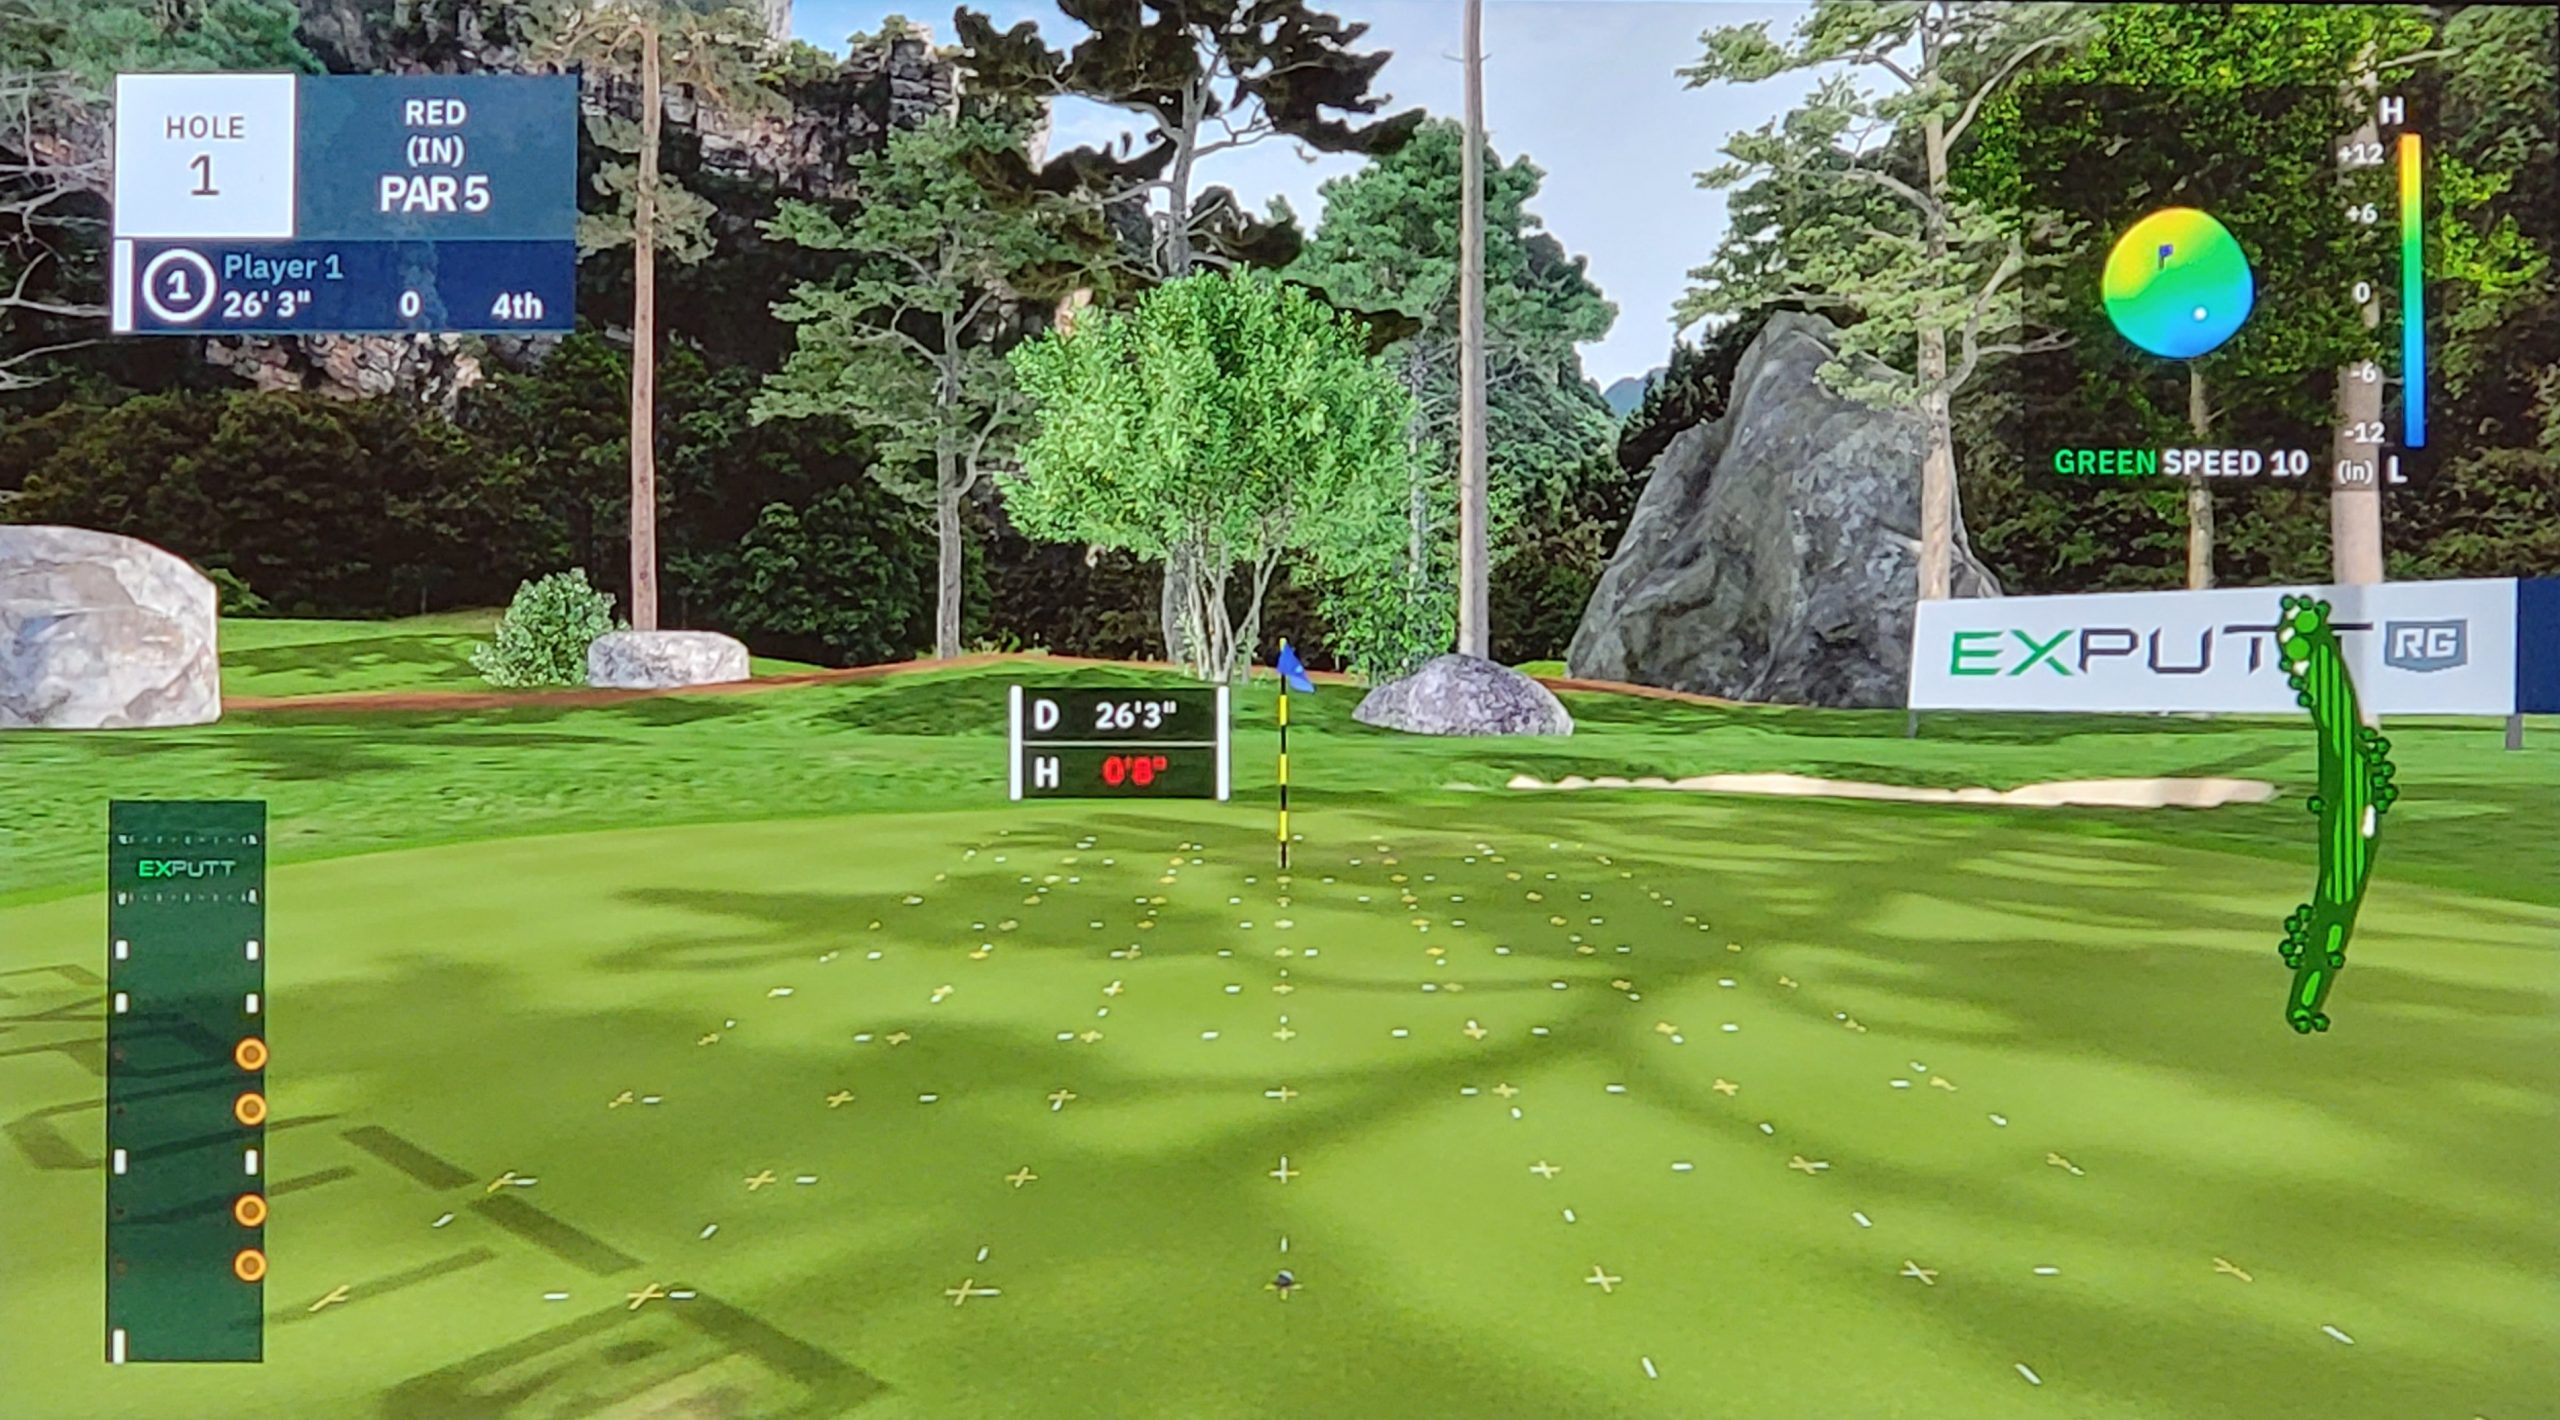
The image below is the TV interface with a HDMI cable.
The ball position for putting is between
the two nearest white lines.
The system says ready when the ball is in position
Mobile Connection
The image below is the Mobile interface on my iPad. It works on my Android phone also.
This is really handy if you have limited room. There could be lots of options for taking this to a friends house, to a hotel, on the road, etc.
Example: I don’t like using my TV with the putting simulator. It ties up the TV.
I leave it hooked up to a monitor, but I’ve also used it with my iPad.
When using the mobile interface, the Classic menu: Practice mode is enabled.
This boots up a little differently. You don’t use the HDMI cable for this.
When you turn on camera with the remote…wait until the indicator on the front of the camera turns green.
At that point, hold down the mobile button on the remote for at least 3 seconds. The green light will turn blue and flash.
Then open up the EXPUTT RG App on your tablet or phone and choose “Connect.”
Both your mobile device and camera must be connected to the same Wi-fi for this to work.
Wi-fi network connections are stored and automatically reconnect.
To avoid connection problems with the mobile interface on the road, connect the camera to a TV and local Wi-fi via HDMI first. Then the camera will store the Wi-fi connection for use with your mobile device as well. (Suggestion from EXPUTT)
Example: Hotel Wi-fi will not be stored on the camera initially, Connecting to the TV via HDMI lets you set up the connection with the EXPUTT RG remote control.
Connection Option
FYI – Suggestion for those with a phone and tablet.
This will give some people options in remote places or in places away from the local Wi-fi signal.
You will need to log the camera into a new W-fi if you are on the road like at a hotel.
I would rather fix this at home.
While your connected to your home TV or Monitor via HDMI, turn on your phone mobile hotspot. Connect the camera to a second source…your phone. The camera will store the connection for future use.
Turn your phone mobile hotspot on. Connect the camera to the hotspot and your tablet to the hotspot. That way you won’t have to mess around trying to connect the camera to a hotel Wi-fi.
How does it work?
This is from the EXPUTT website.
Easy to set up and simple to use, Exputt RG uses a high-speed camera and innovative tracking software to track your swing mechanics and ball movement.
Just roll out the putting mat and plug in the high-speed camera, and you’ll be on your favorite course green in no time.
Upgraded Features
- Practice on real life greens
- Upgraded camera system
- Innovative tracking mat
- Wi-fi enabled for online gaming
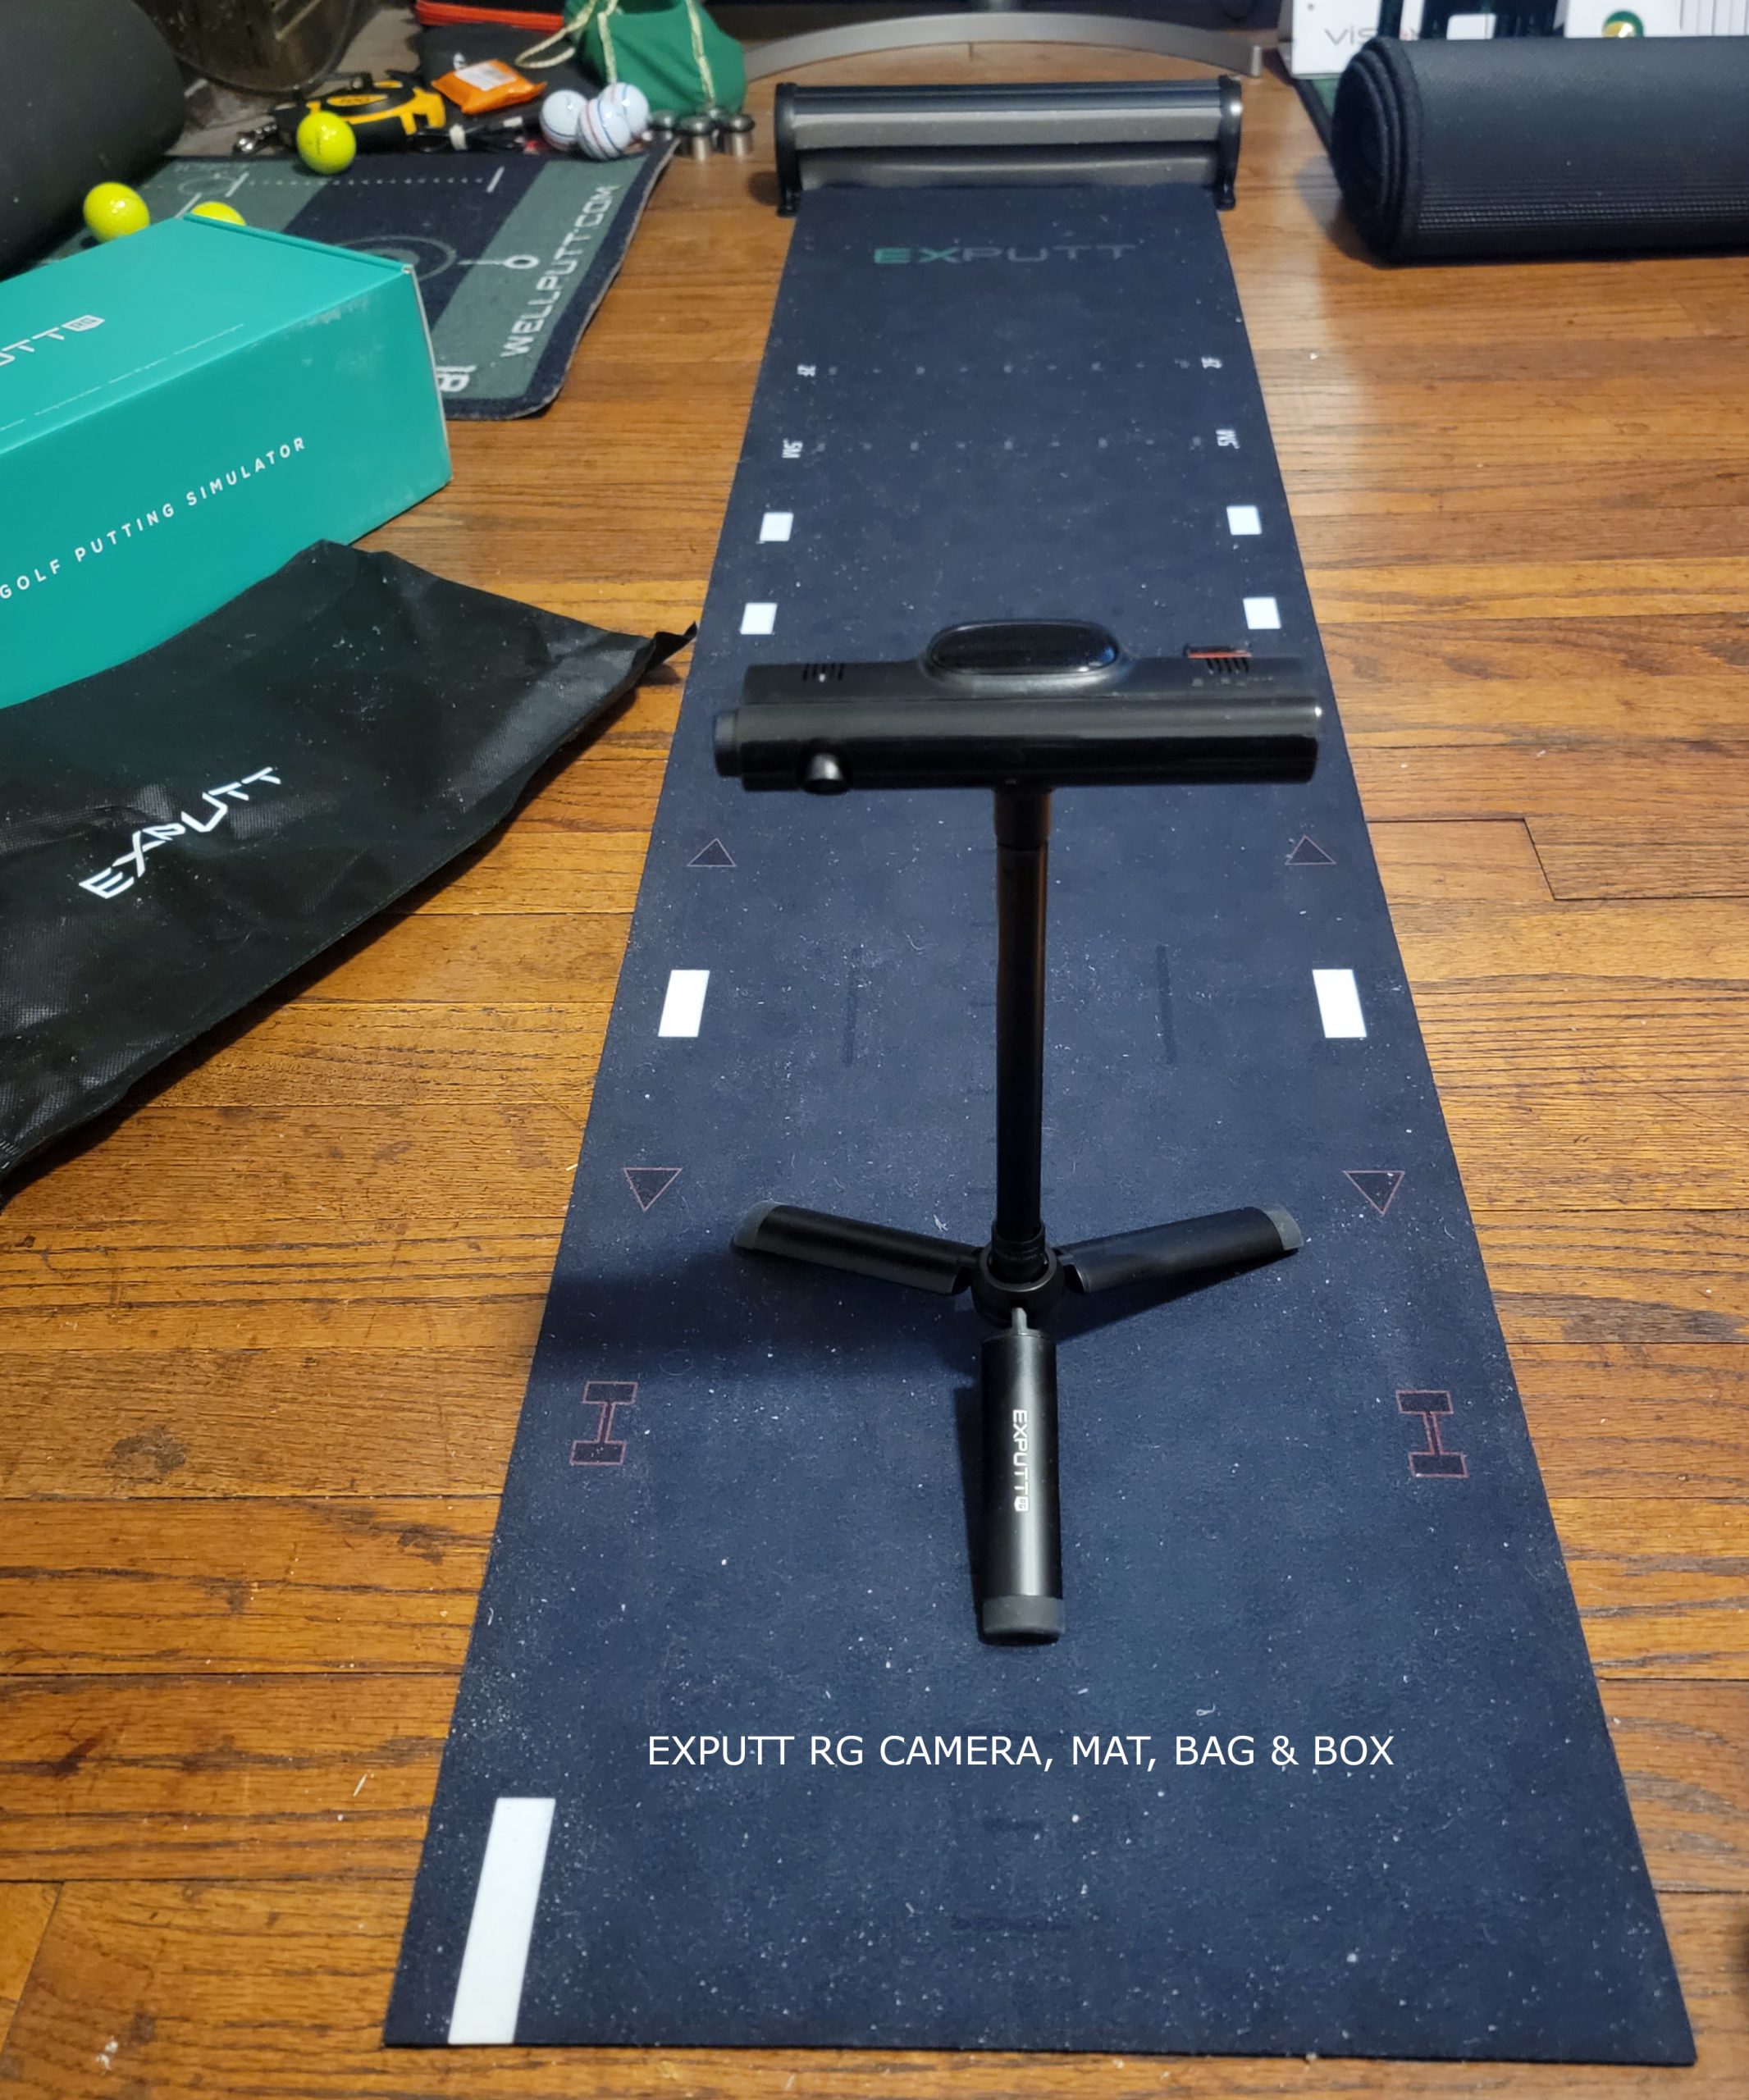
The system comes in the green box to the left in the image below. The mat rolls up to fit in the bag on the left. The ultra high speed camera is in the center of the image. The other components are a remote control, HDMI cable, power brick, power cord and another adapter to mount the camera on your TV or monitor.
You could almost put everything in the bag. I may buy a small padded camera duffle if I travel with the system.
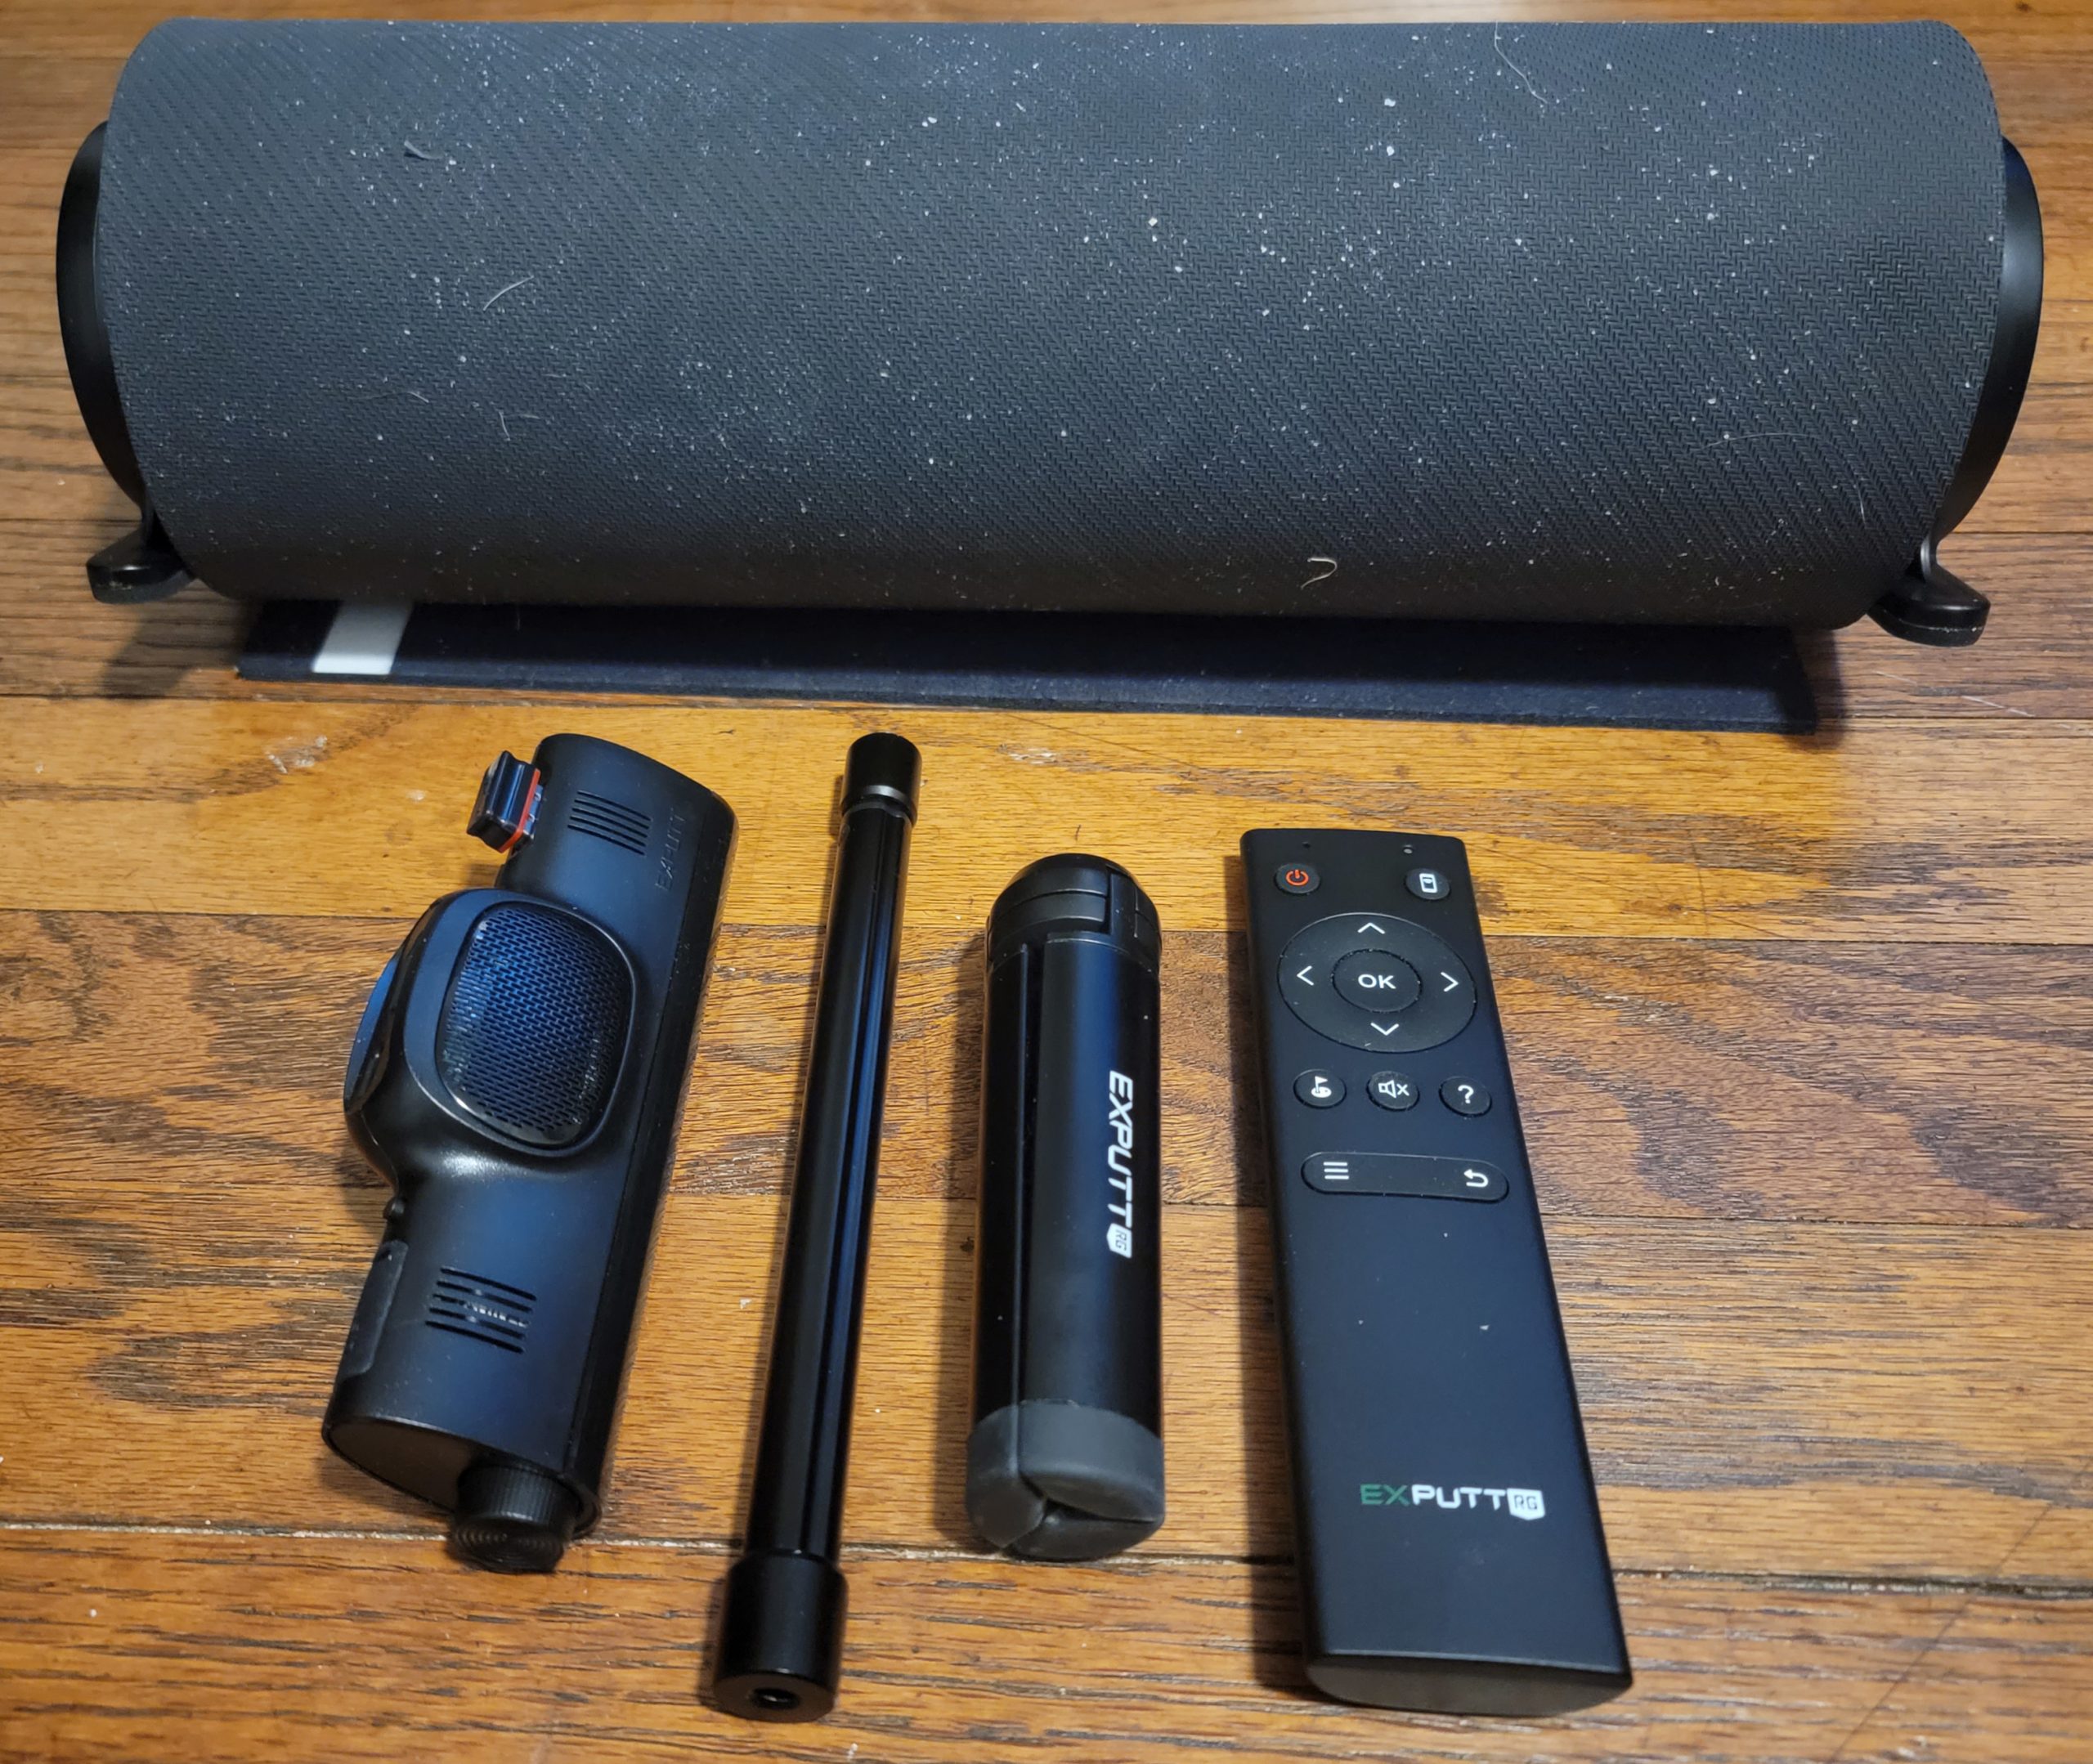
The image below shows how small of a package this is. The only things missing are the power cable and HDMI cable. This could easily fit in to a camera backpack or bag.
It’s the mat rolled up, then from left to right: Ultra High Speed camera, tripod extension, tripod and the remote control.
Here is my take on the system
I’ve had the system about a couple weeks at the time I’m writing this article.
It takes time getting used to making 50 foot putts on a 4 foot mat into memory foam.
I’m still not completely settled with it, but I’m improving every time I use it.
To me, it seems a lot like a full swing simulator or device that uses cameras and stickers.
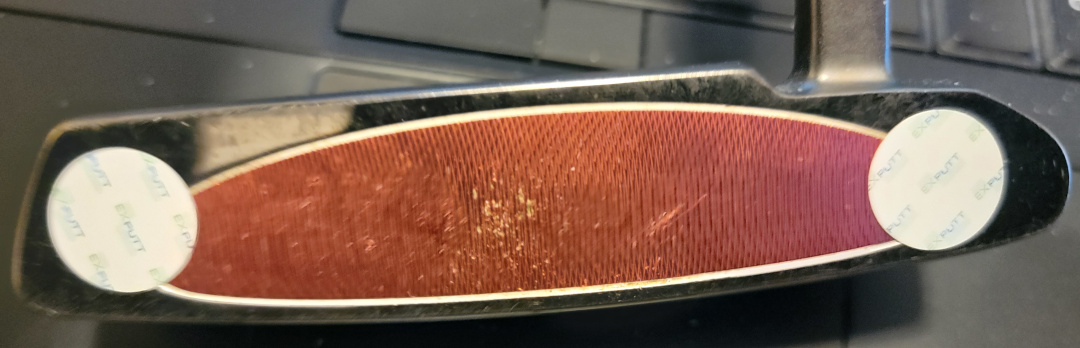
The putting simulator uses a ultra high-speed camera and stickers on your putter.
It’s just like putting on a real green with putting statistics on the screen.
Most of the setup and use of the system is pretty obvious and easy.
There are unboxing videos online and an article or two, but they don’t go all the details. I have listed them at the end of this article.
I’ve found myself sending messages to EXPUTT customer service.
The questions I had were not on setup.
Their manual leaves something to be desired on the function of certain features and how putt data is analyzed.
At this point, my intent is to do a review and add things here that should be in the “Manual.”
I have received a number of very timely responses in detail from EXPUTT customer service.
TV & Mobile Interface
The TV interface gives you more data on the screen, all the Classic features and all the new features. You can use a TV or a computer monitor with an HDMI port.
The Mobile interface gives you the Classic menu and Practice mode only.
However, being able to take the system on the road and use a tablet or phone will be a game changer for some.
EXPUTT RG membership / login
One thing I would suggest is creating your online “account / membership” using a computer.
Why? It’s much easier than using a remote control. I’m sure we’ve all been there.
It’s really just establishing your login information.
What’s in the box?
- Ultra High-Speed Camera.
- Indoor Putting Mat & Case
- Camera Stand. (Tripod & Extension)
- Camera Clip. (For TV or Wall Mount)
- HDMI Cable.
- Remote Control.
- Power Cable & Wall Socket.
- Putter Alignment Stickers.
- 1 AAA Battery
- Manual
Note: It does not come with audio speakers. However, It plays audio. I have mine hooked up to a monitor that has internal speakers. Audio plays through whatever device (TV, Monitor, Tablet, Phone) that you have it hooked up to.
Overview – Setup
I’ve set it up and have taken hundreds of putts.
I think it’s one of the two best putting training aids I own.
The setup is pretty simple.
You put a small camera on a tripod. The camera has to be placed at a minimum height of 2′ 3″ inches and a maximum height of 5′ 6″ inches.
Example: I have the camera on a bookshelf above my monitor.
The camera lens is at 40 inches (vertical) and the mat is set back 22 inches (horizontal) from the bookshelf on the floor.
The mat has to be in the field of view of the camera as there are white lineup marks on the mat.
I tried the TV setup first. I plugged the HDMI cable into the camera and into our television.
Then I plugged in the power cord for the camera.
Then turned on the camera.
It prompts you to log into your Wi-fi and then log into your account / membership.
Note: If you don’t log out of your account, it remembers you. That means you don’t have to log in every time. There is no “remember me” check box.
The software is loaded on the camera. It boots up to a screen prompting your to choose what you want to do.
The device also plays stock music and nature sounds. It speaks to you if you make good putts. I use the remote to shut that stuff off or I lower the sound most of the time.
Putter Stickers
Use putter stickers on your putter so the camera can follow your putter. The EXPUTT RG comes with 20 WHITE putter stickers. If you run out, you can purchase more online. The size of the stickers is metric or 15 mm or .591. The closest fraction is 19/32 of an inch. You can get several hundred 15 mm stickers for under $10.
WHITE stickers are available online – look for 15 mm stickers
The EXPUTT RG comes with 20 putter stickers
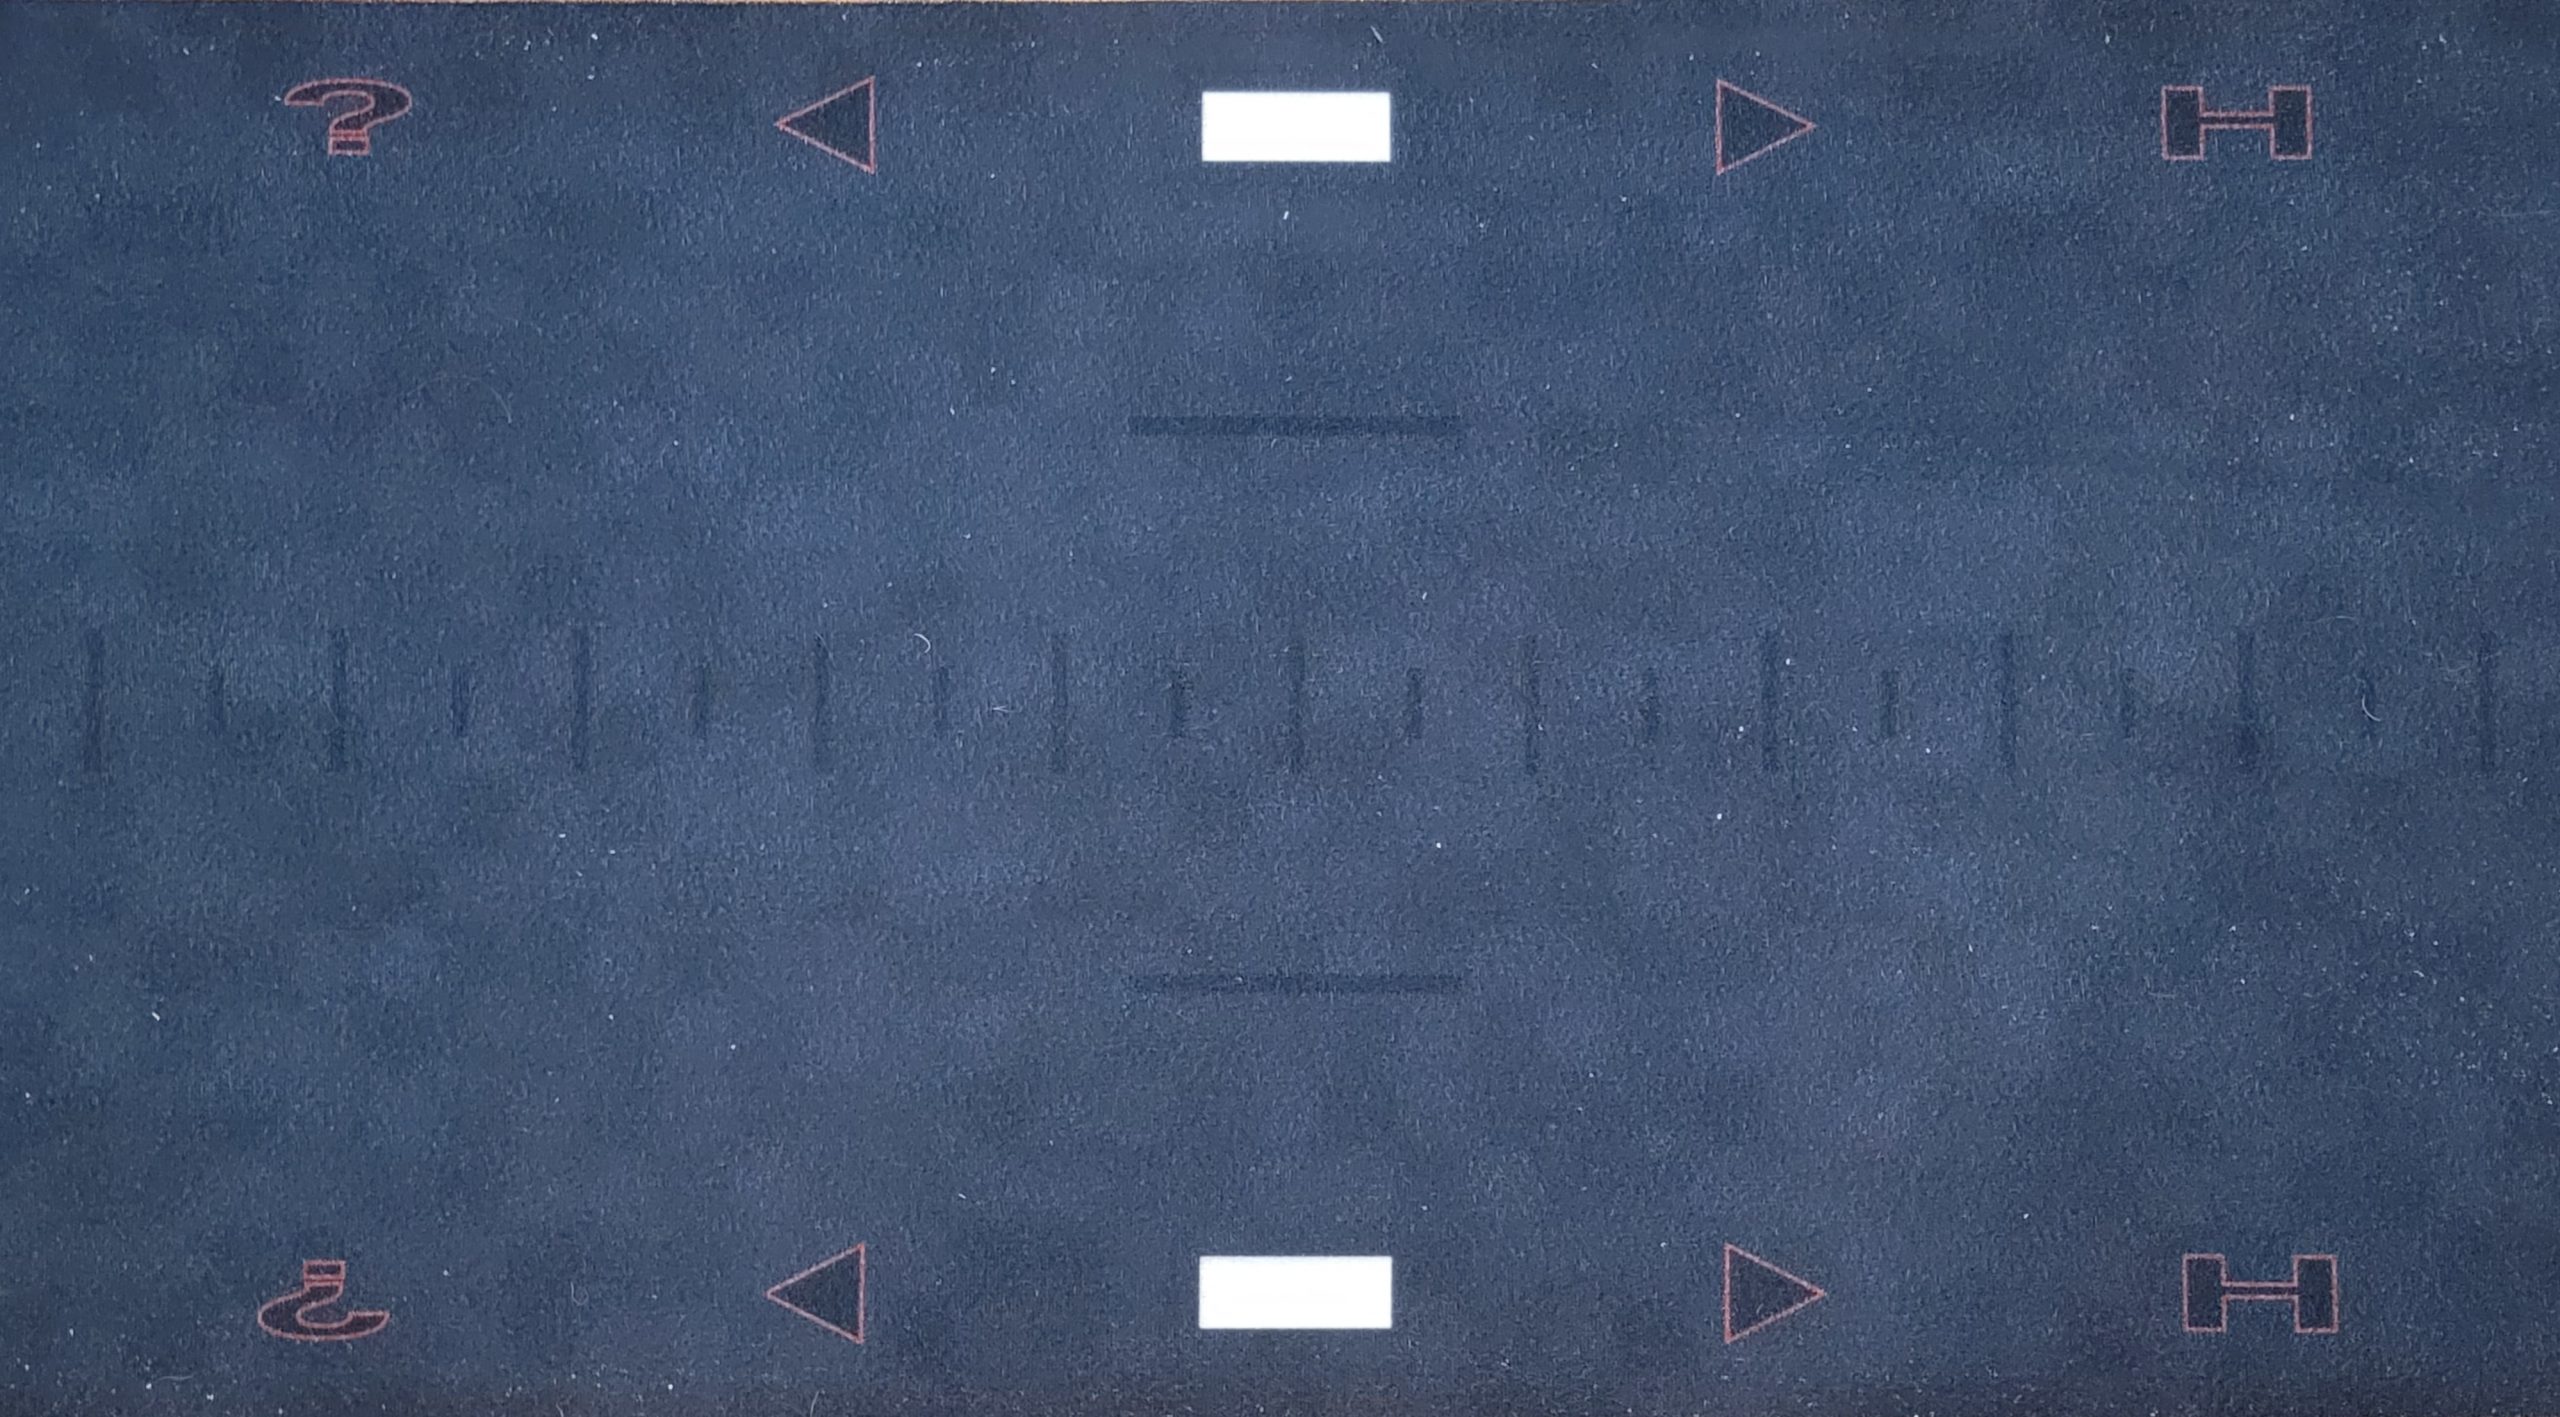
Control Keys
You can use your putter like a mouse or like the remote control. Hold the toe or heel over the control key on the mat. Why toe or heel? The camera needs to see the sticker.
The ball must be in the hitting zone for these to work.
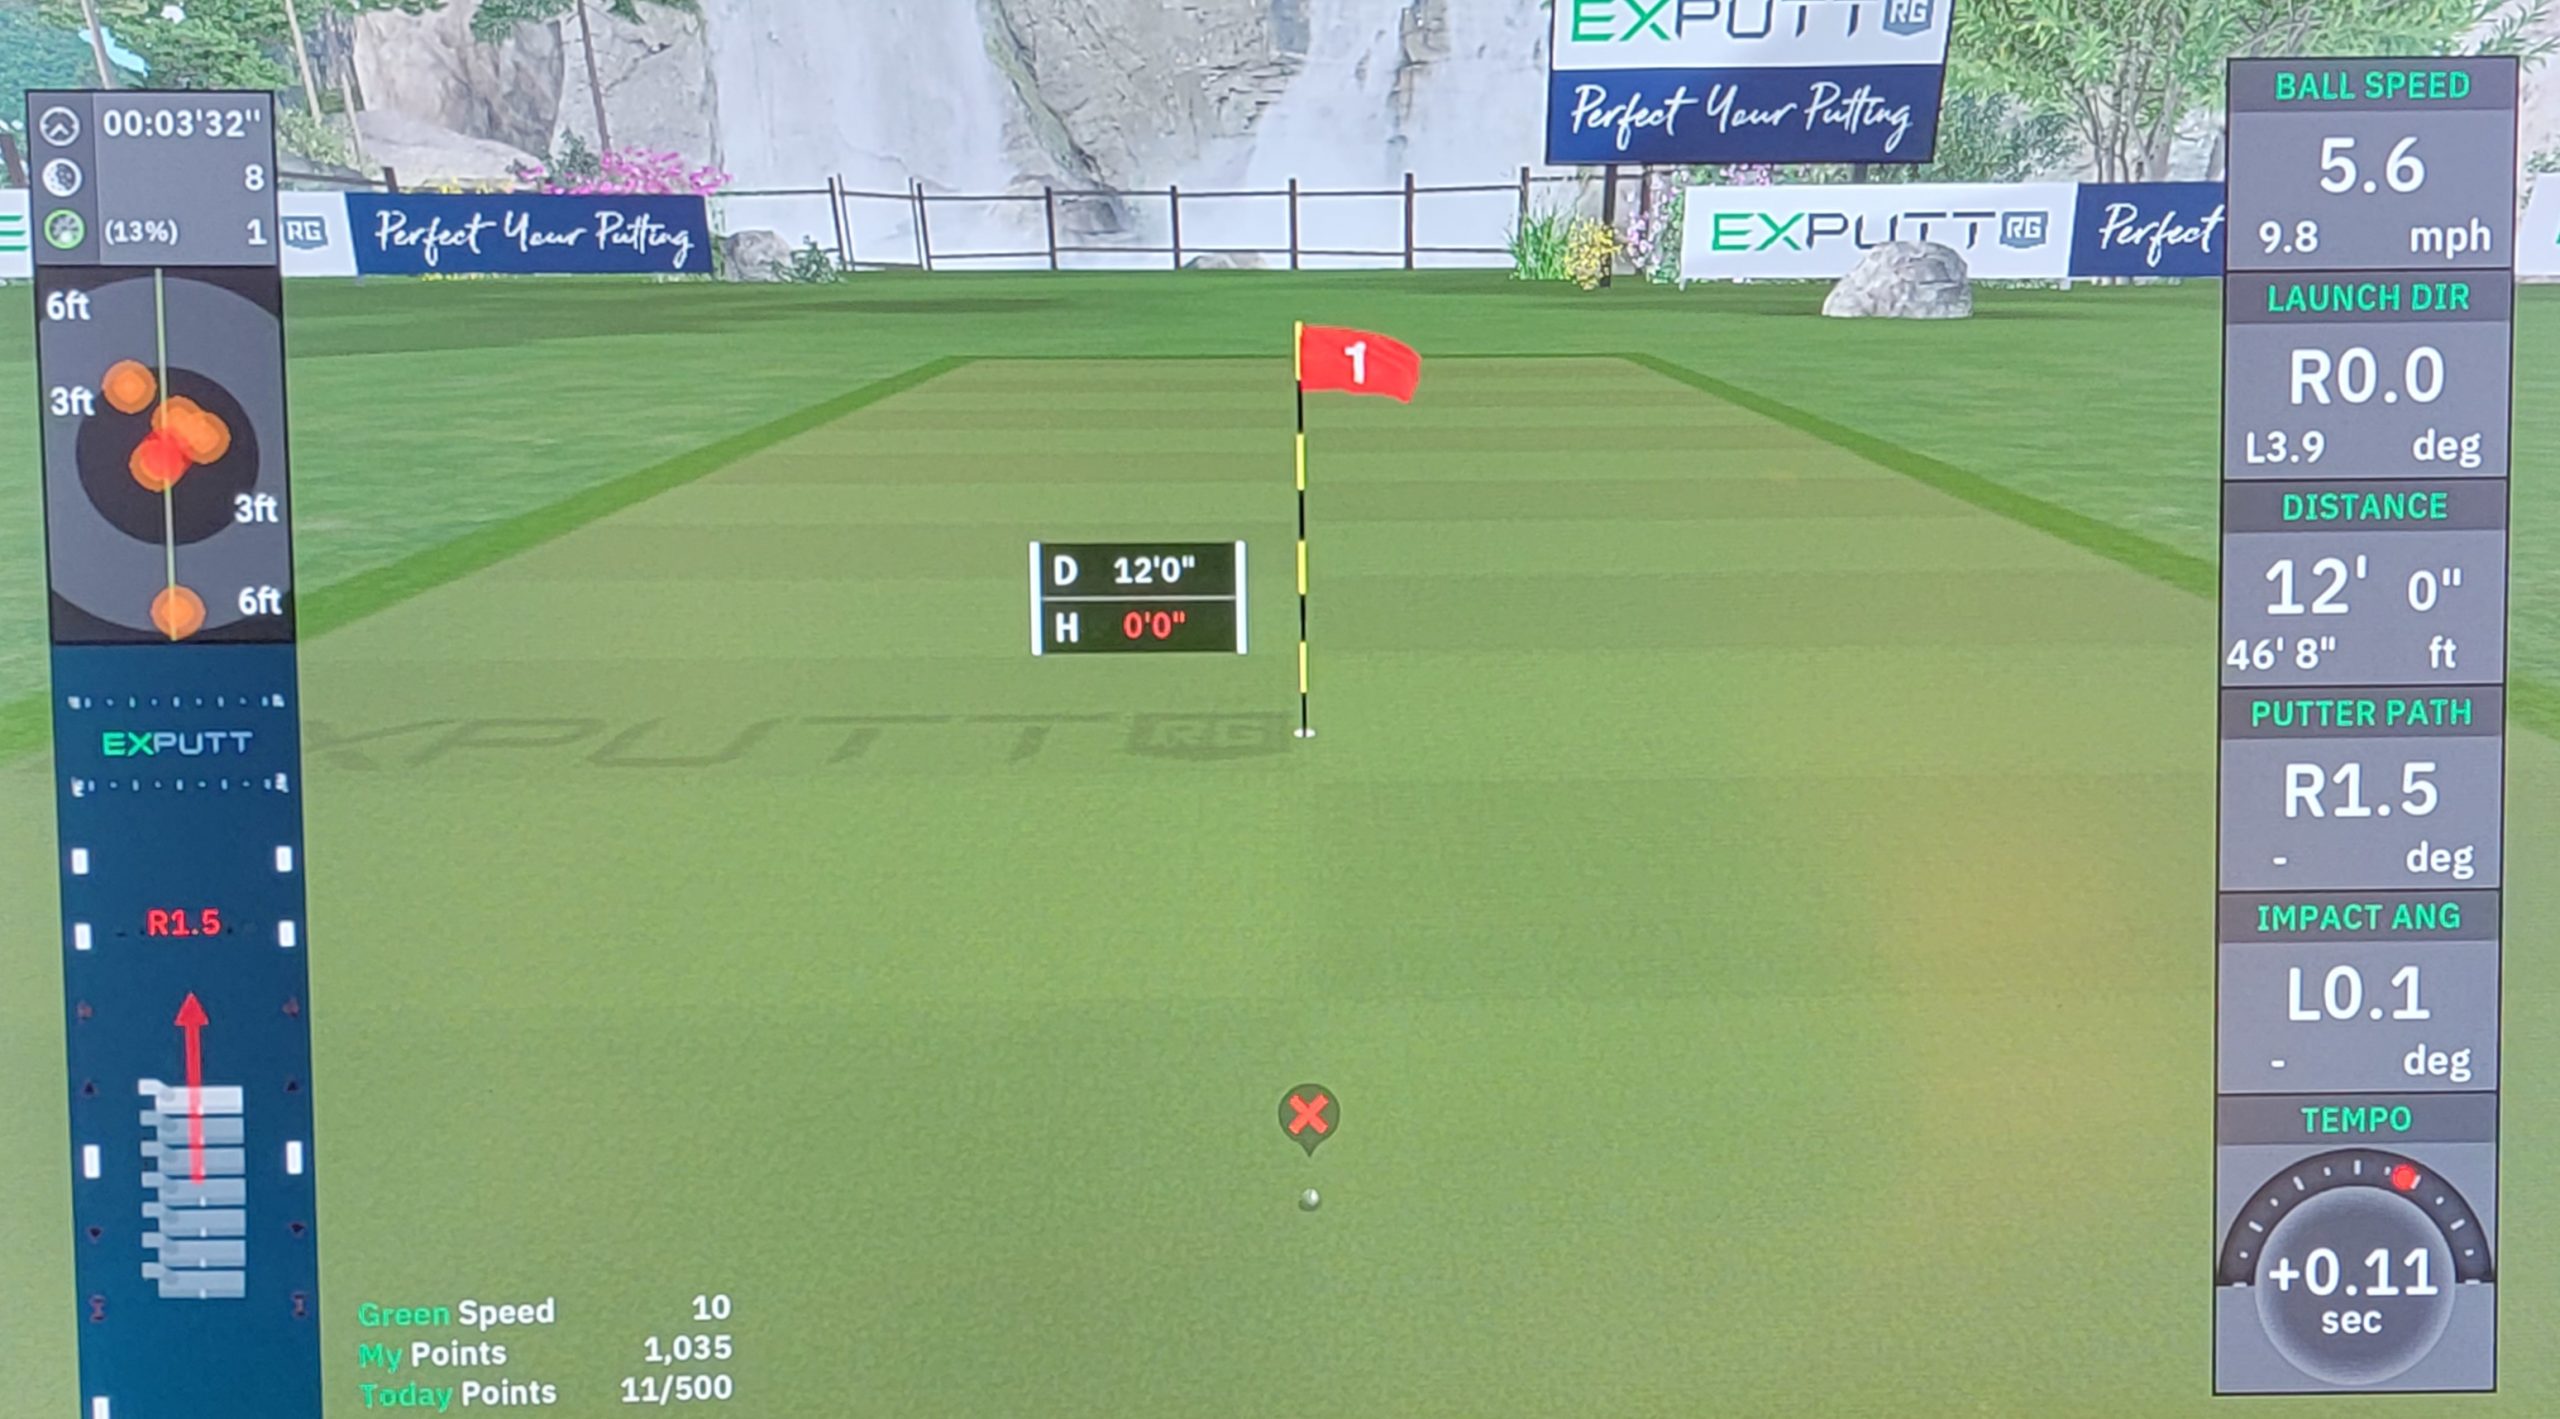
Hint Key – The ? or question mark symbol shows recommended ball speed, angle to hole, & directional aim distance to the hole.
Direction Key – The ← and → or arrow keys are used to adjust the putting direction from side to side.
Viewing Angle Key – The H key – The viewing angle is lowered while the key is pressed. This key works in the playing modes. It’s like crouching down to read a putt.
The image below is the ball ready zone along with the right and left handed control keys on the mat.
Remote Control
Since I mentioned the remote control, I thought I’d describe that device right away.
- The remote has an on/off button.
- A “select mobile device” mode button for phone or tablet
- OK button in the middle to select things
- An arrowed navigating menu
- An Explore button – in Explorer mode you can relocate the pin and ball position.
- Sound on/off button
- Hint button – suggests the speed and break of a putt
- Menu button
- Back button
Note: You need to control volume from the source. In my case, the monitor volume level.
Camera
The camera is pretty straight forward.
- Camera Lens
- Dial for camera rotation (adjust to find the mat)
- Indicating LED
- Remote control receiver
- Power button
- Power terminal (micro-C type)
- HDMI terminal
- micro SD card slot (For updates*)
- USB port(Wi-fi dongle)
- Female tripod mount (0.25 inch)
*Note: Updates are done when the system is online, but the micro SD slot could be used for that also.
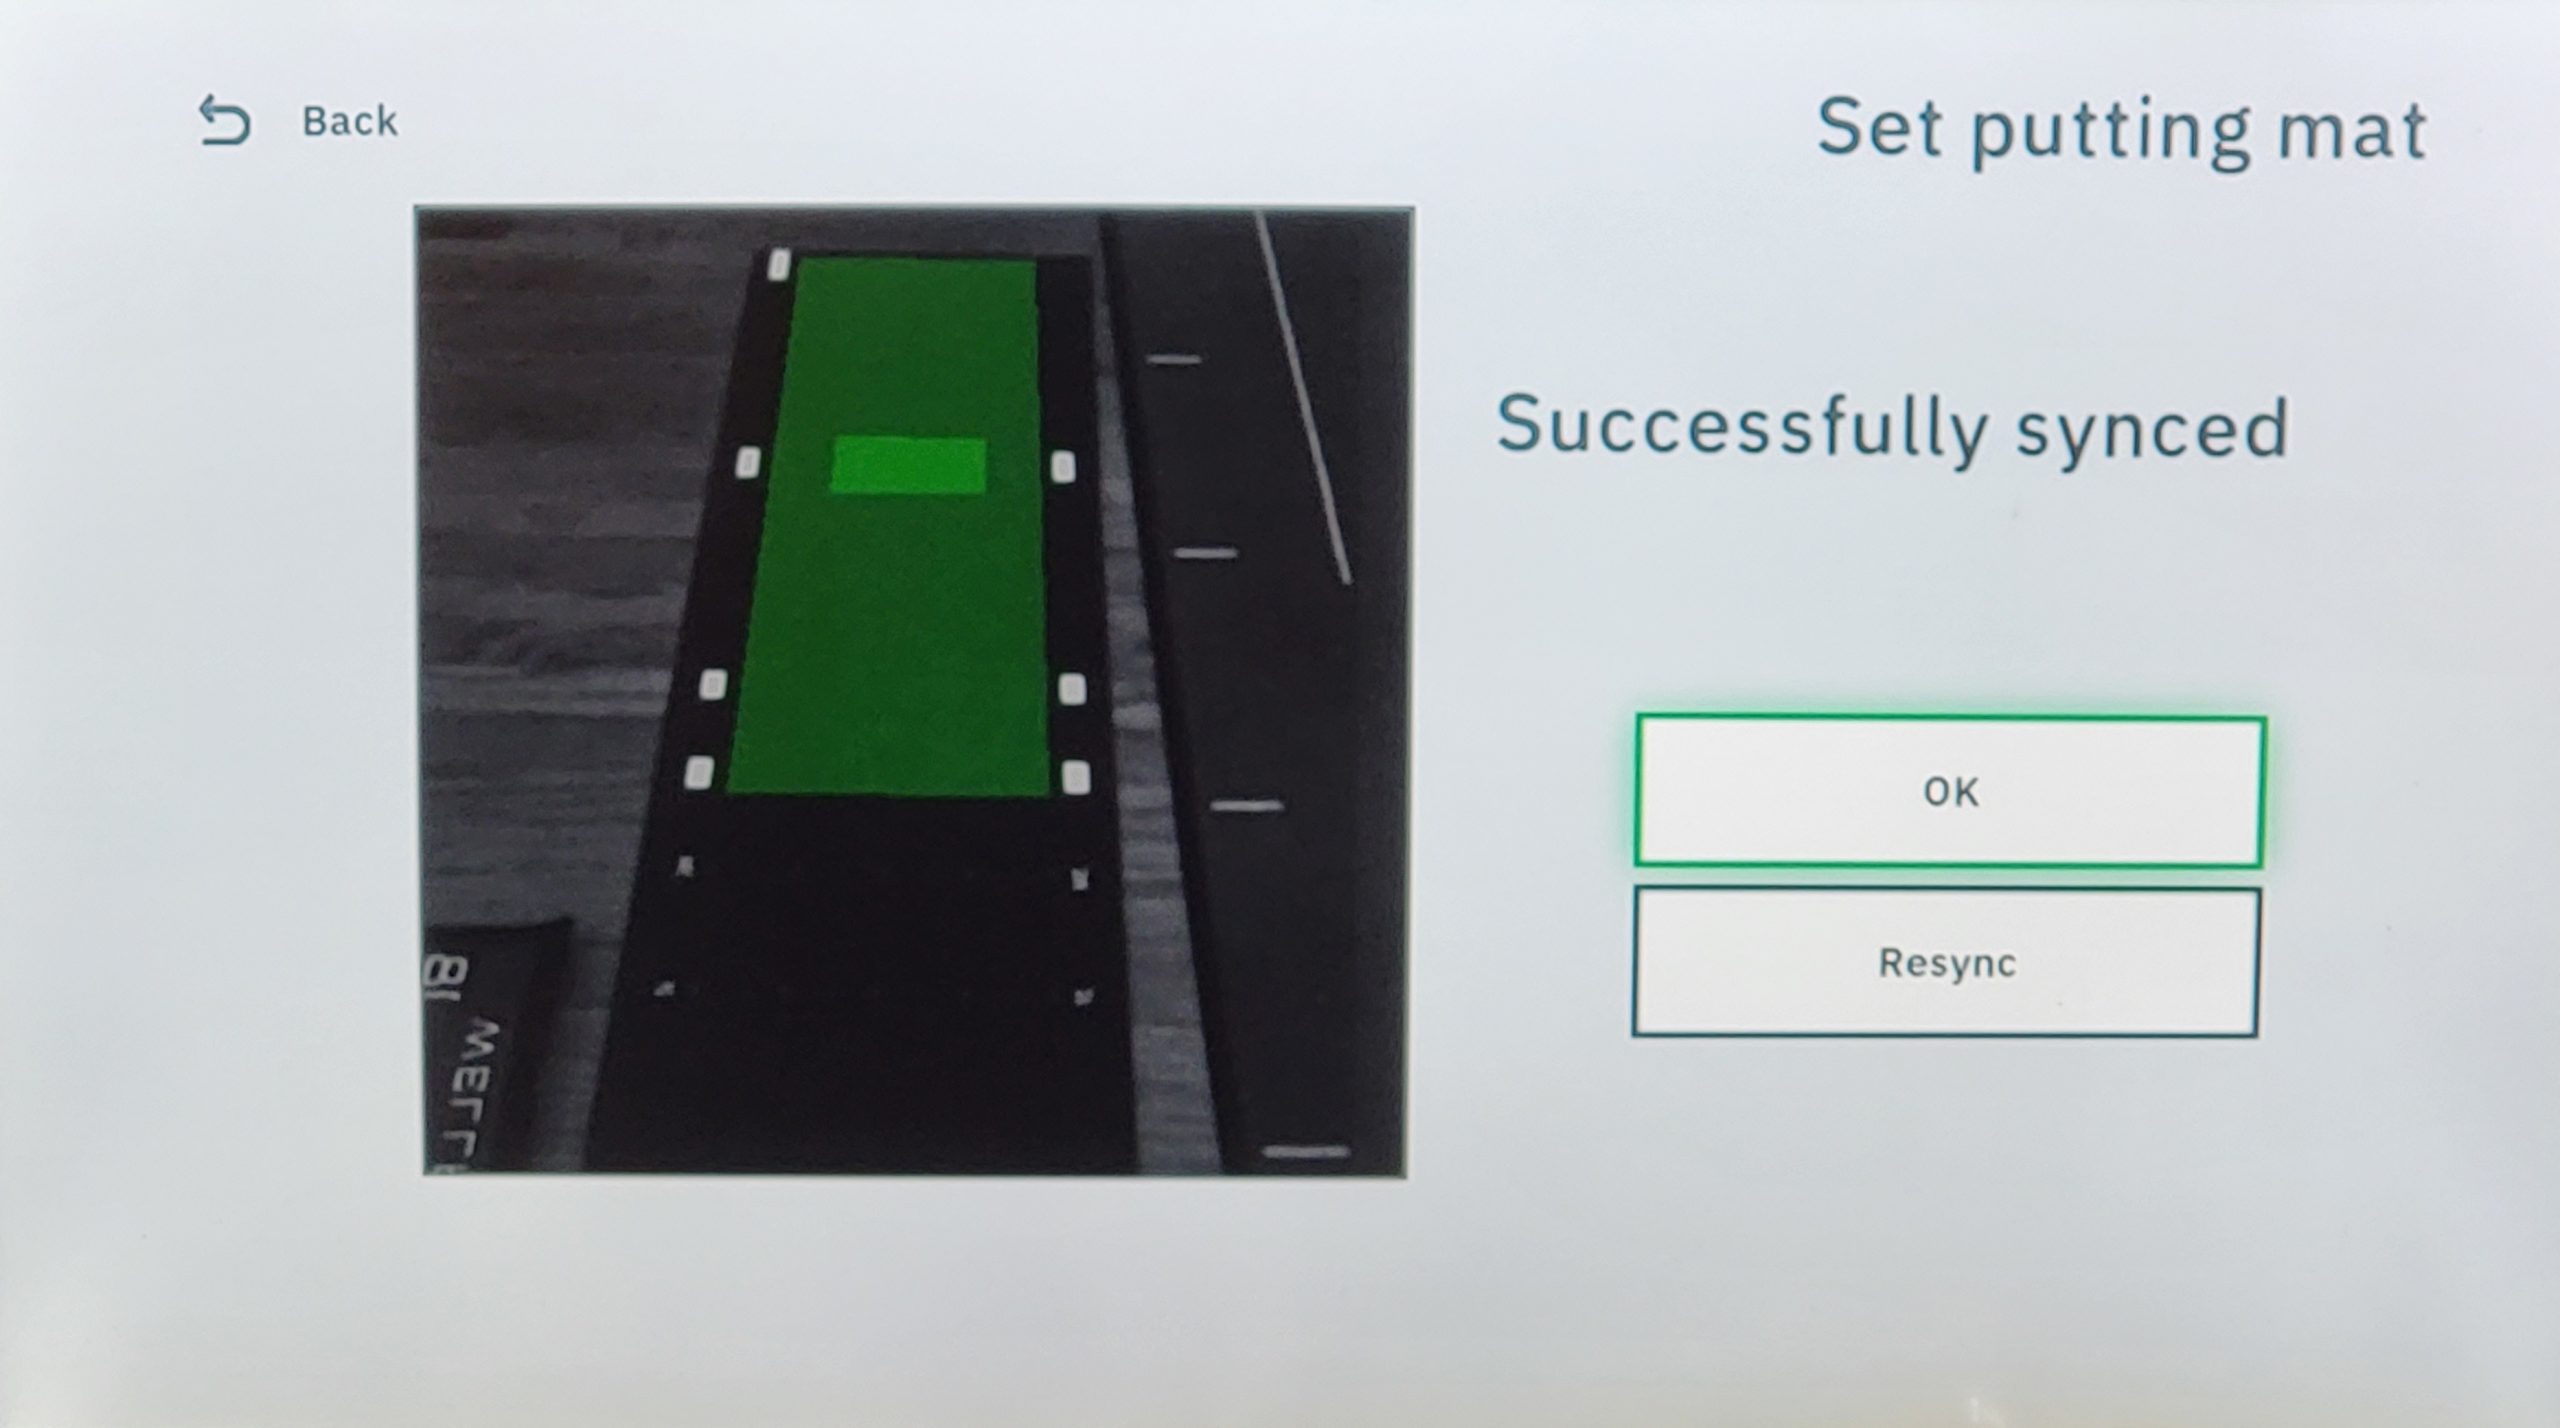
Finding the mat
After the system logs you in, the camera searches for the mat. You will see what the camera is seeing on your TV or mobile device, so if it can’t find the mat, you can adjust the camera.
It’s pretty clear that it’s searching and you need to rotate or move the camera to view all the white lines on the mat.
When it finds the mat, the system shows you this prompt. Successfully synced. Click OK to finish setting up the putting mat.
Notes:
I roll up the mat to get it out of the way, but leave it in place. It’s almost unrolls itself and stays in the correct line of sight for the camera.
You don’t want anything on the mat when the camera is searching for it. Example: putter, you blocking the camera, etc.
I turn on an overhead light. It doesn’t work great in low light.
Since I don’t move things or log out, it takes me to the SELECT PROFILE screen right away.
Select Profile Screen
Sign up online, but login here. That goes for others as well.
Data is saved for active profiles. If you sign in as a guest, putt data is not saved.
You could enter friends, family or if you are a coach you could enter students.
Add profiles for others online at exputt.com under membership.
Create a new profile by registering a new ID and password.
I’ve not done this yet. I’ve only created my own.
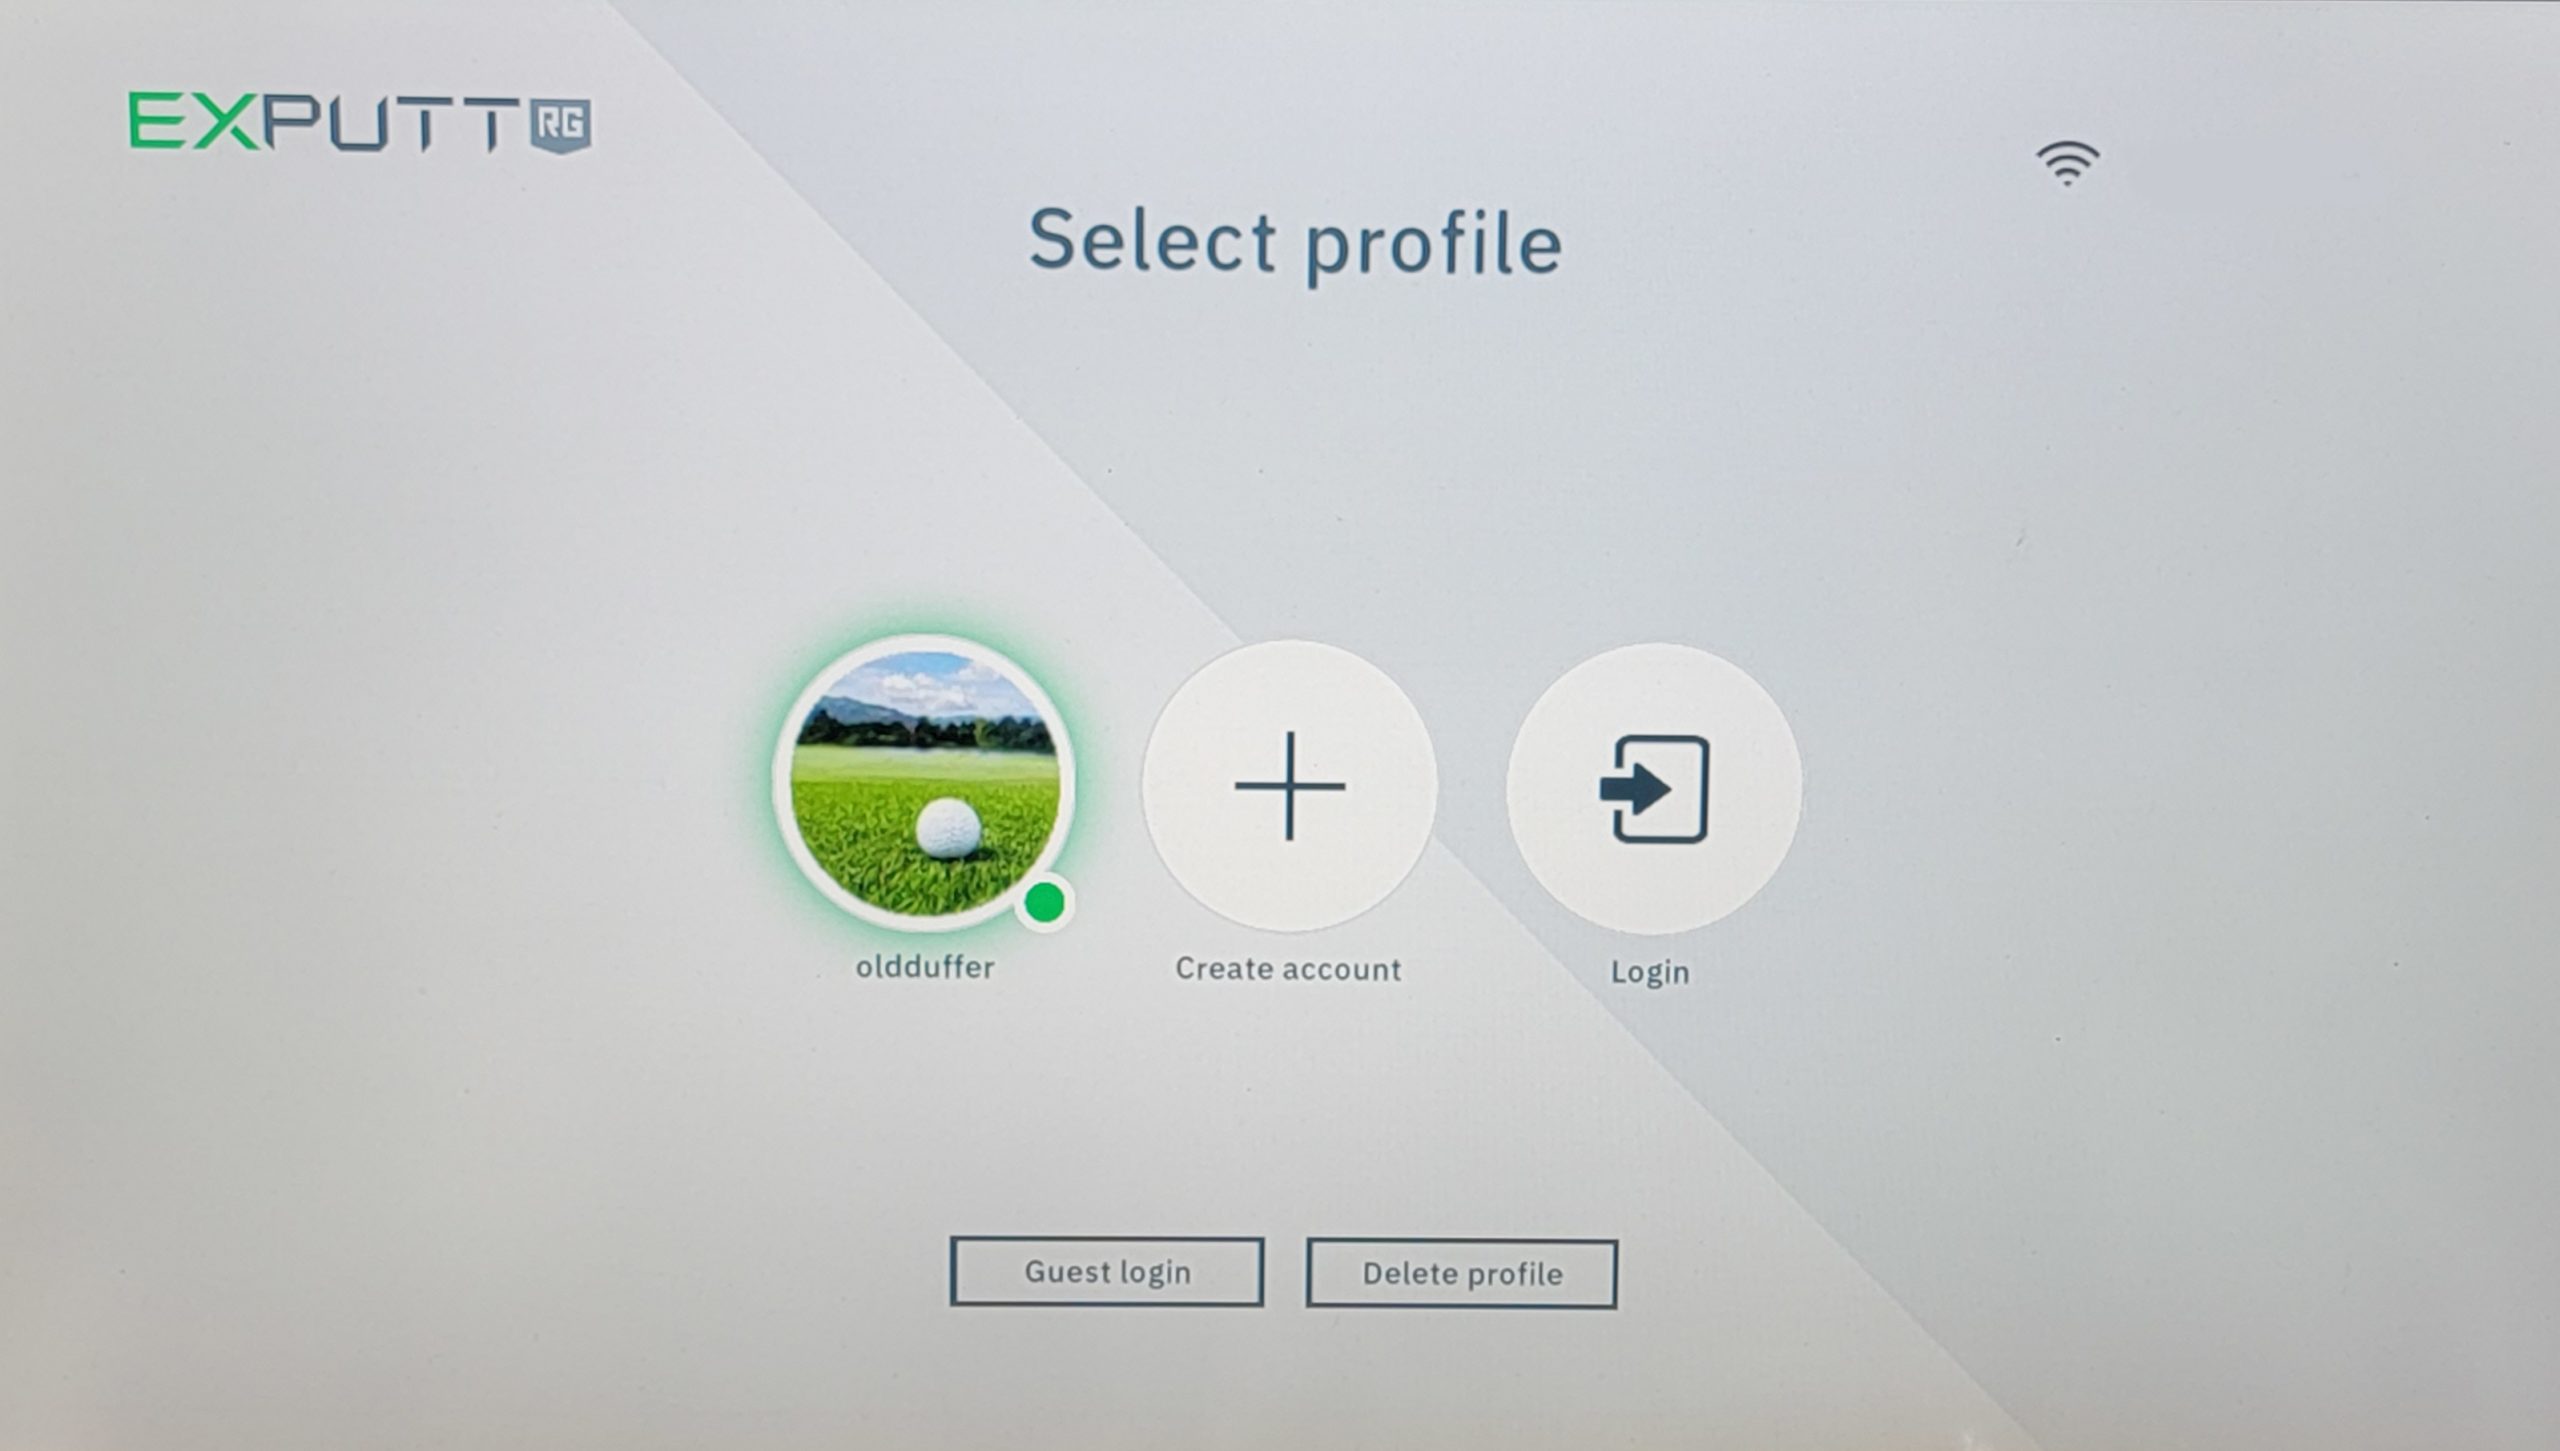
A greyed out profile is inactive
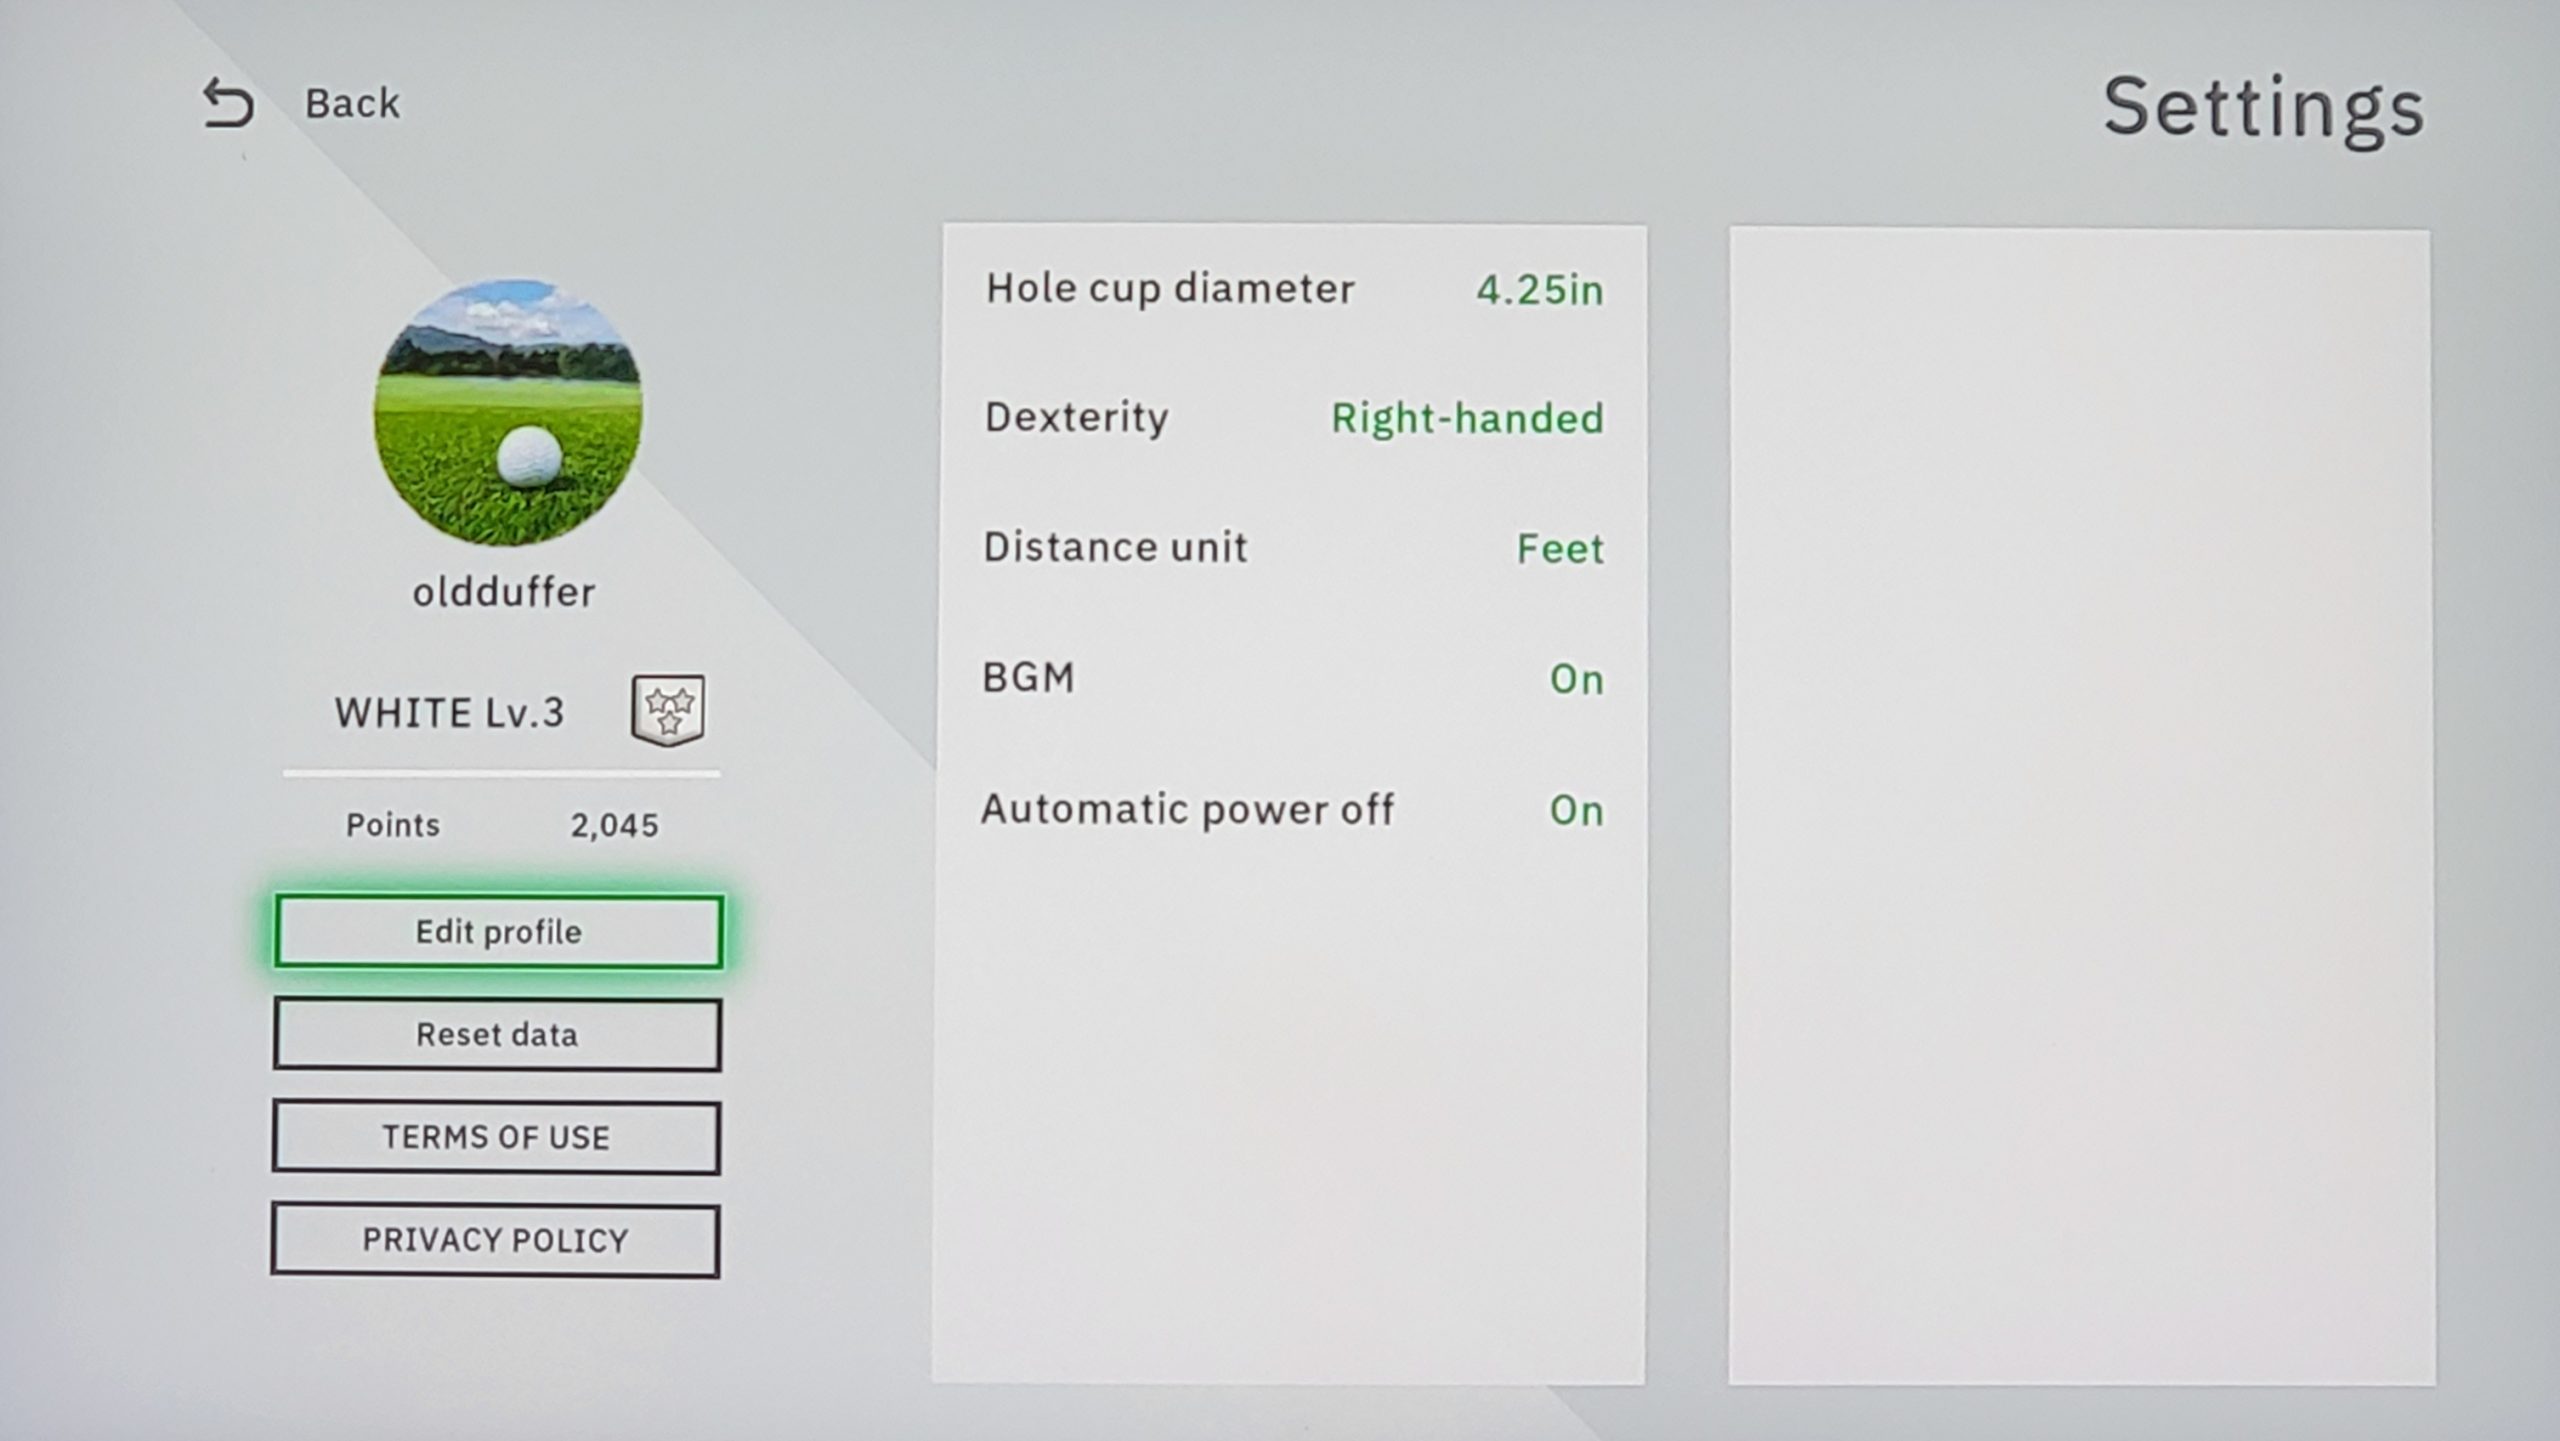
Select a Menu / Settings
Menu Option
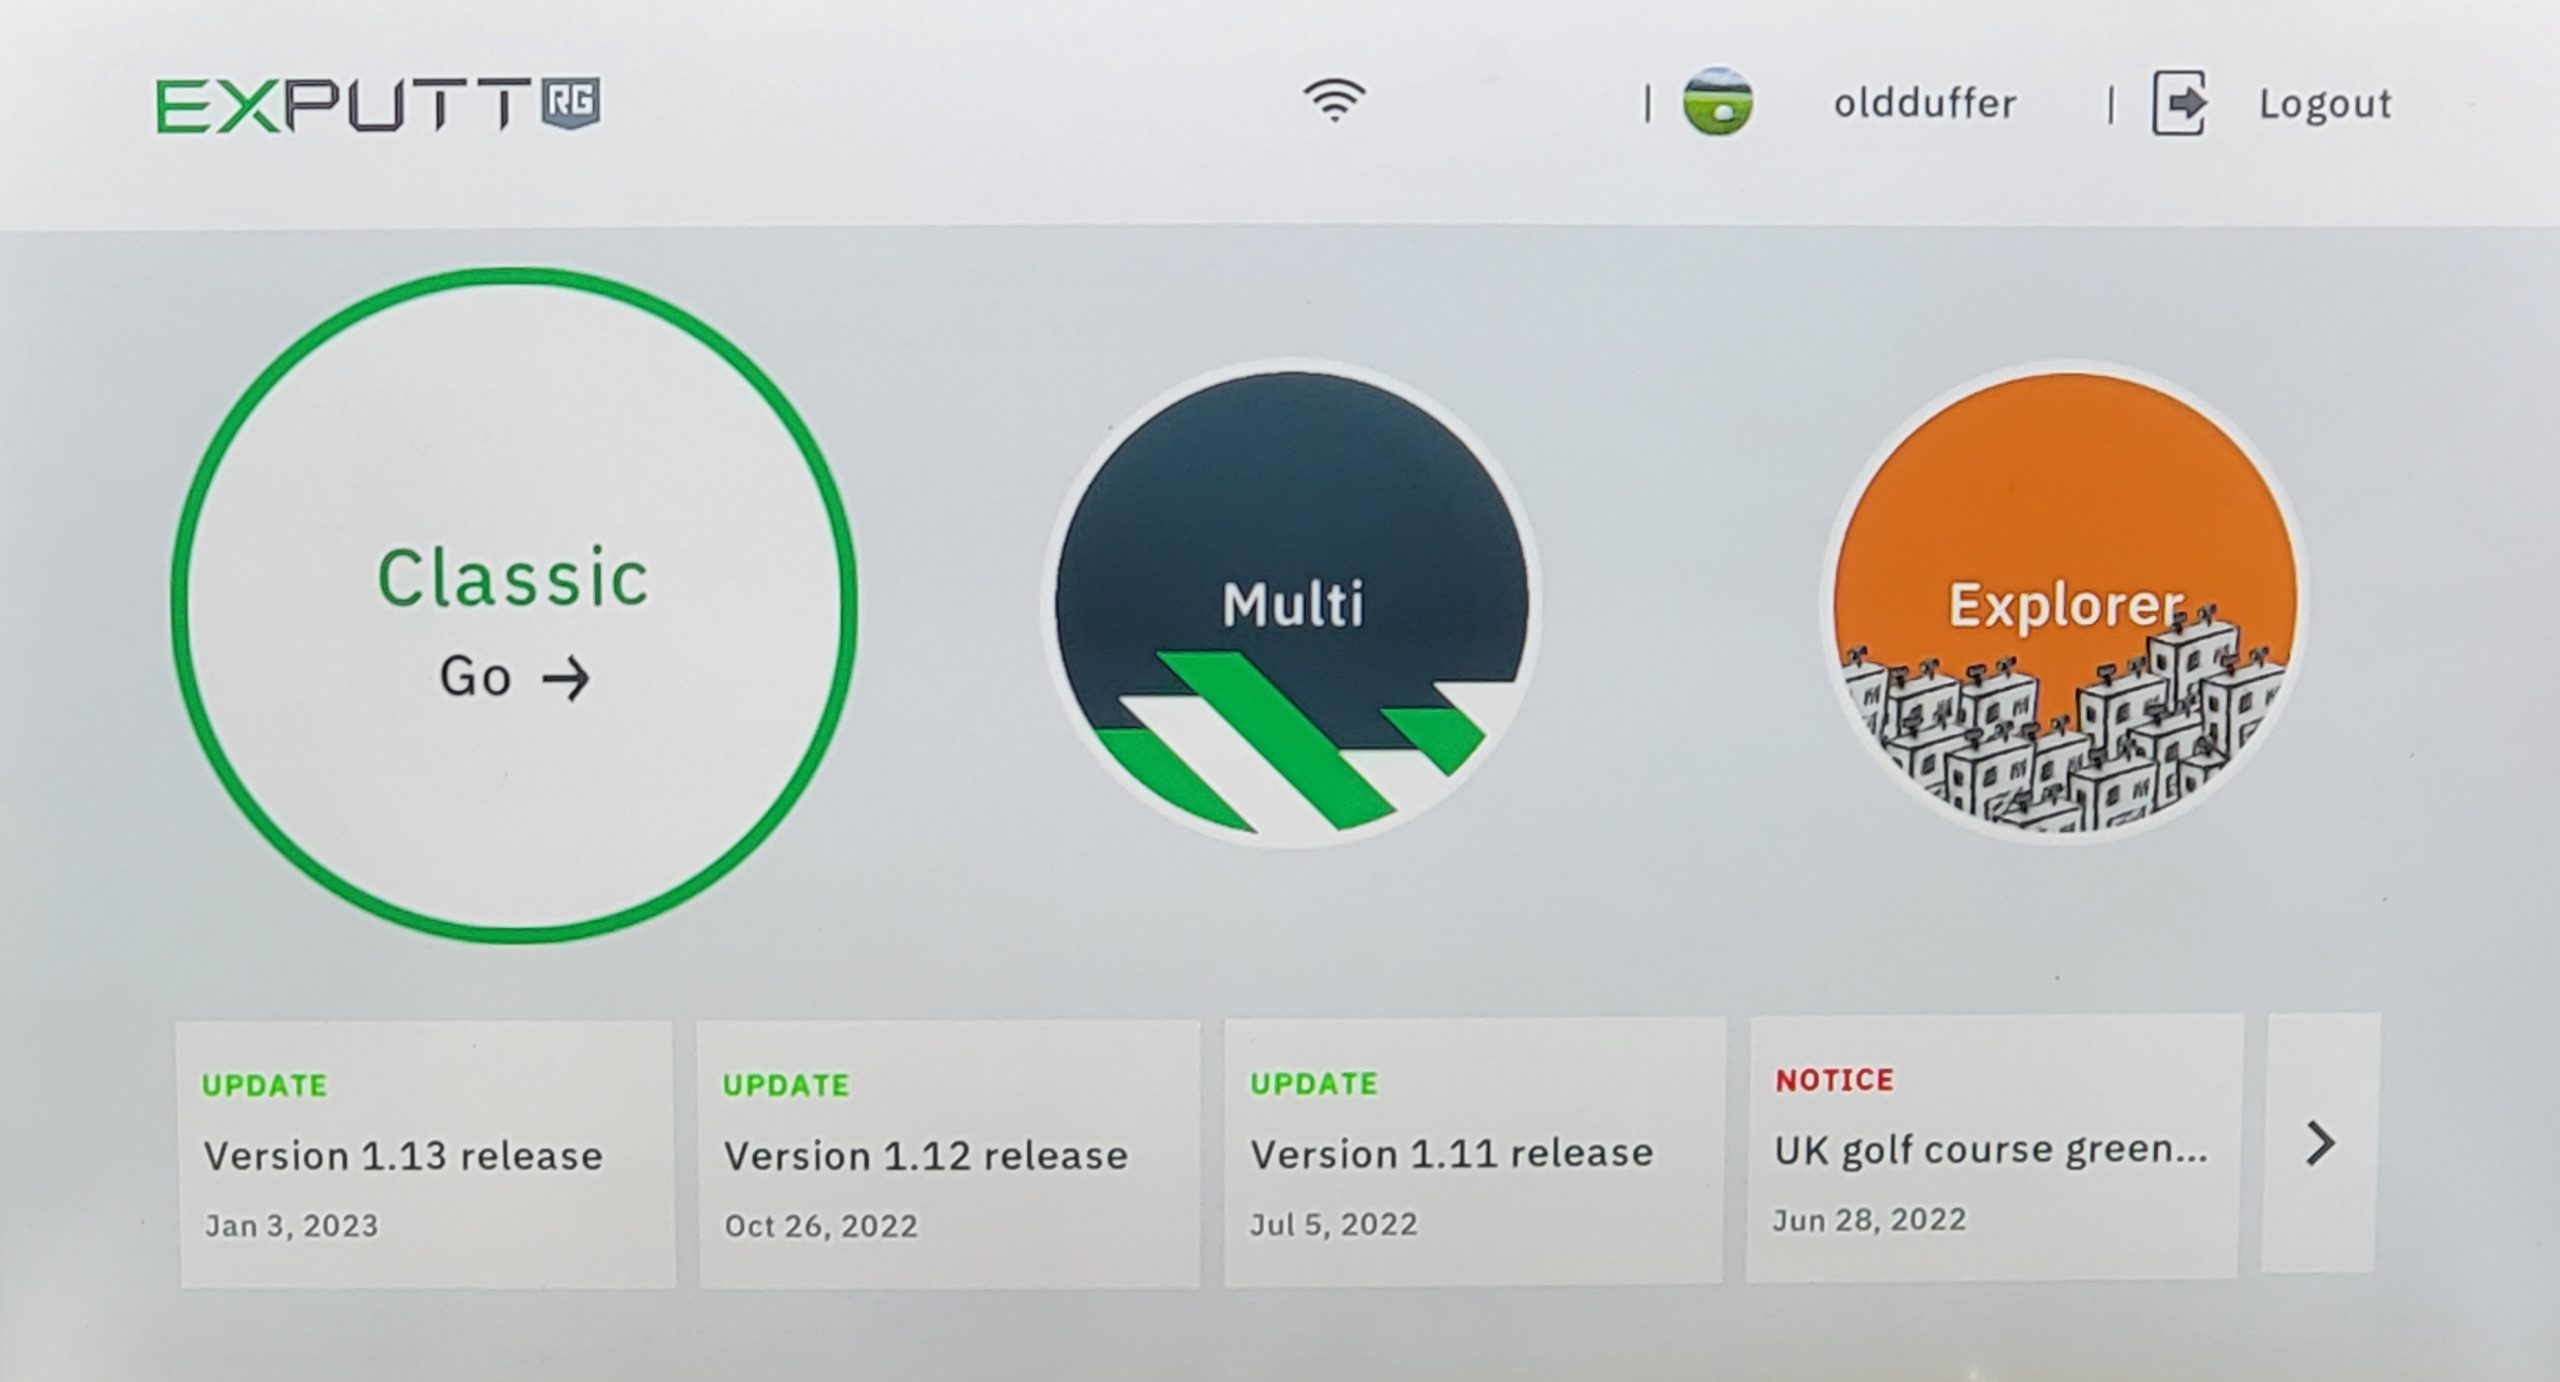
After logging in, you choose a menu item on the main screen.
Example: Clicking on Classic menu takes you to: Practice, Play 9, and Challenge.
Settings
Note: On the menu screen, toggle up to your profile name. Click on your profile name. This screen comes up and you can select Imperial / US units or Metric. I chose to have my putts displayed in feet.
Menu items: Hole cup diameter, Dexterity, Distance unit, Background Music (BGM), and automatic power off. Select one of the menu items and options appear in right hand column.
Definitions or Terms
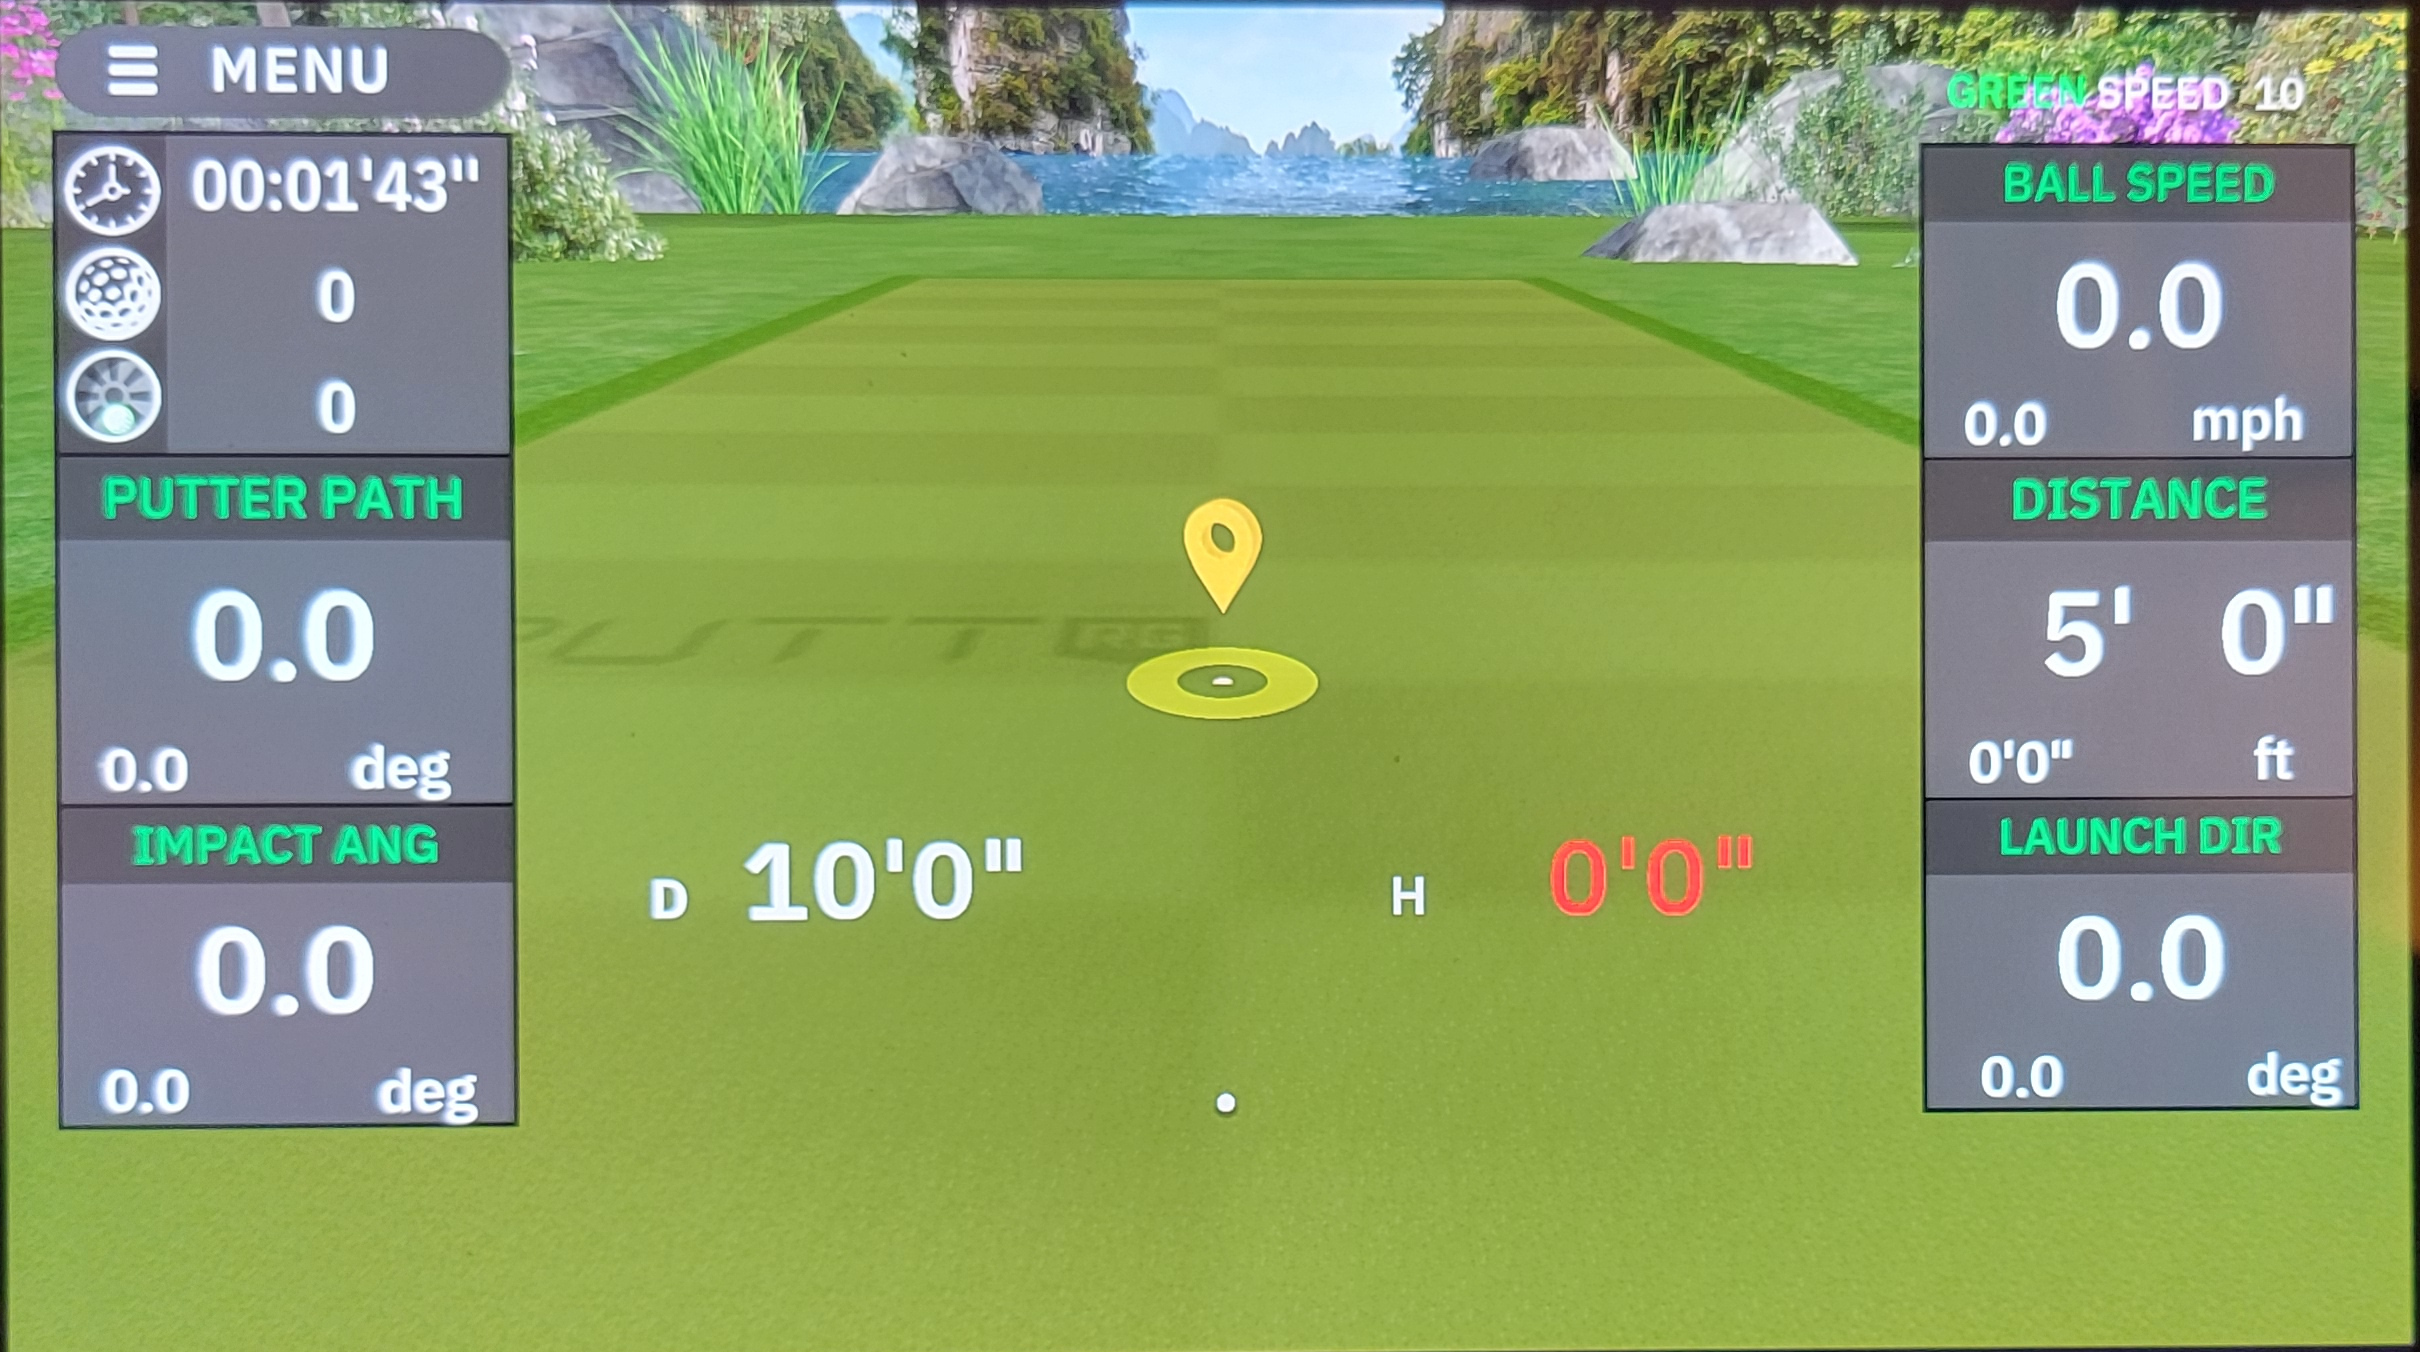
For all modes: “H” numbers in RED are UPHILL, “H” numbers in BLUE are DOWNHILL. You get Distance and Height numbers for putts.
In Playing modes, PRESS THE ? on the remote for hints on ball speed, angle to hole and the aim distance from hole.
Most of the “settings” are pretty obvious. Use the remote to navigate, arrow over to the setting you want to change and click OK to select.
To leave a mode you will need to use the remote to click on the “Return” key and / or “Finish Session” using the “Menu” key.
Control Key – There are control keys printed on the EXPUTT mat allowing you to control functions with your putter instead of the remote. (Ball Ready Zone, Hint Key, Direction Key, and Viewing Angle Key)
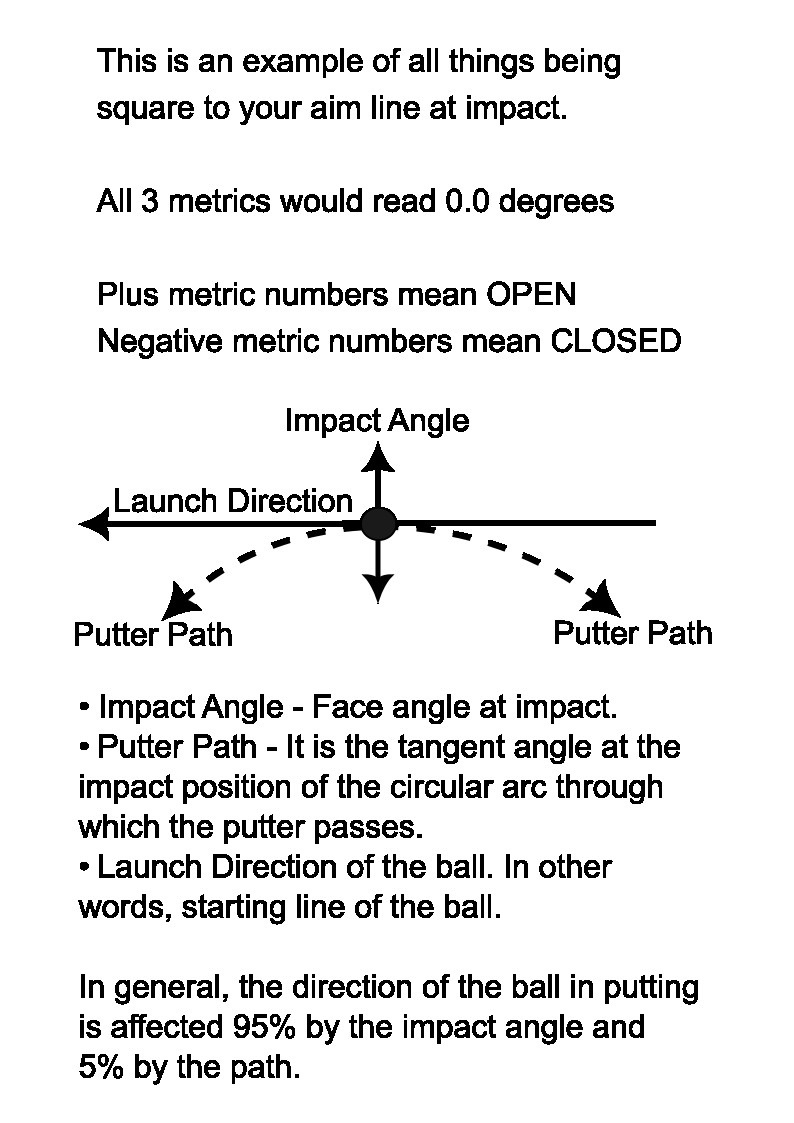
EXPUTT RG Metrics
This is a graphic that explains the terminology you will see on the screen when running the TV or Mobile interface with EXPUTT RG. Thanks to the folks at EXPUTT customer service for the information.
Classic – Practice
You can practice your sense of distance on a flat green.
It offers fixed, random or increasing distance putts.
You can change stimp, slope, and slant, etc.
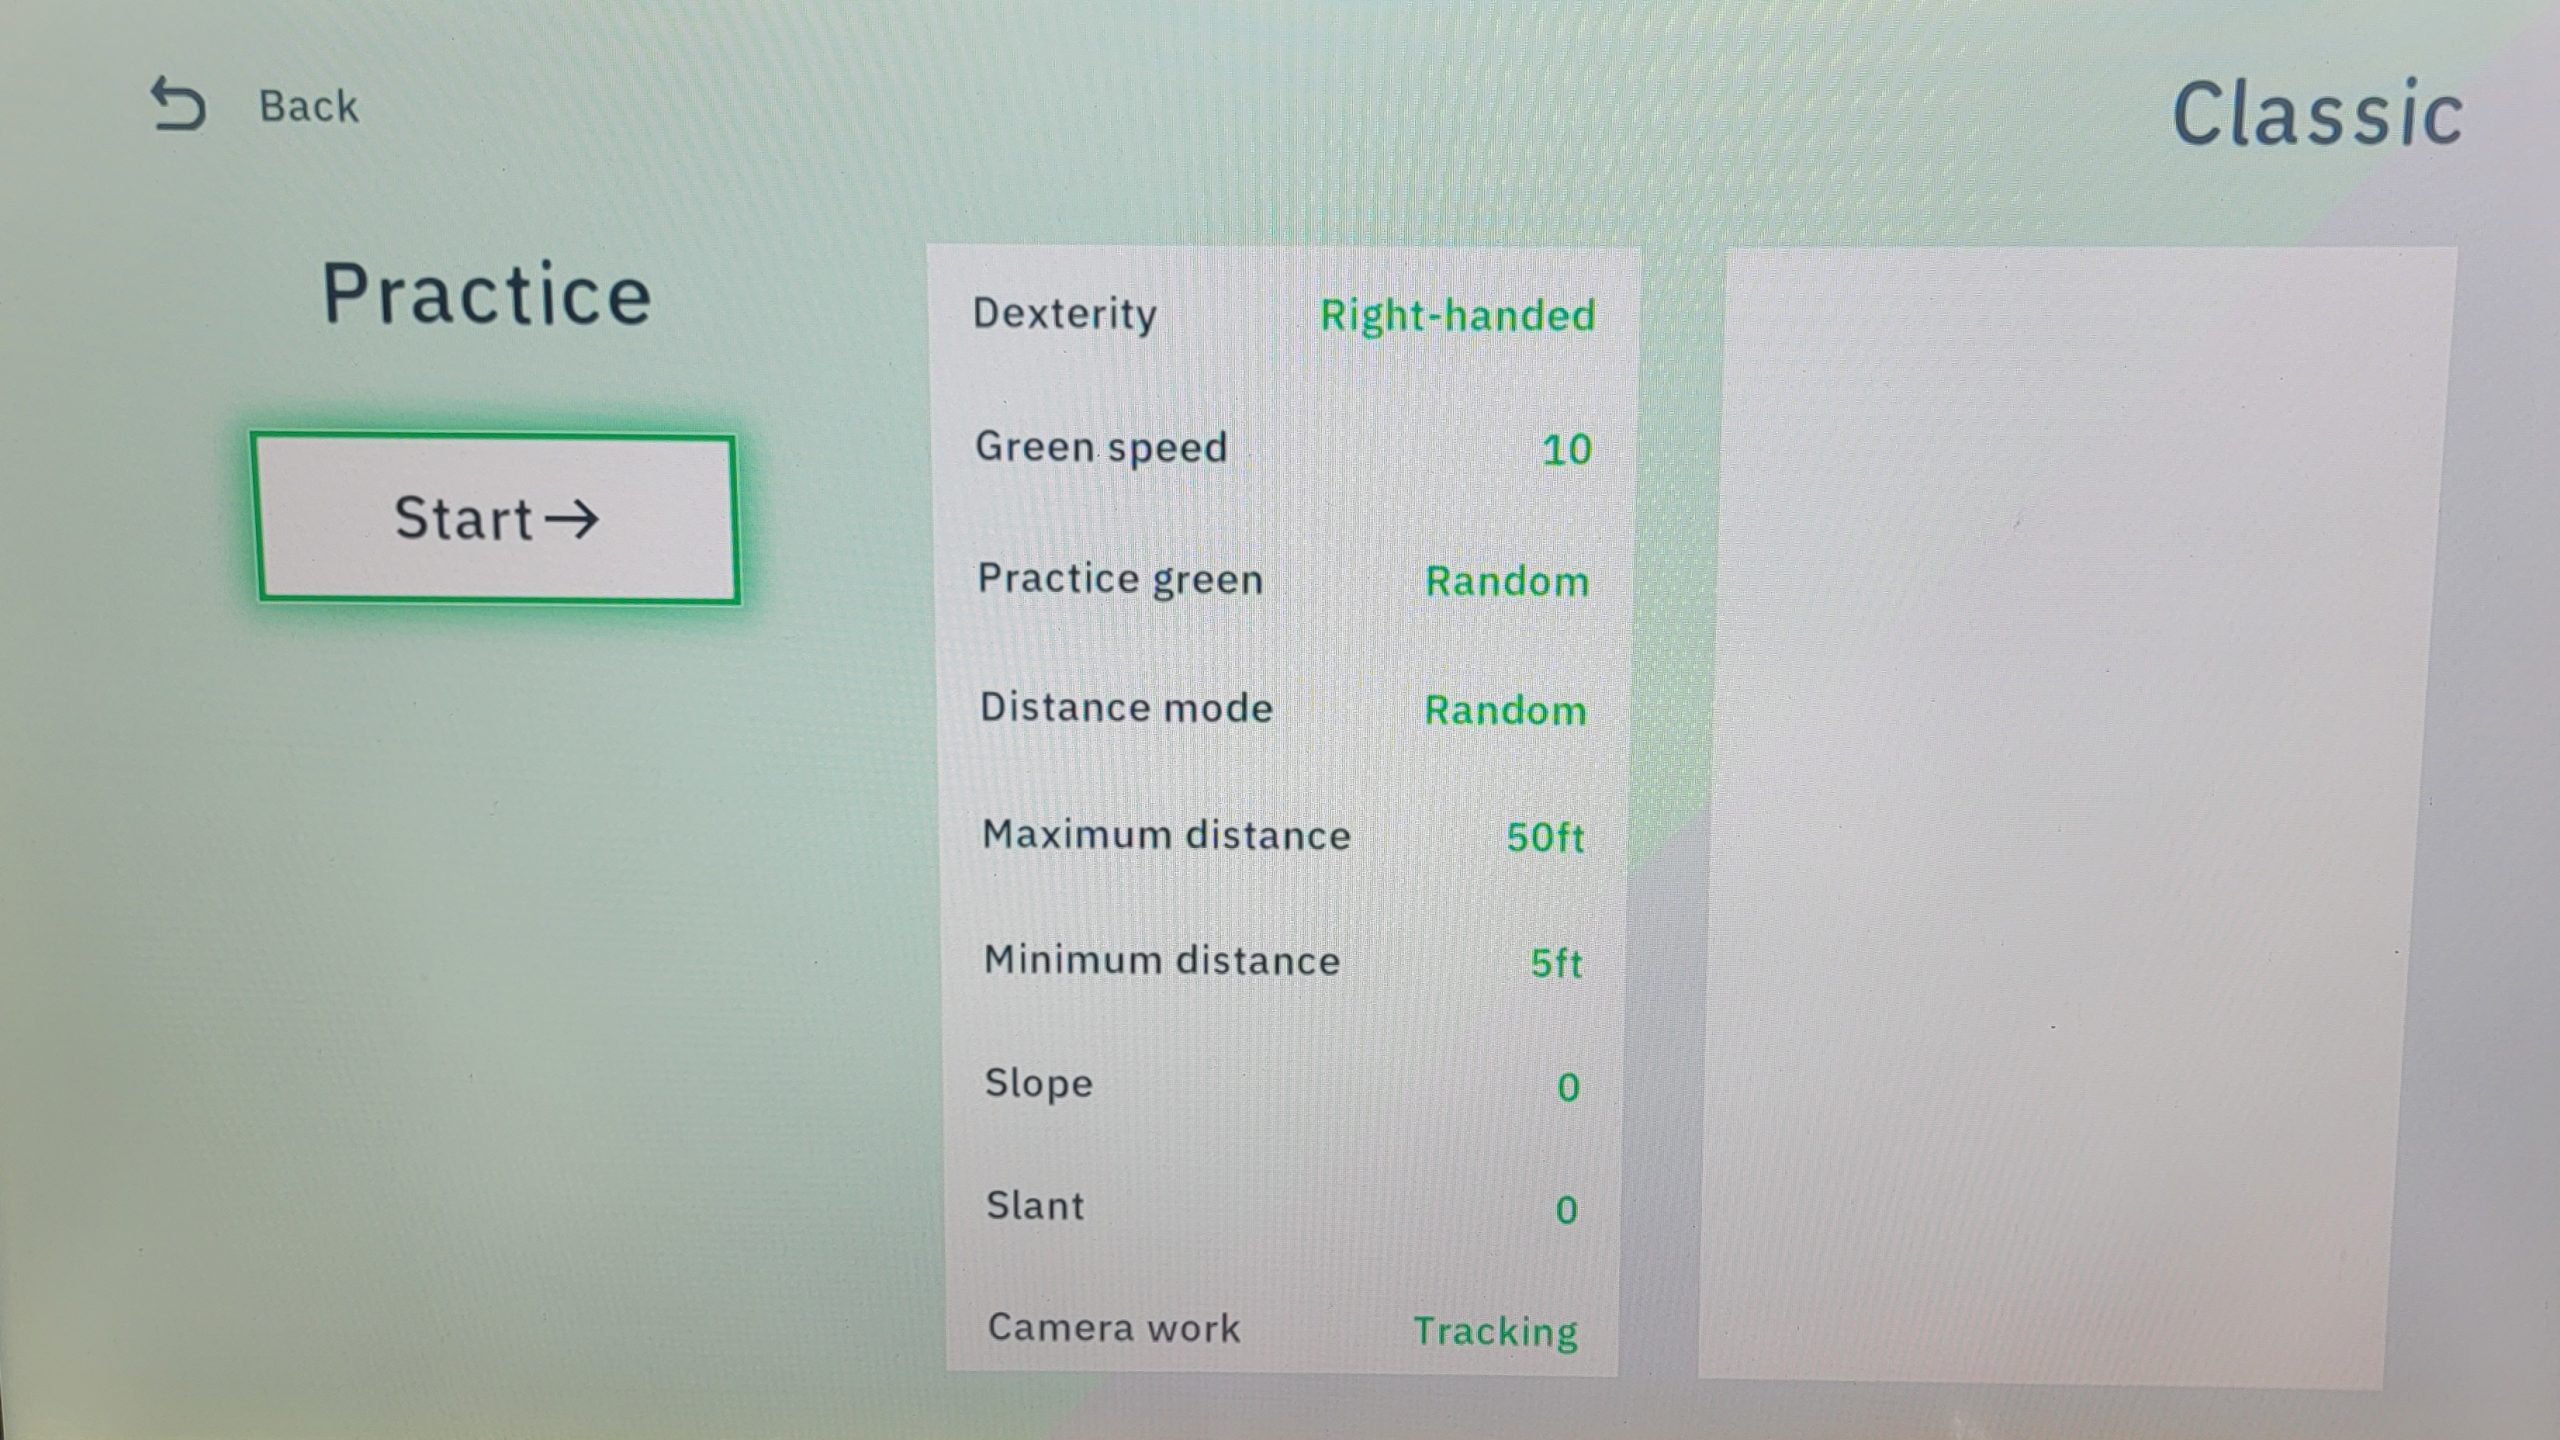
Click on items on left: Options appear on right
On Screen Data
- Ball Speed – Ball speed is a measure of how fast your ball leaves the club head after impact. Ball speed is the main component in generating distance, and it comes from a combination of factors, including your club speed, the selected club, and the quality of the impact.
- Launch Direction – Launch Direction is the initial direction the ball starts relative to the target line. A positive launch direction indicates a ball that starts right of the target and a negative launch direction indicates a ball that starts left of the target.
- Distance -Distance your ball traveled in proximity to the hole.
- Putter Path – The putter path direction describes the direction of the swing path in relation to the intended target line at impact.
- The direction of the swing path at impact determines initial ball direction. It is less important as compared with the putter face angle.
- Impact Angle – The putter face angle at impact determines the initial ball direction. It is the most important factor for ball direction.
- Tempo – Tempo is defined as the elapsed time of your golf swing from backswing to follow-through.
Settings
- Slope – You can change the slope of the green from flat, to uphill or downhill putts.
- Slant – You can change the green slant from flat to left or right breaking putts.
- Set the Tempo in Practice to your tempo. The system has a built in metronome if you choose a tempo in beats per minute.
- Stimp – You can change the stimp reading from 8 which is slow to 13 which is very fast.
- Distance mode – Fixed, Random, or Increasing
- Background image.
- Maximum and Minimum distance
- Dexterity
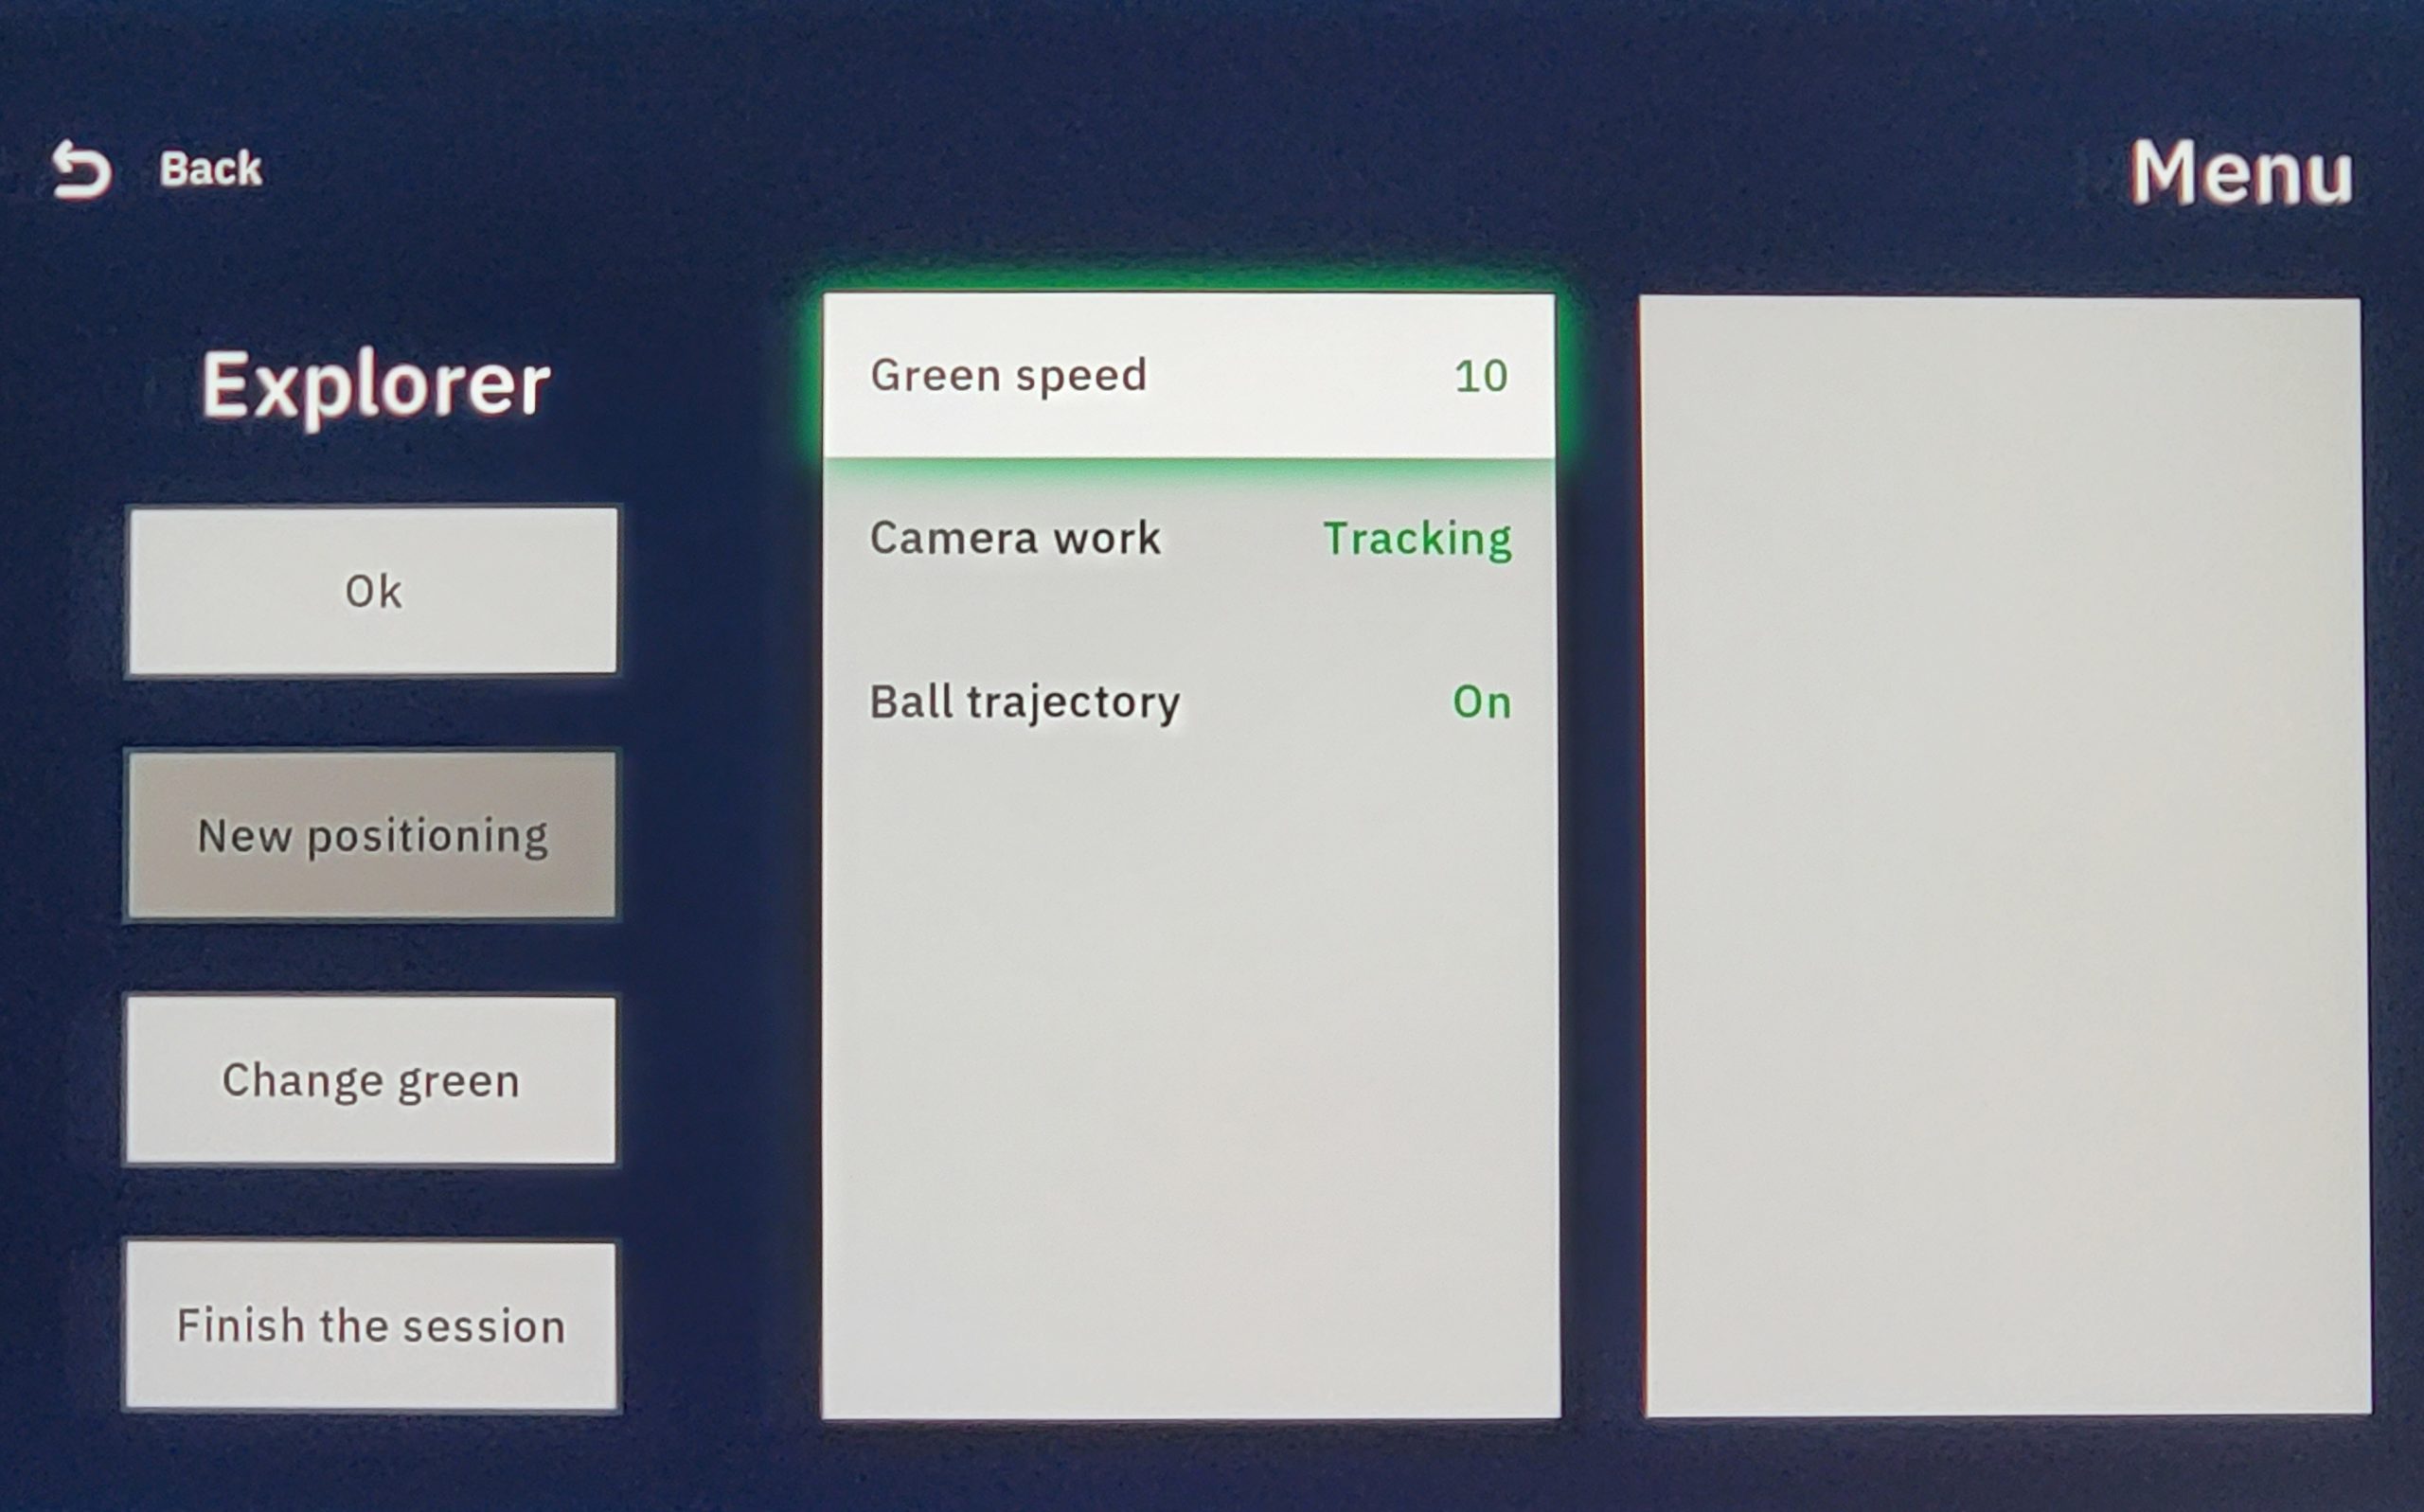
- Camera Work: Tracking or Fixed (I’d leave it on tracking)*
*Tracking – camera follows motion, Fixed – camera is fixed, does not follow, creating a series of still images. I tried both and did not find any difference between the two on my system.
(Note: Tempo is time. Rhythm is ratio. Pro golfers usually have a combined tempo and rhythm of between 70 and 80 beats a minute on a metronome. Most are at 76 beats per minute. Rhythm is the ratio between your backstroke and forward stroke. The correct Rhythm is said to be a 2.0:1 ratio. In other words, if your back swing takes 0.60 seconds and your forward swing takes 0.30 seconds for a total of 0.90 seconds, the ratio between the two is 2.0:1.)
Practice Analysis
Preface
I was having a hard time getting used to the EXPUTT RG. So, I stopped doing practice analysis sessions until recently. After using it for two weeks, I’m starting to get dialed in.
The Classic menu – Practice mode was useful getting my feet on the ground. Then I tried Play 9.
Work your way into the other modes and options including analysis.
Once you have started practice mode, click the menu button on the remote. One of the menu options is Analysis.
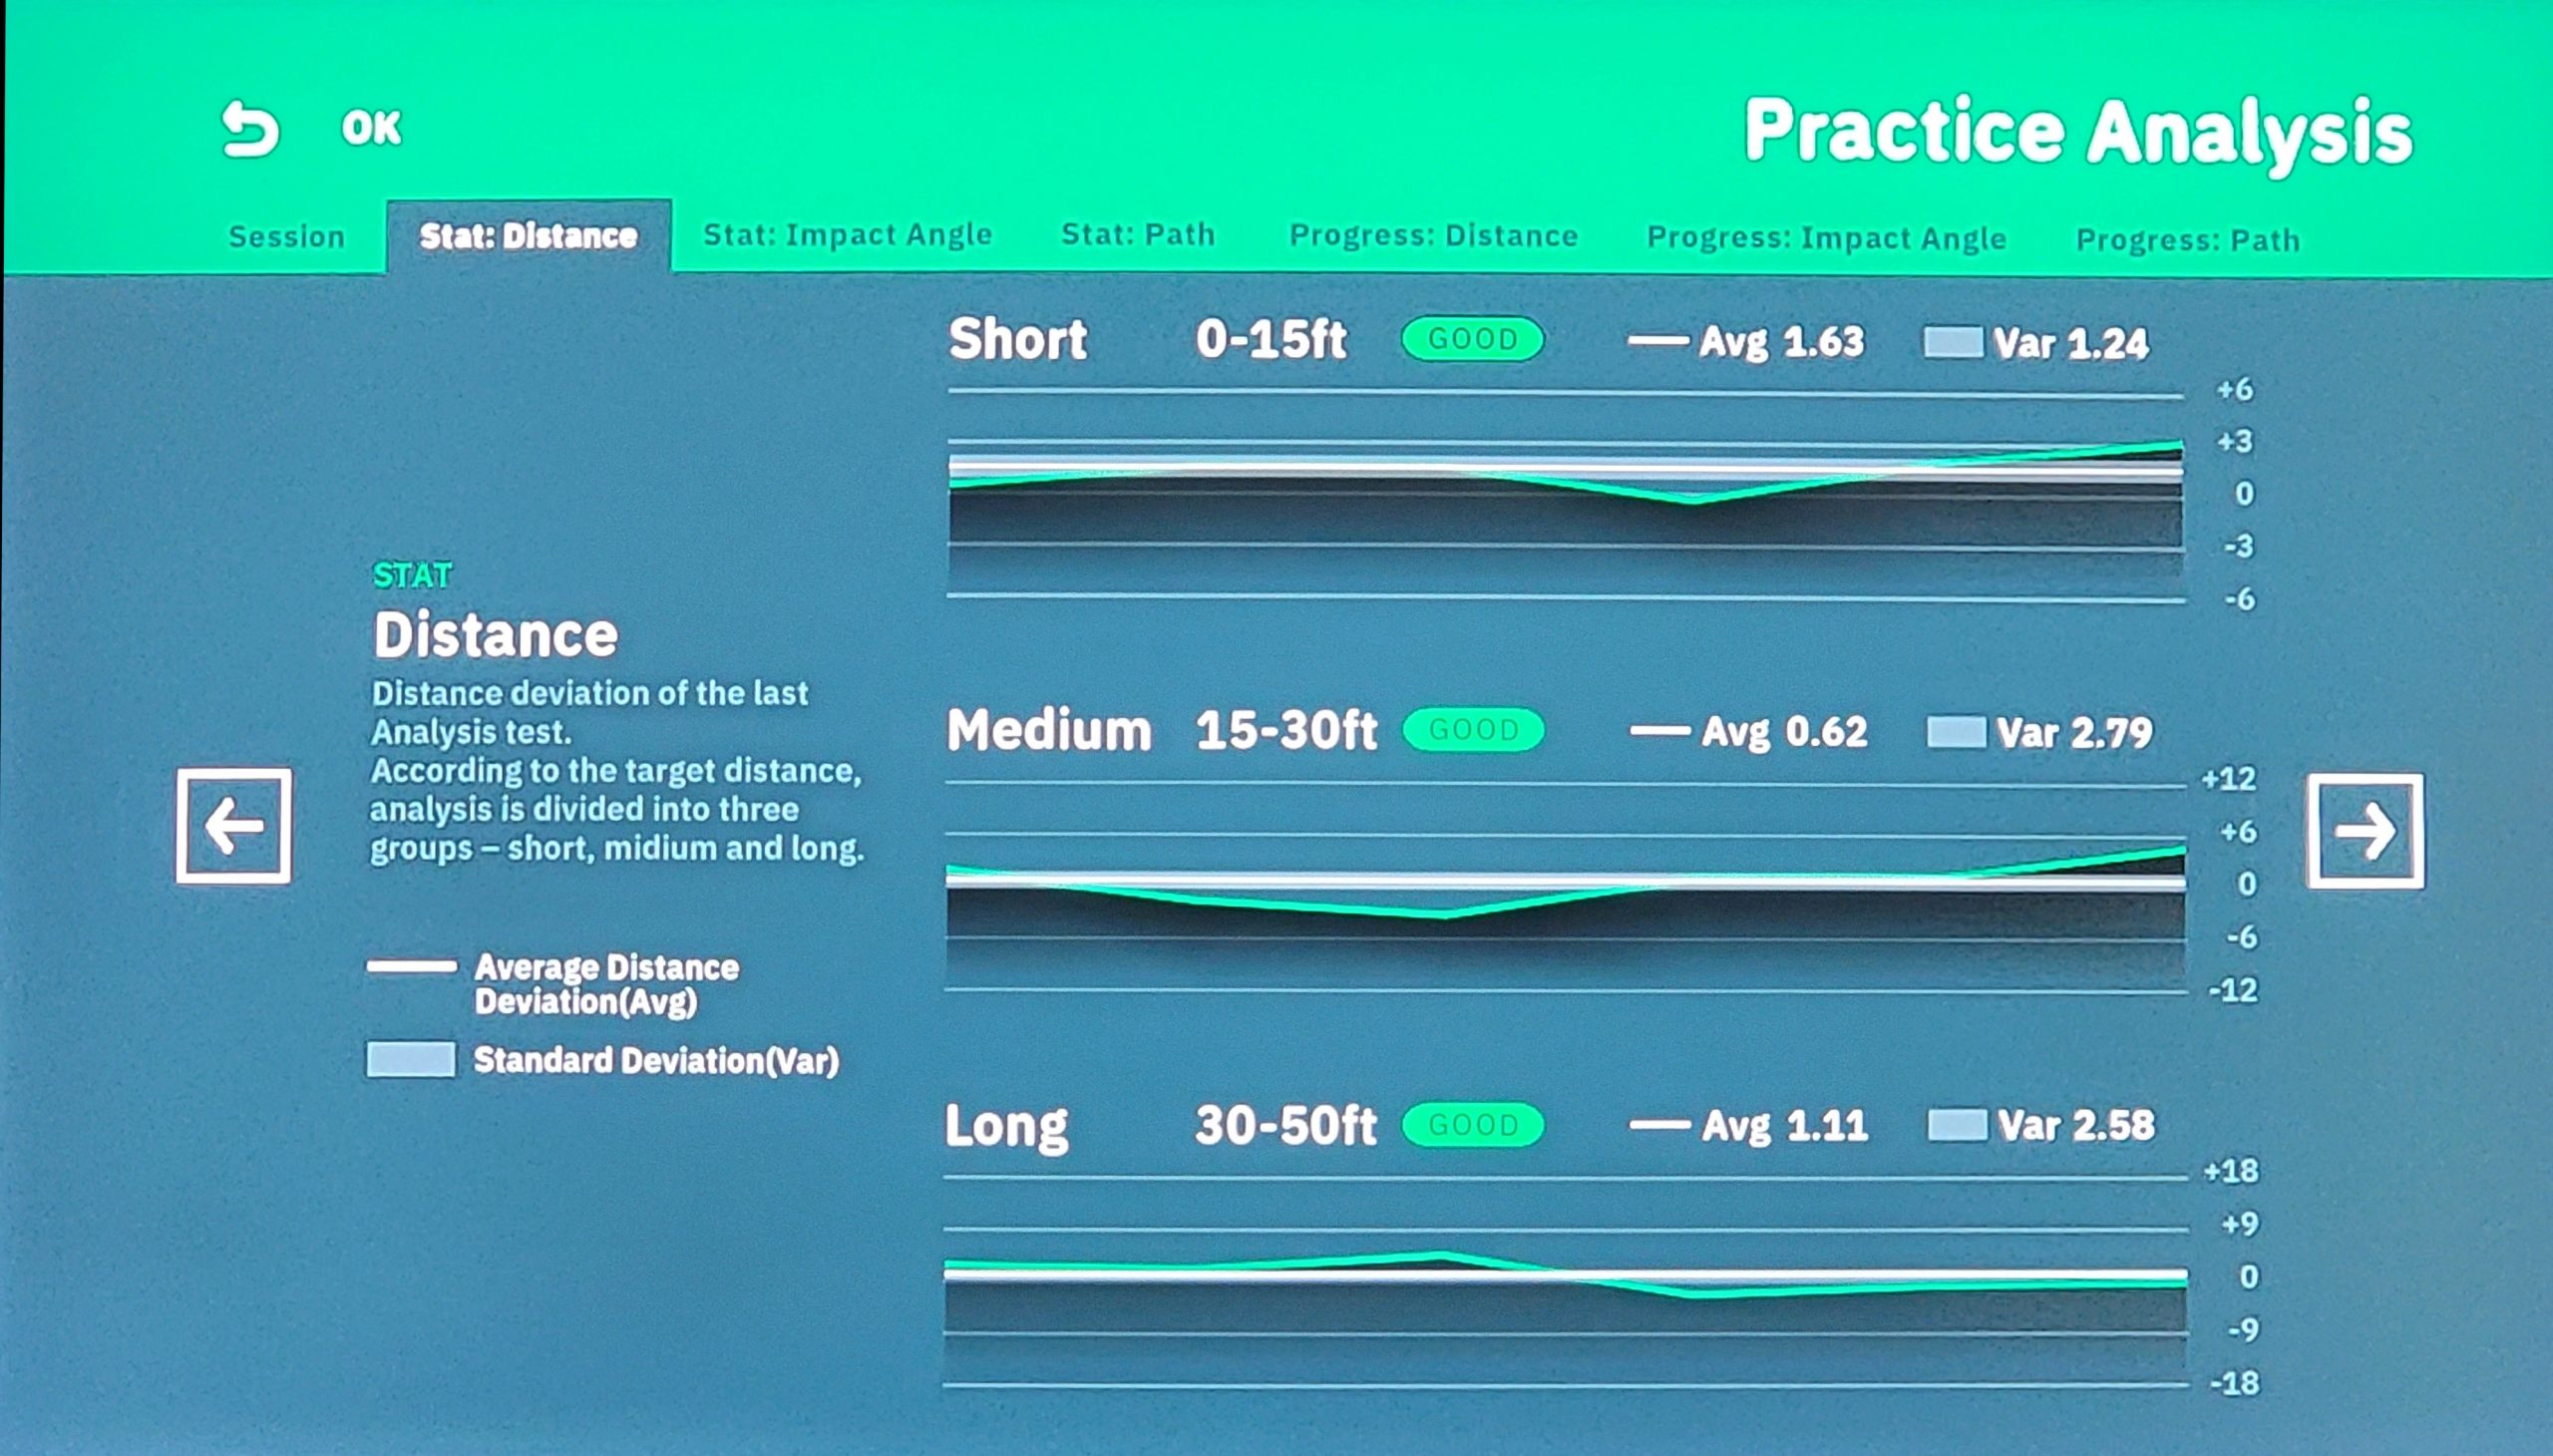
Analysis is for a series of 18 putts that the system brings up on the screen at random lengths.
After you make 18 putts, they are autosaved. Then you will see a Practice Analysis screen.
At the top of the screen there are tabs for Session and Progress analysis.
Stat: Analysis is for the most recent 18 putts.
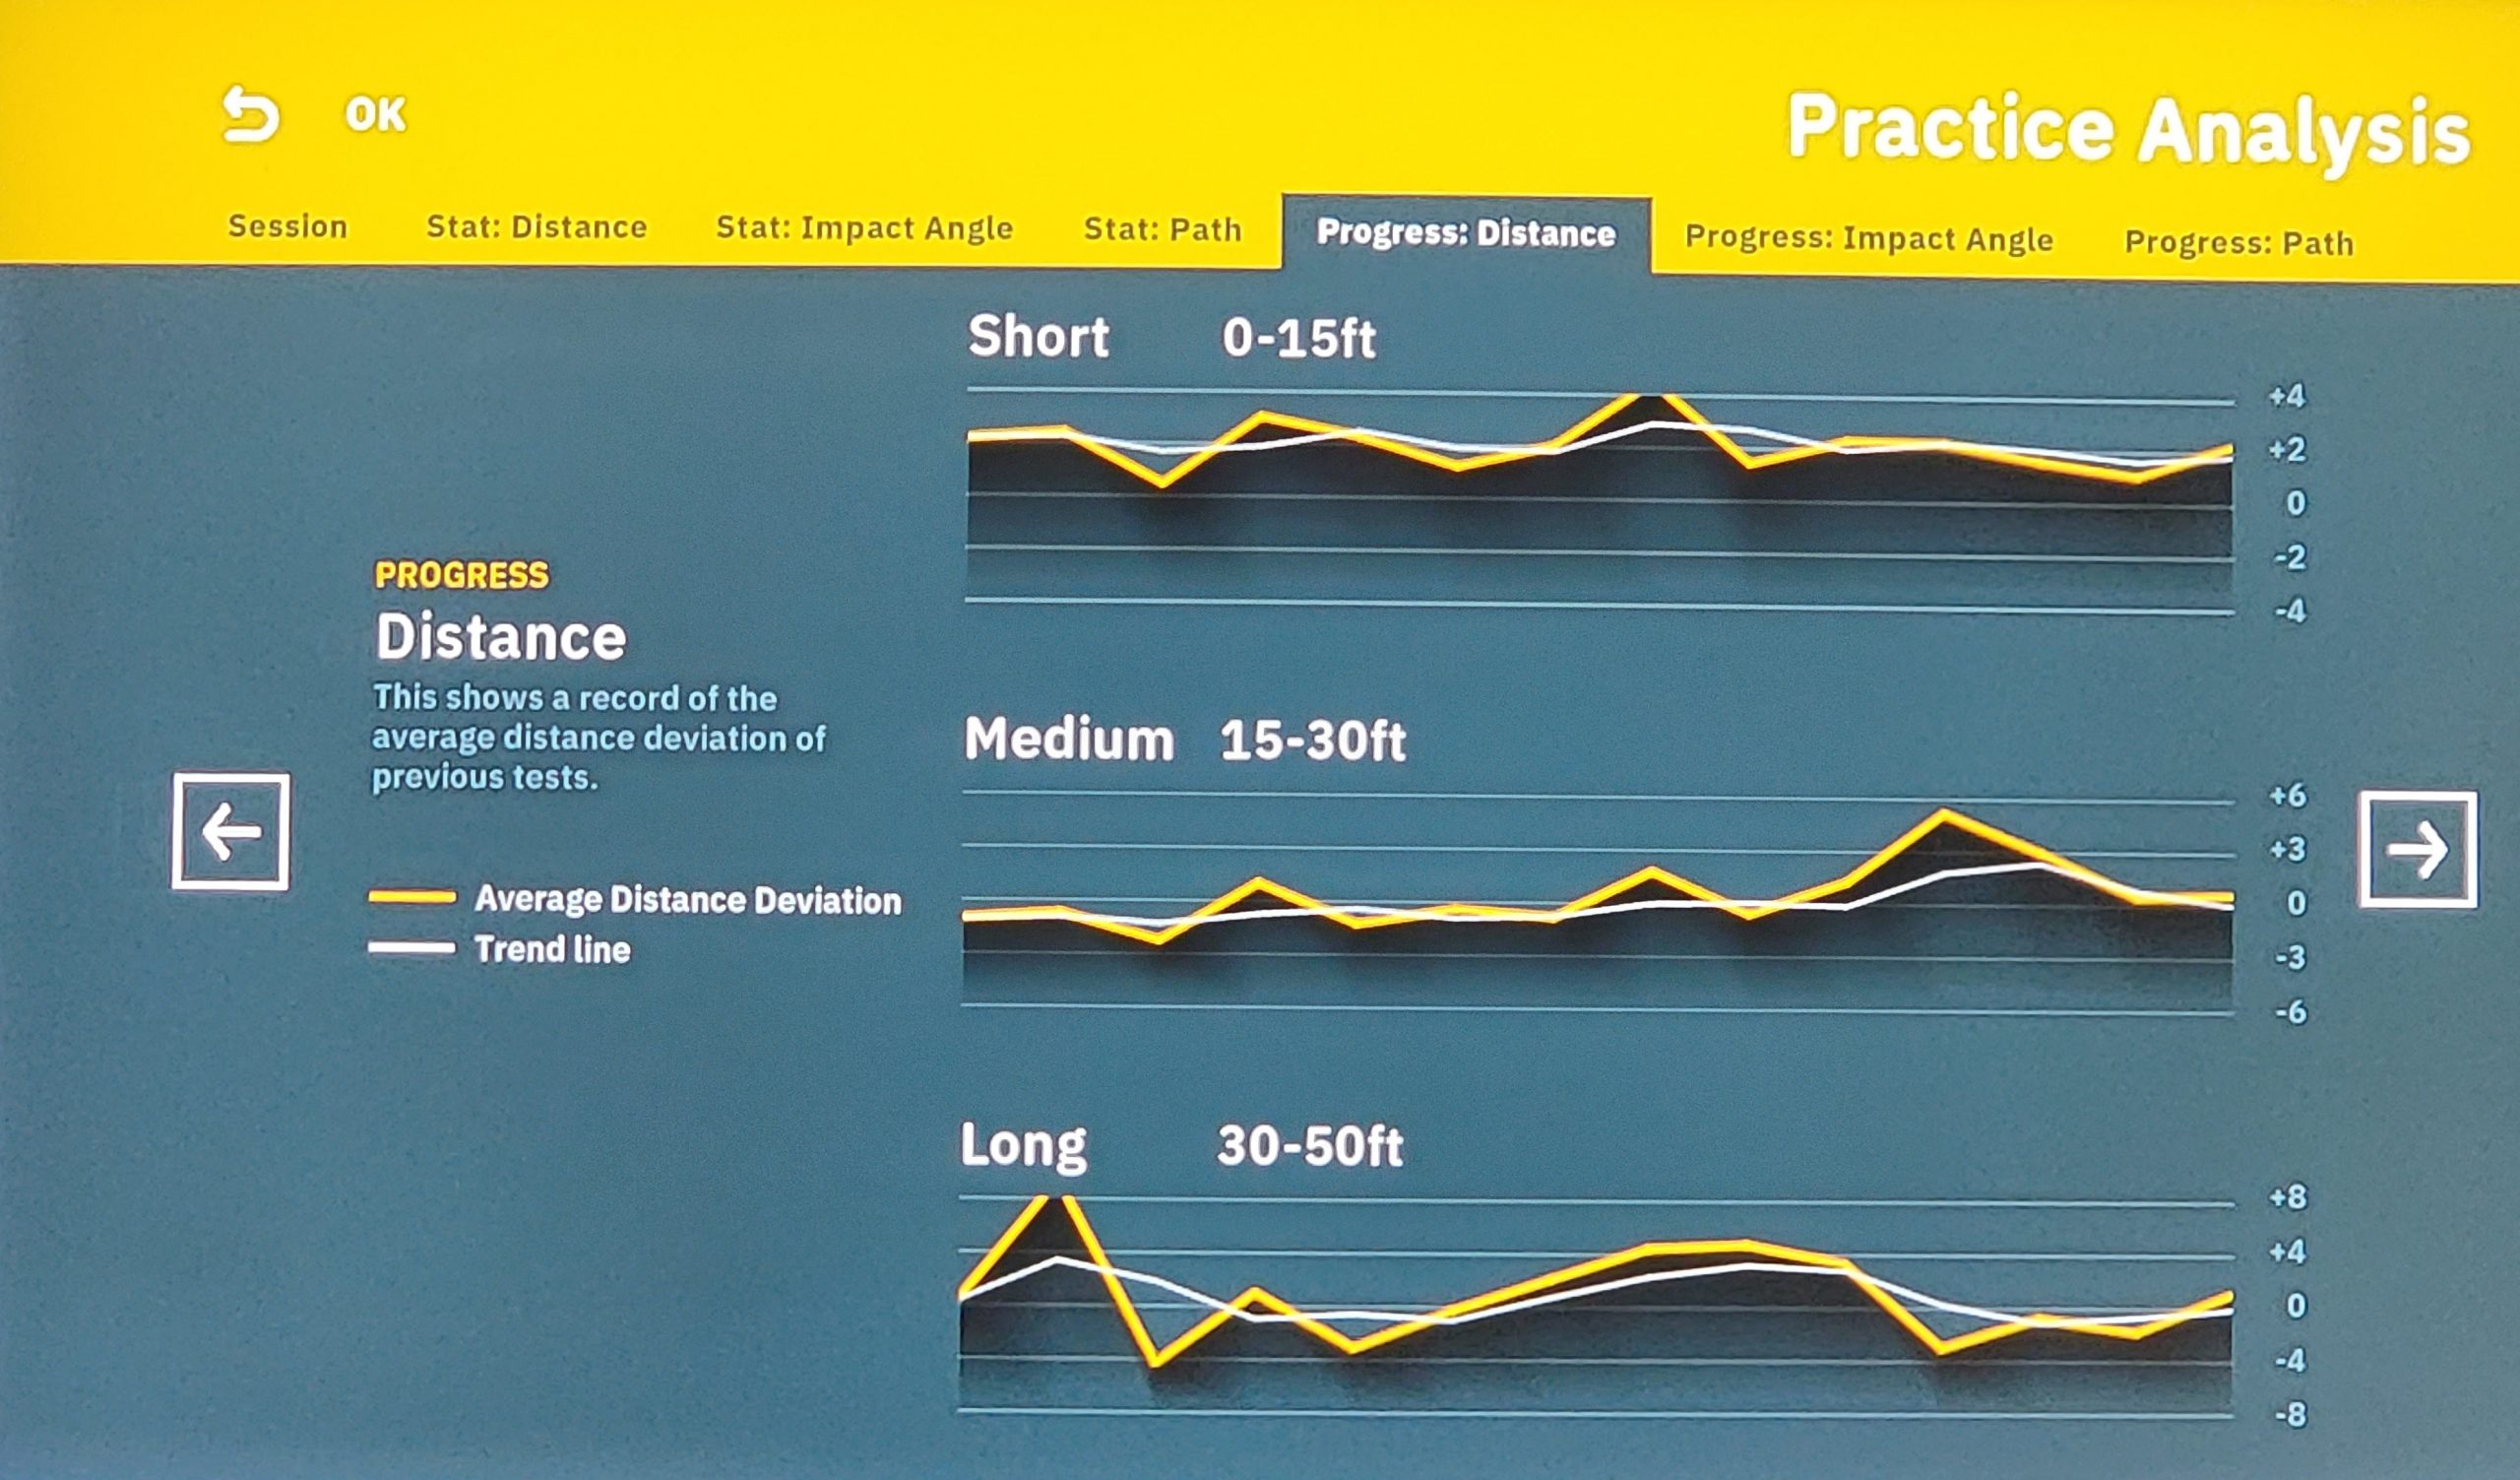
After 5 Analysis sessions, the Progress tabs begin to populate.
The Progress tabs keep track of your most recent 30 Analysis sessions.
The output from your putt data is in chart form grouping putts of a given length together.
The categories or tabs are: Session, Stat: Distance, Stat: Impact Angle, Stat: Path, Progress: Distance, Progress: Impact Angle, and Progress: Path.
Data is stored in the camera for the latest 30 practice analysis sessions.
Screenshots: Practice Analysis
The image below is a screen shot of my most recent Analysis “Session.” It’s the Stat: Distance tab.
The chart indicates I’m doing better at getting the ball to the hole or just past.
It’s very different trying to hit a 50 foot putt on a short mat. I was very happy to finally see good, good, and good on the last session distance analysis.
I thought I would add another image just to show how much I struggled over about 10 analysis sessions to get my putting distance and other metrics to come around.
This is Progress: Distance for about 180 putts. Awful, awful, and awful.
As I mentioned, it’s just been my last session that things are much better. I’m getting used to the short mat.
Classic – Play 9
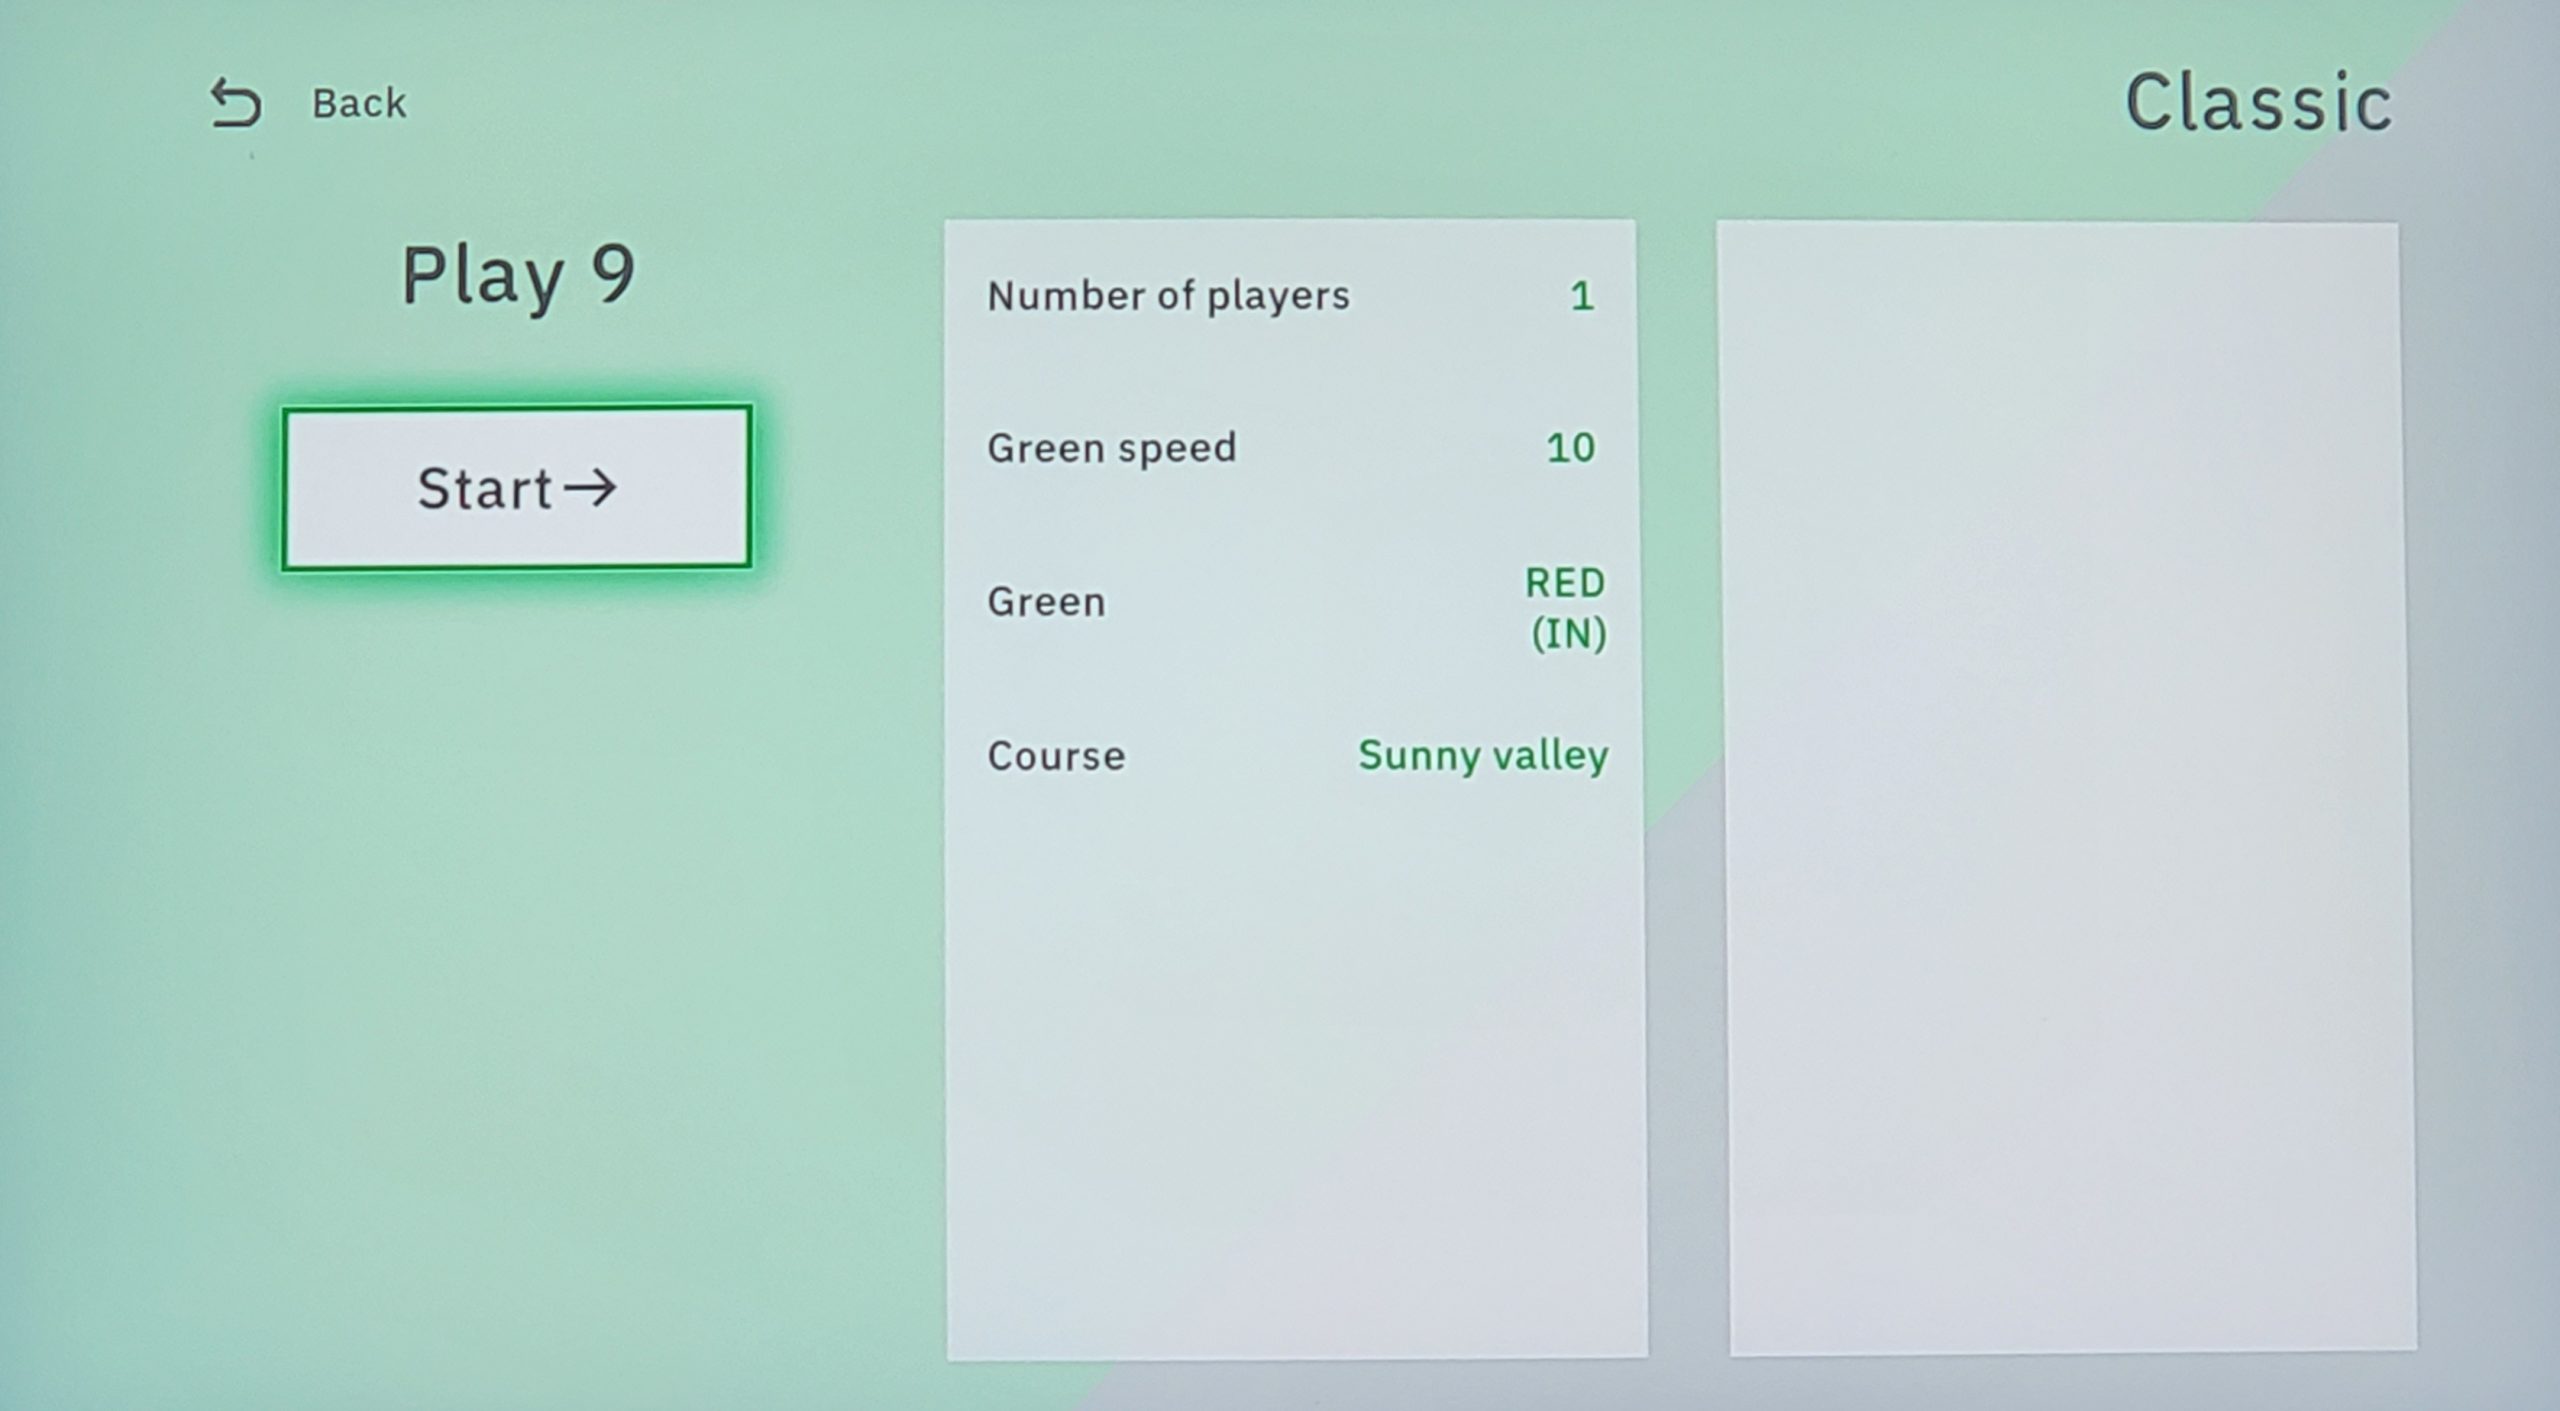
This option in the Classic menu allows you to play / putt on 9 holes from a course of your choosing and keep score.
Up to 4 players can play in this mode.
This is like playing a round of golf. You putt until you make a putt or get close enough that the EXPUTT RG concedes the putt.
Classic – Challenge
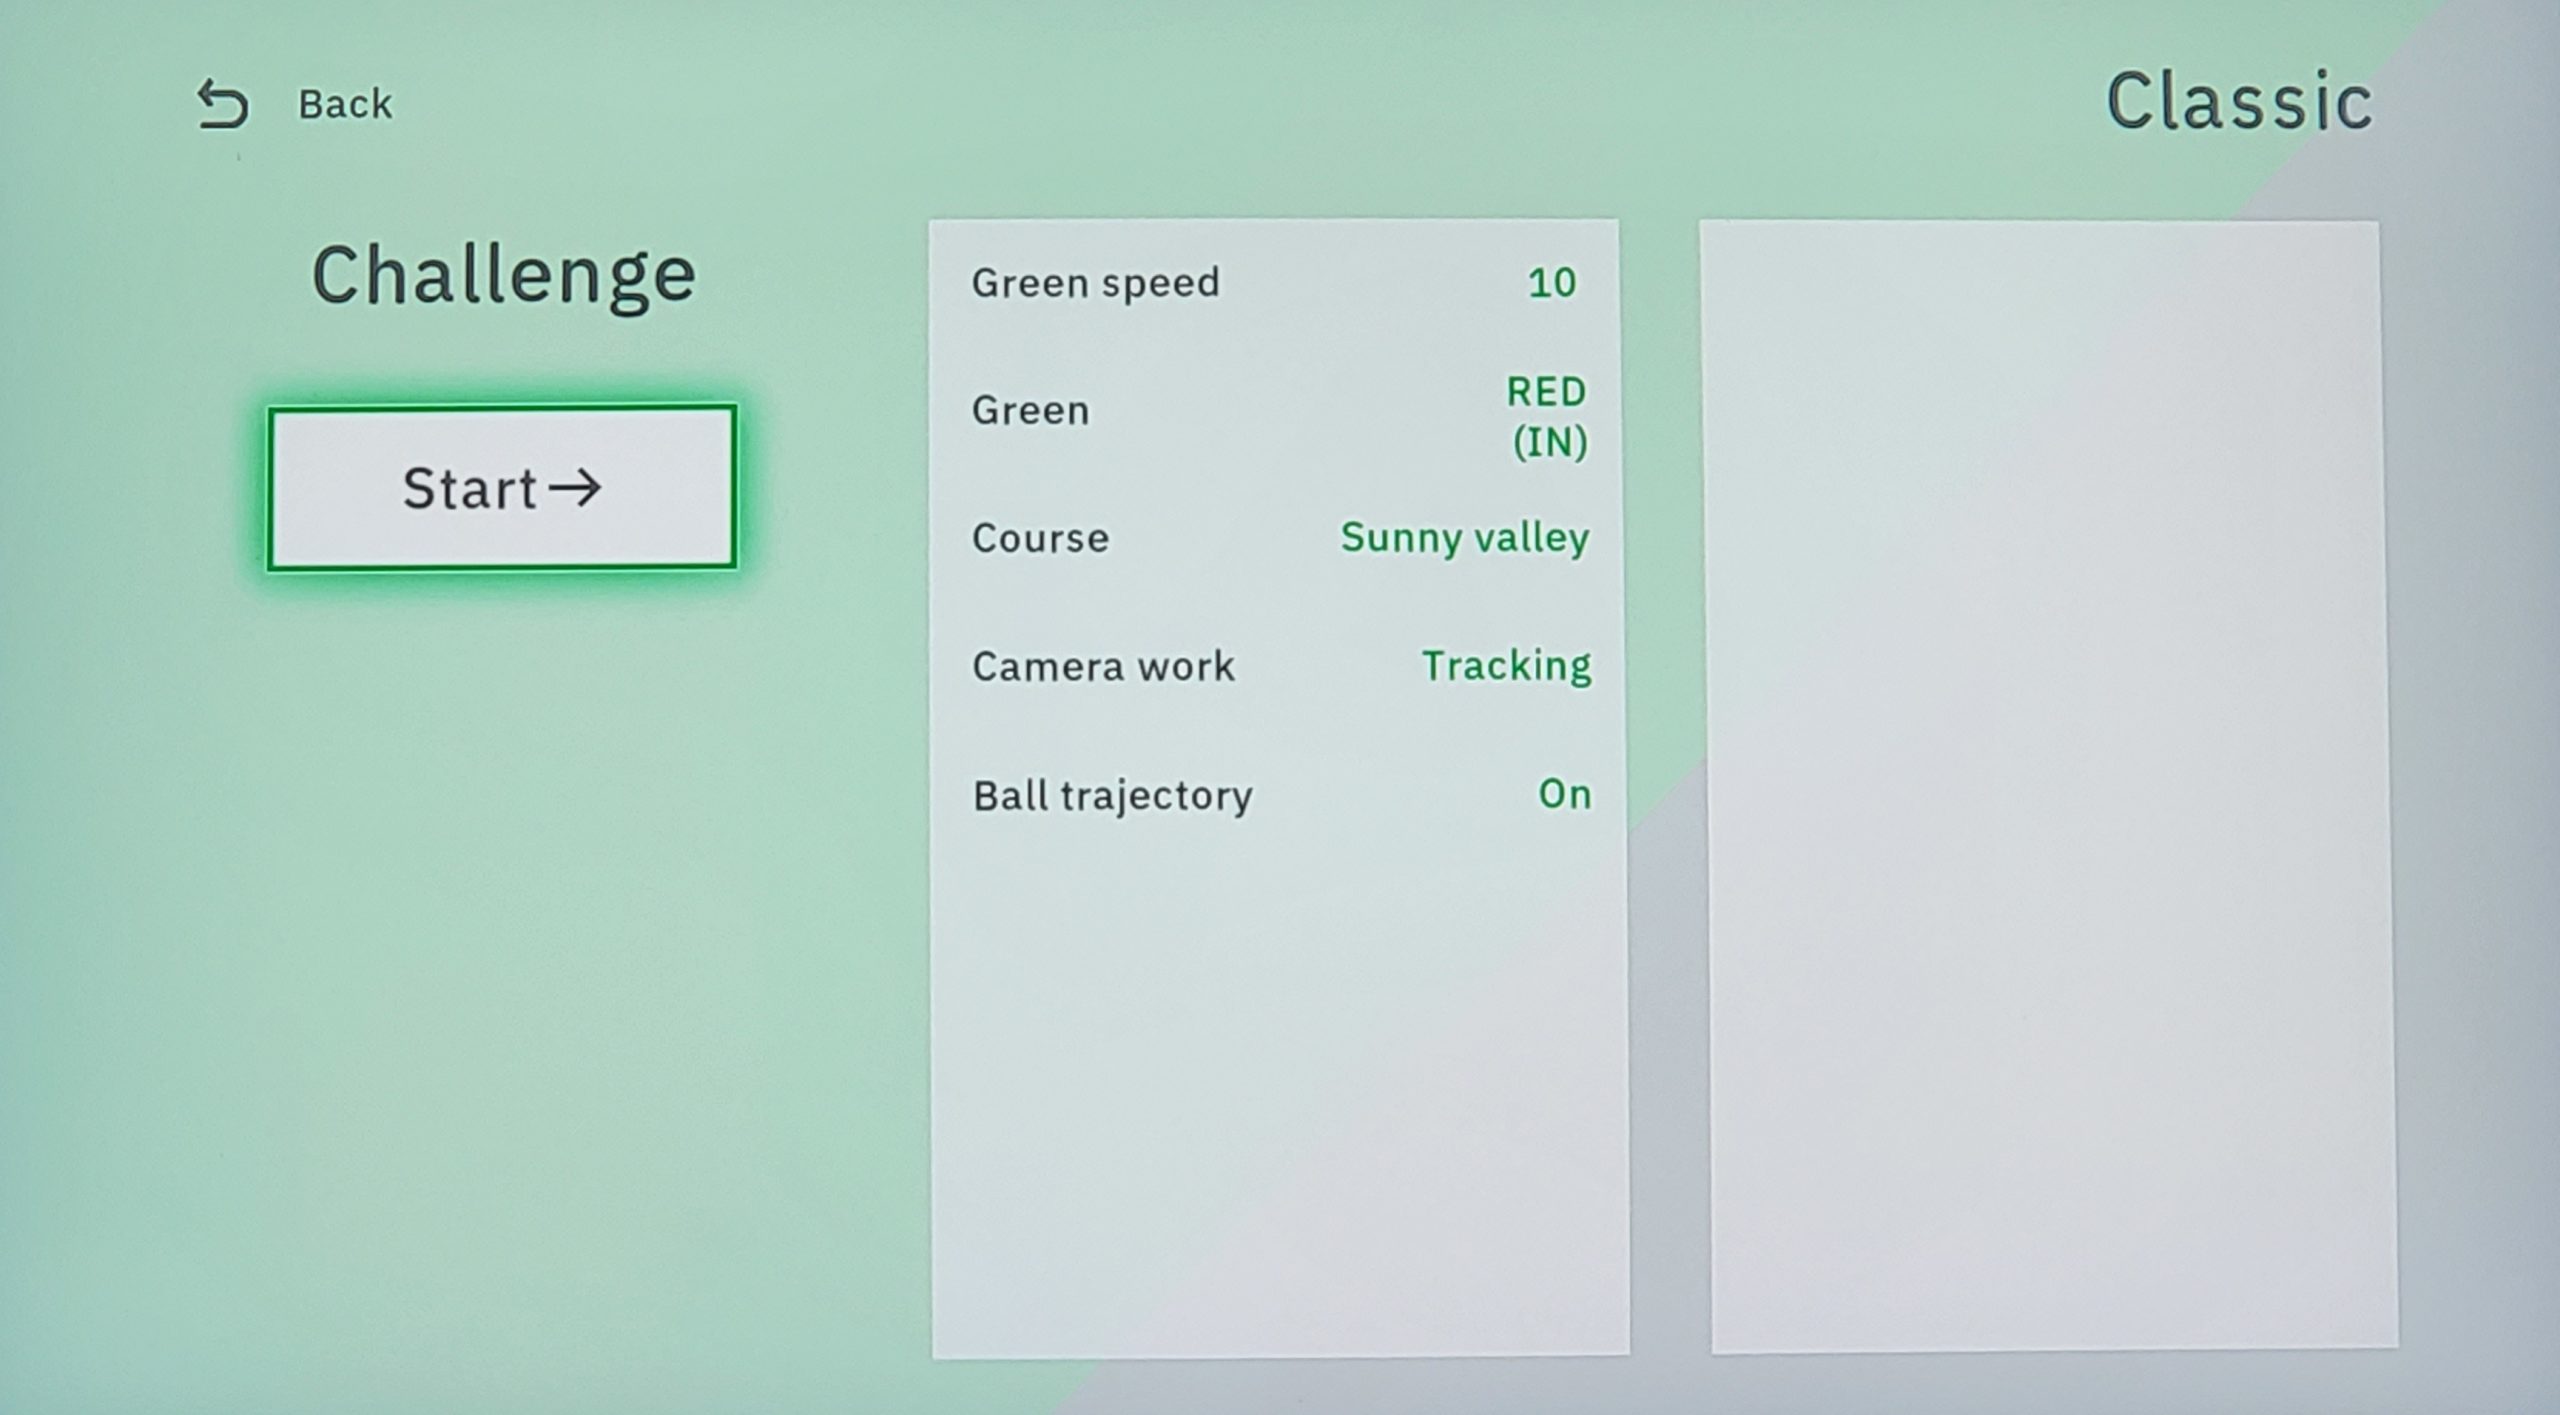
The Challenge feature in the Classic menu does just that. It’s challenging.
You can practice reading slope and putting direction depending on the slope of the green.
It gives you 3 chances at every hole before it switches to the next hole. Just goofing around and missing intentionally…it gave me 3 x 3 chances or 9 putts total.
The score is based on making a putt or EXPUTT RG conceding the putt.
When I came close it conceded. So my best attempt on a hole was a total of 3 conceded putts.
Suggestion!!! Use the hints and move the aim line with the remote or direction keys.
You are going to want to move the aim line or you could putt off the mat left or right.
How could you putt off the mat? It’s only a foot wide and some of the breaks are significant. One green at Pebble Beach I played had 6 feet 8 inches of break.
I would have had to hit is so far right I would have been way off the mat. So, they let you move your aim line over with the remote or keys on the mat. Then you just hit a straight putt.
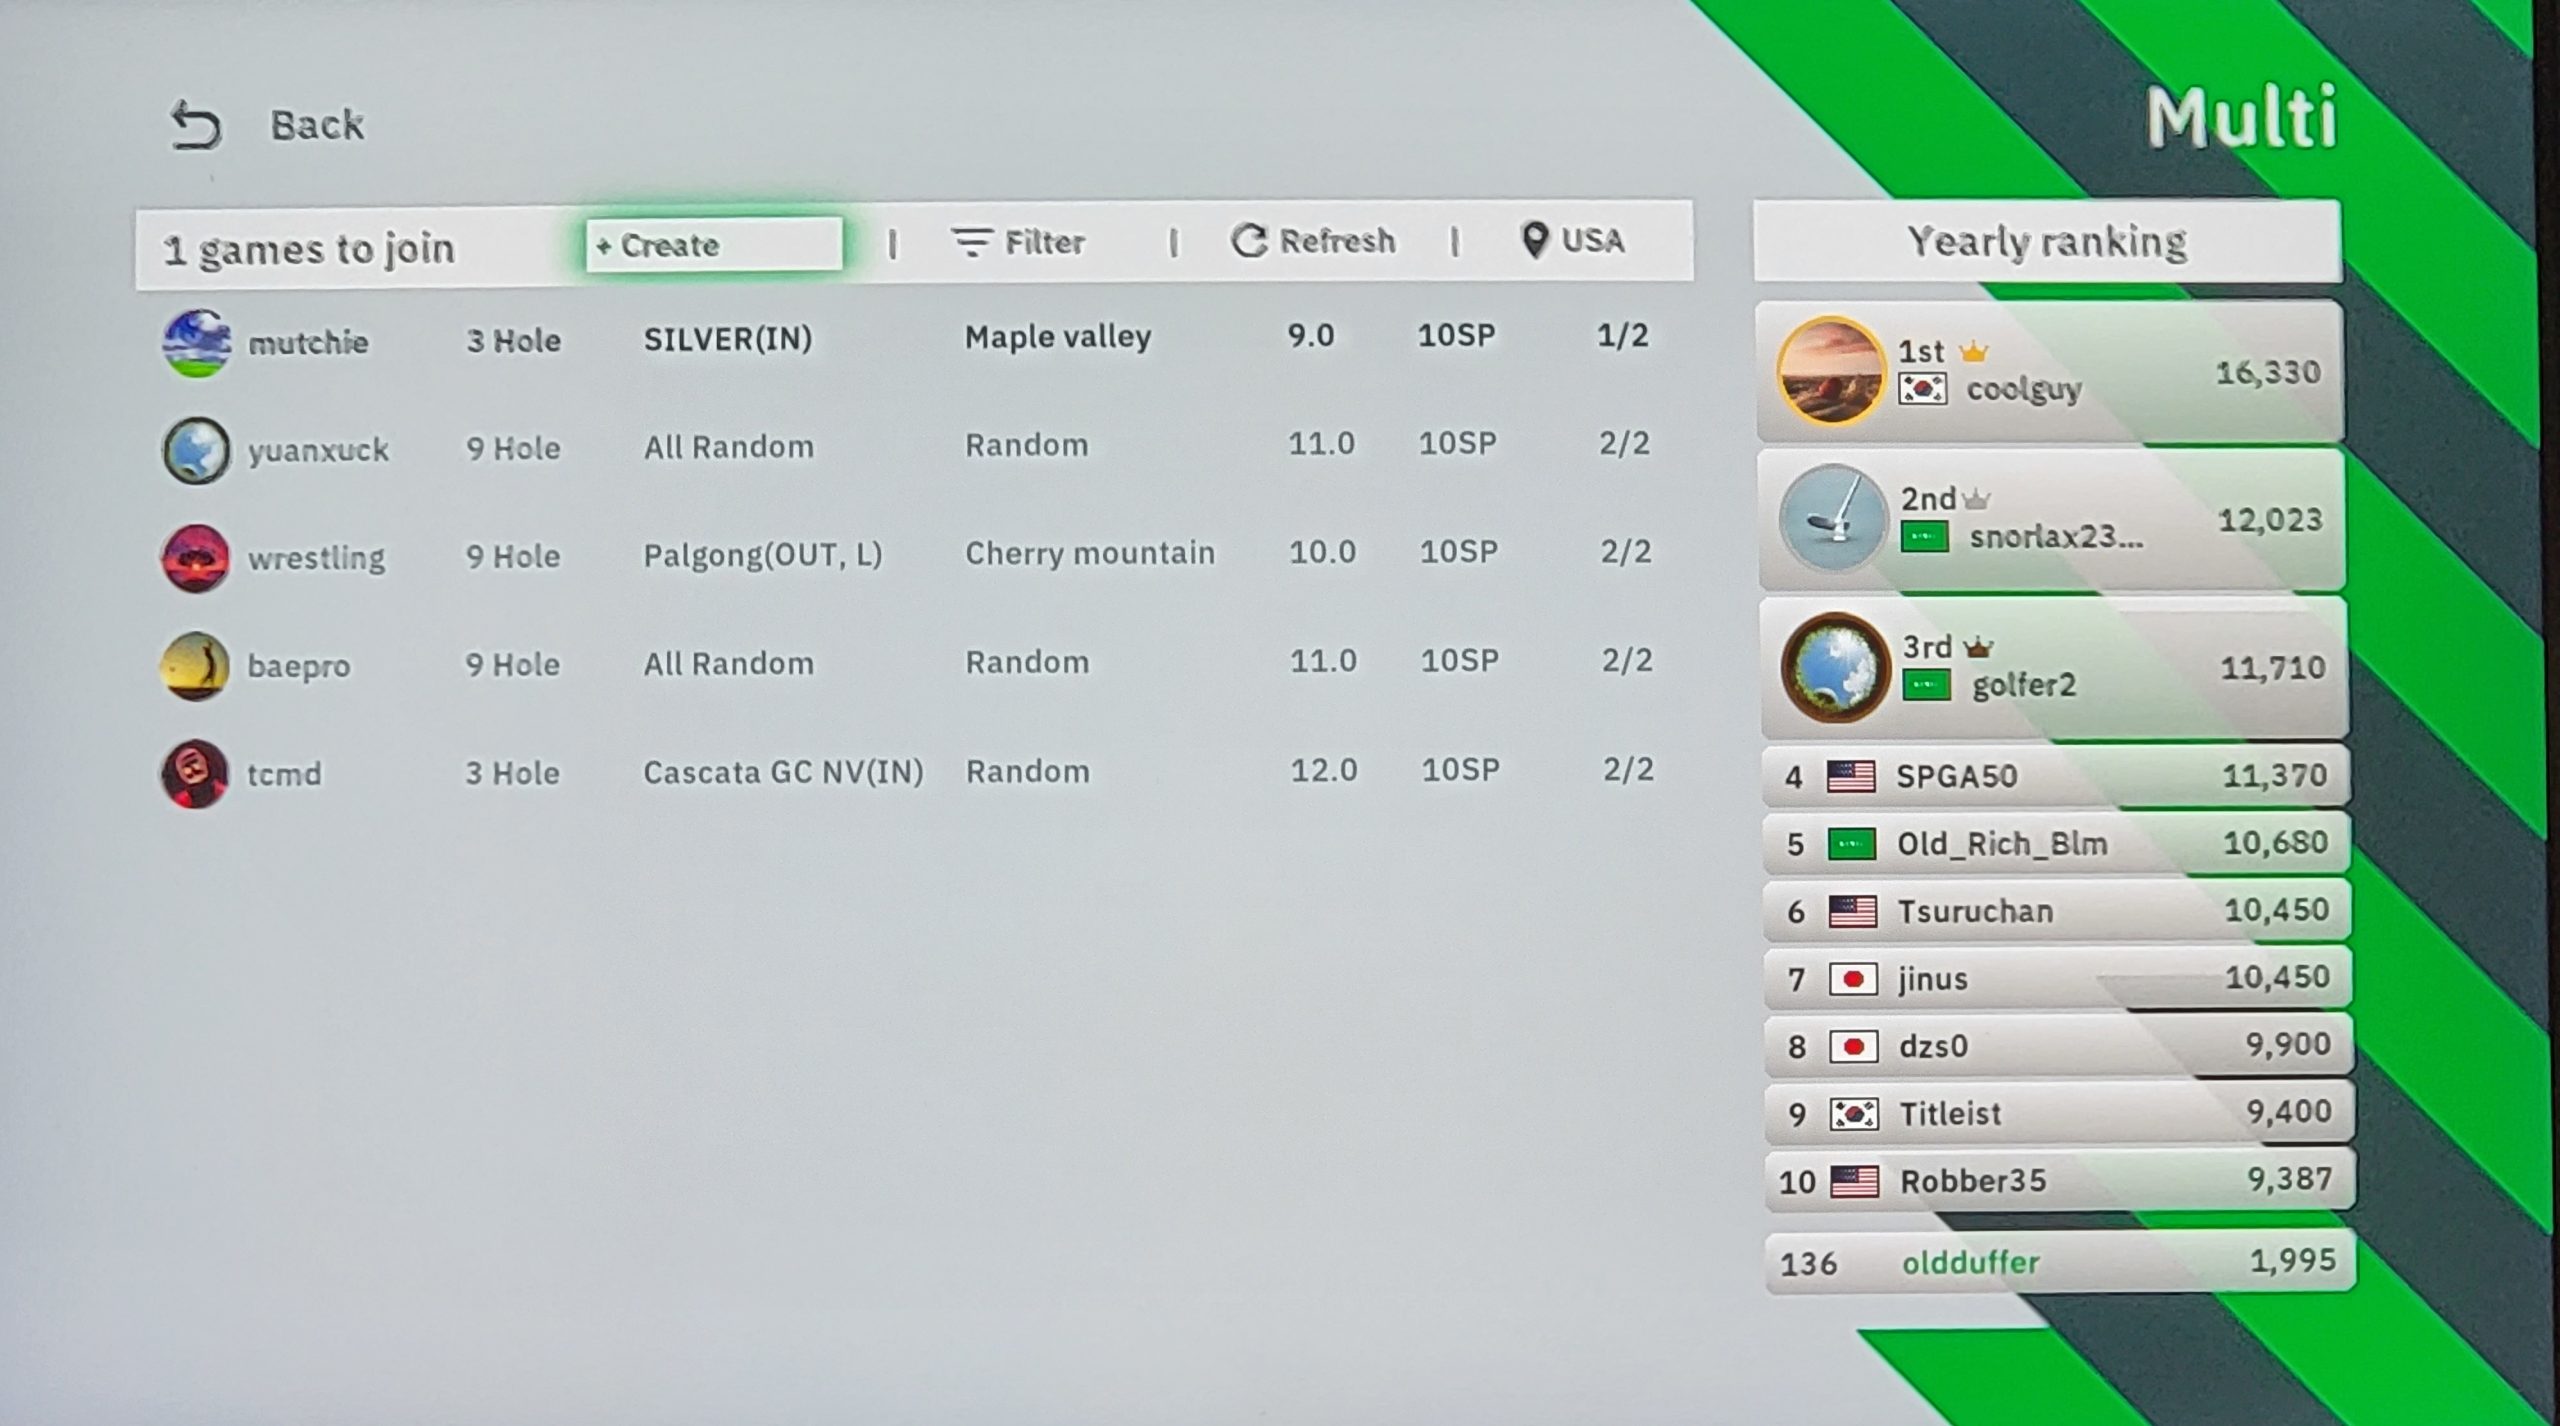
New – Multi Mode
This mode is for competition with your friends online. There are open and private sessions.
Not all games are open to join. In this screenshot there is 1 game to join.
New – Explorer Mode
You can choose from a variety of courses. By clicking on “Search from list,” you get a Country list that includes: Random, EXPUTT course, Japan, Korea, UK, and the USA.
If I counted right, there are 91 courses to choose from just in the USA.
You can request courses. I’m guessing it has to be a course that’s been mapped with Lidar imaging. I’m going to request one from Wisconsin that I play on.
The benefit of that would be practicing on greens that you actually play on.
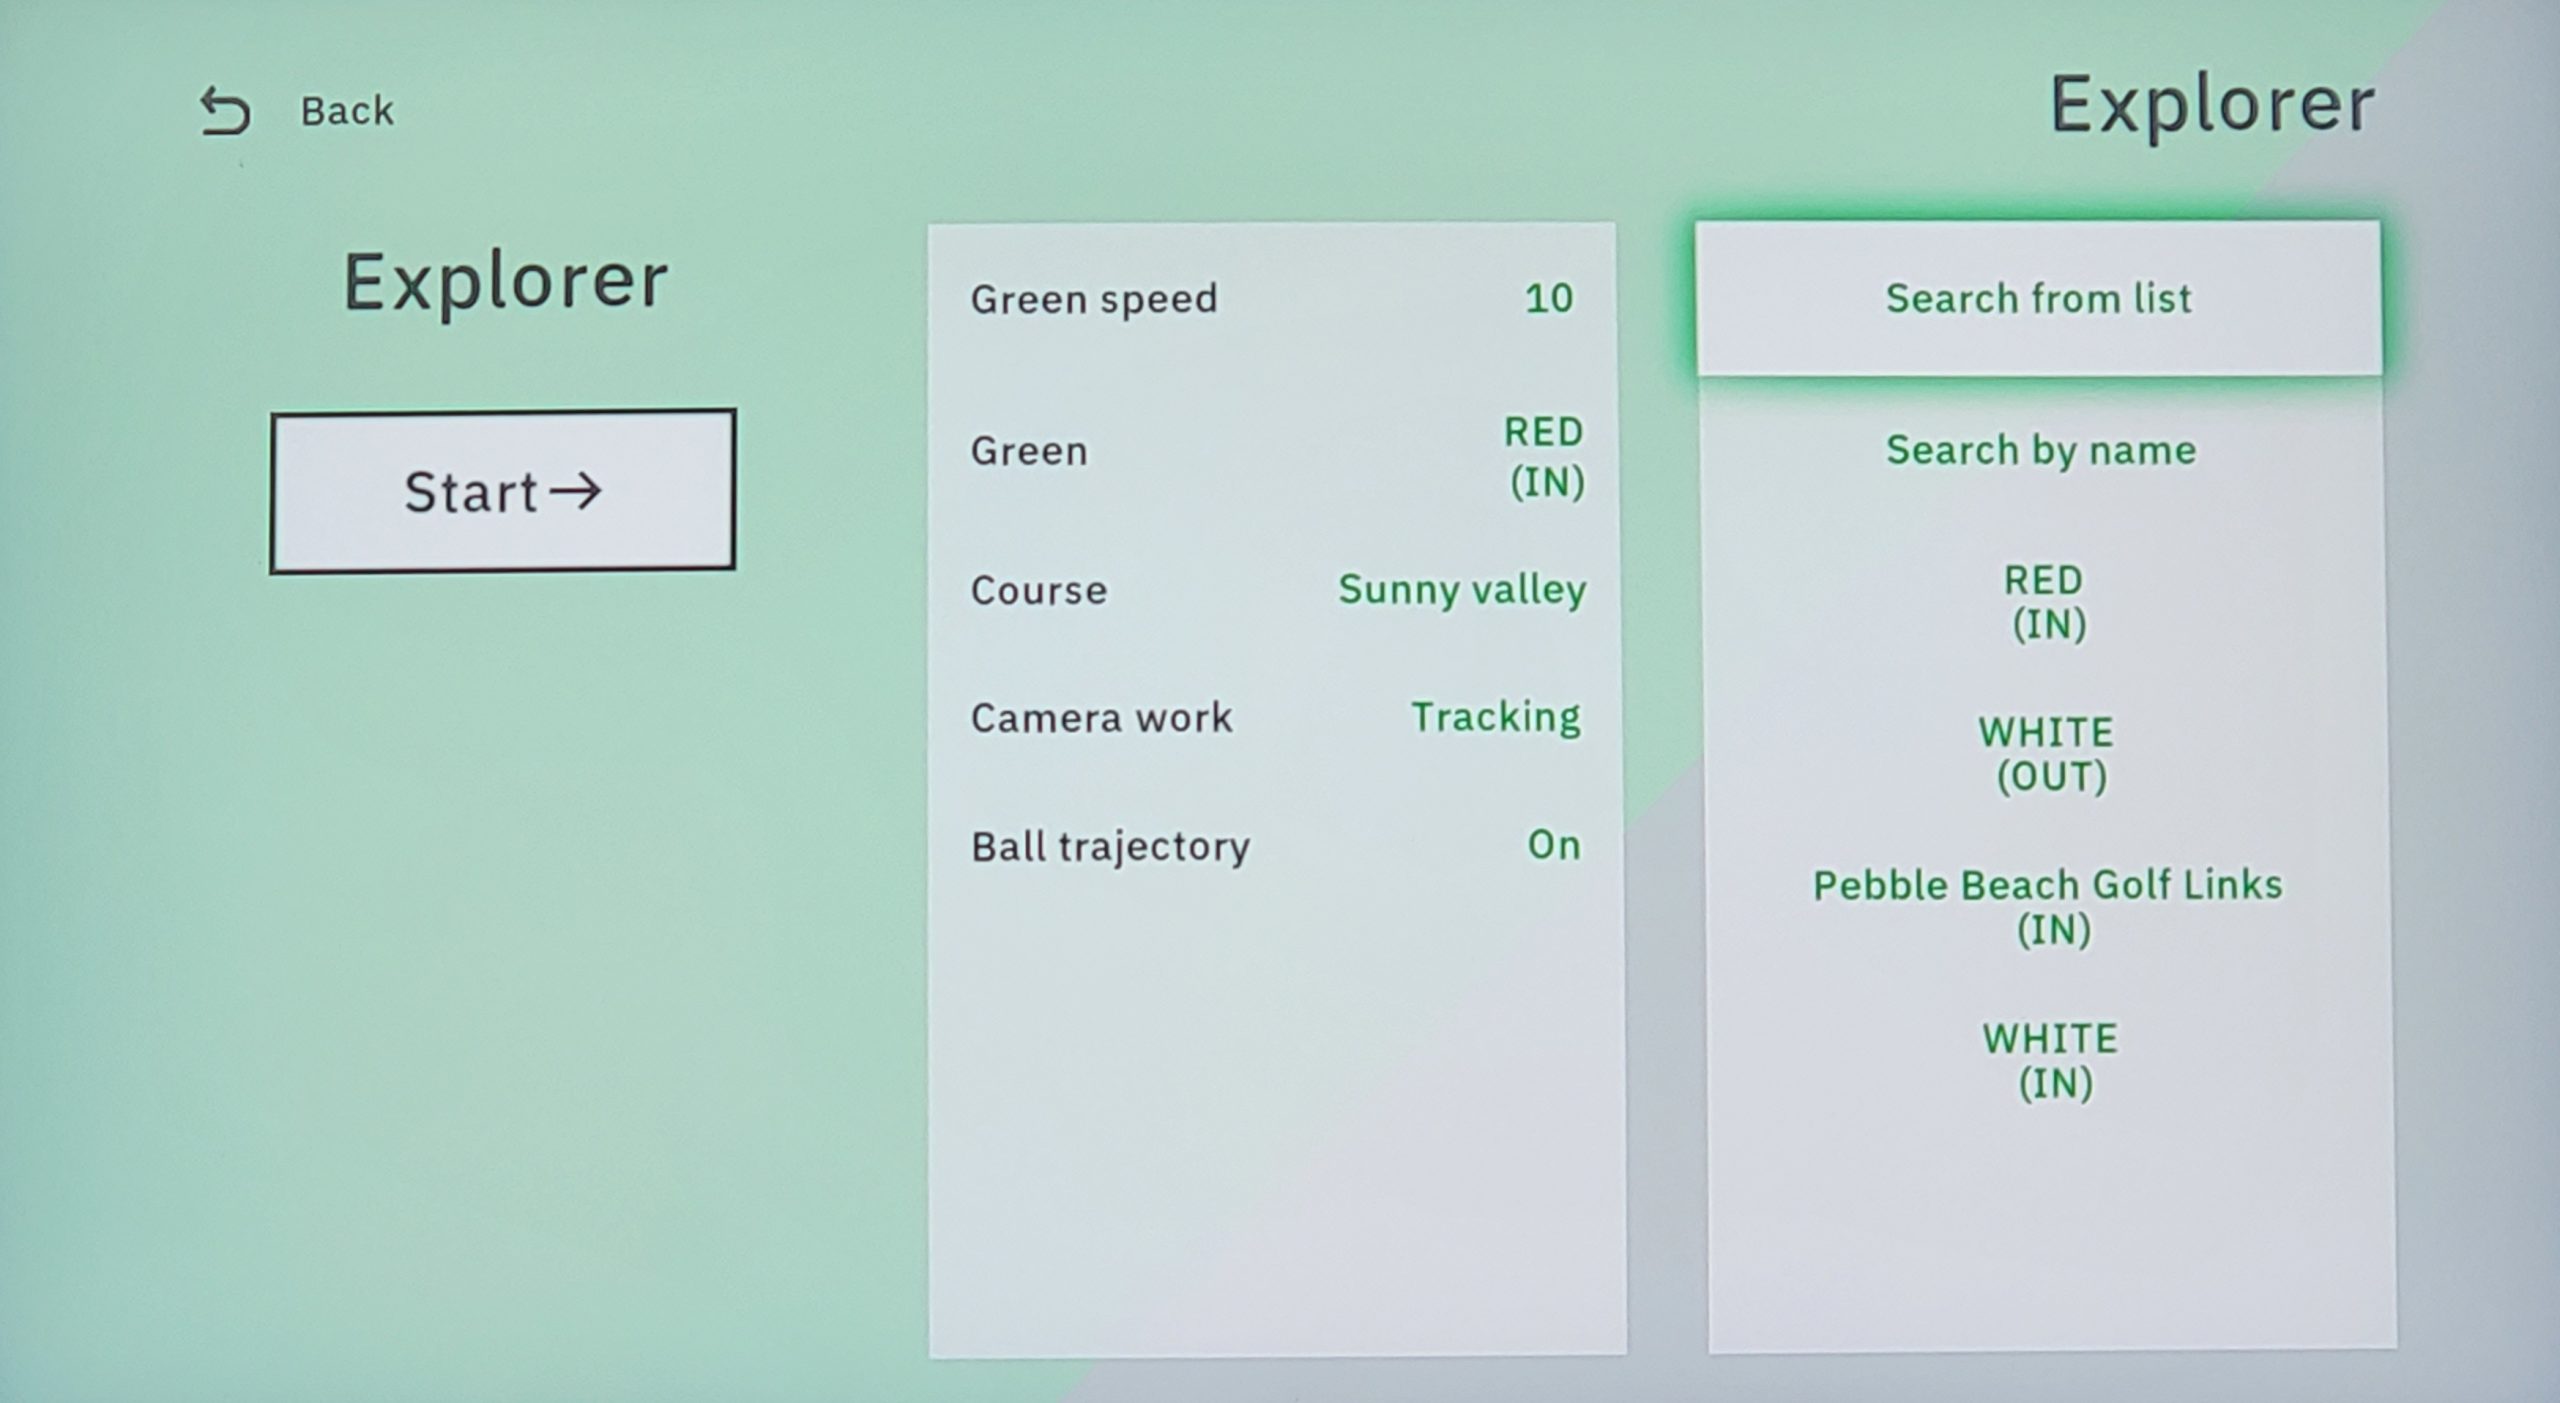
This is where you can select courses
Example: Pebble Beach
This mode is really challenging. I tried this several times on Pebble Beach greens.
You can pick out a green and move the ball and pin position to practice a wide variety of putts.
You change to another greens when you want to.
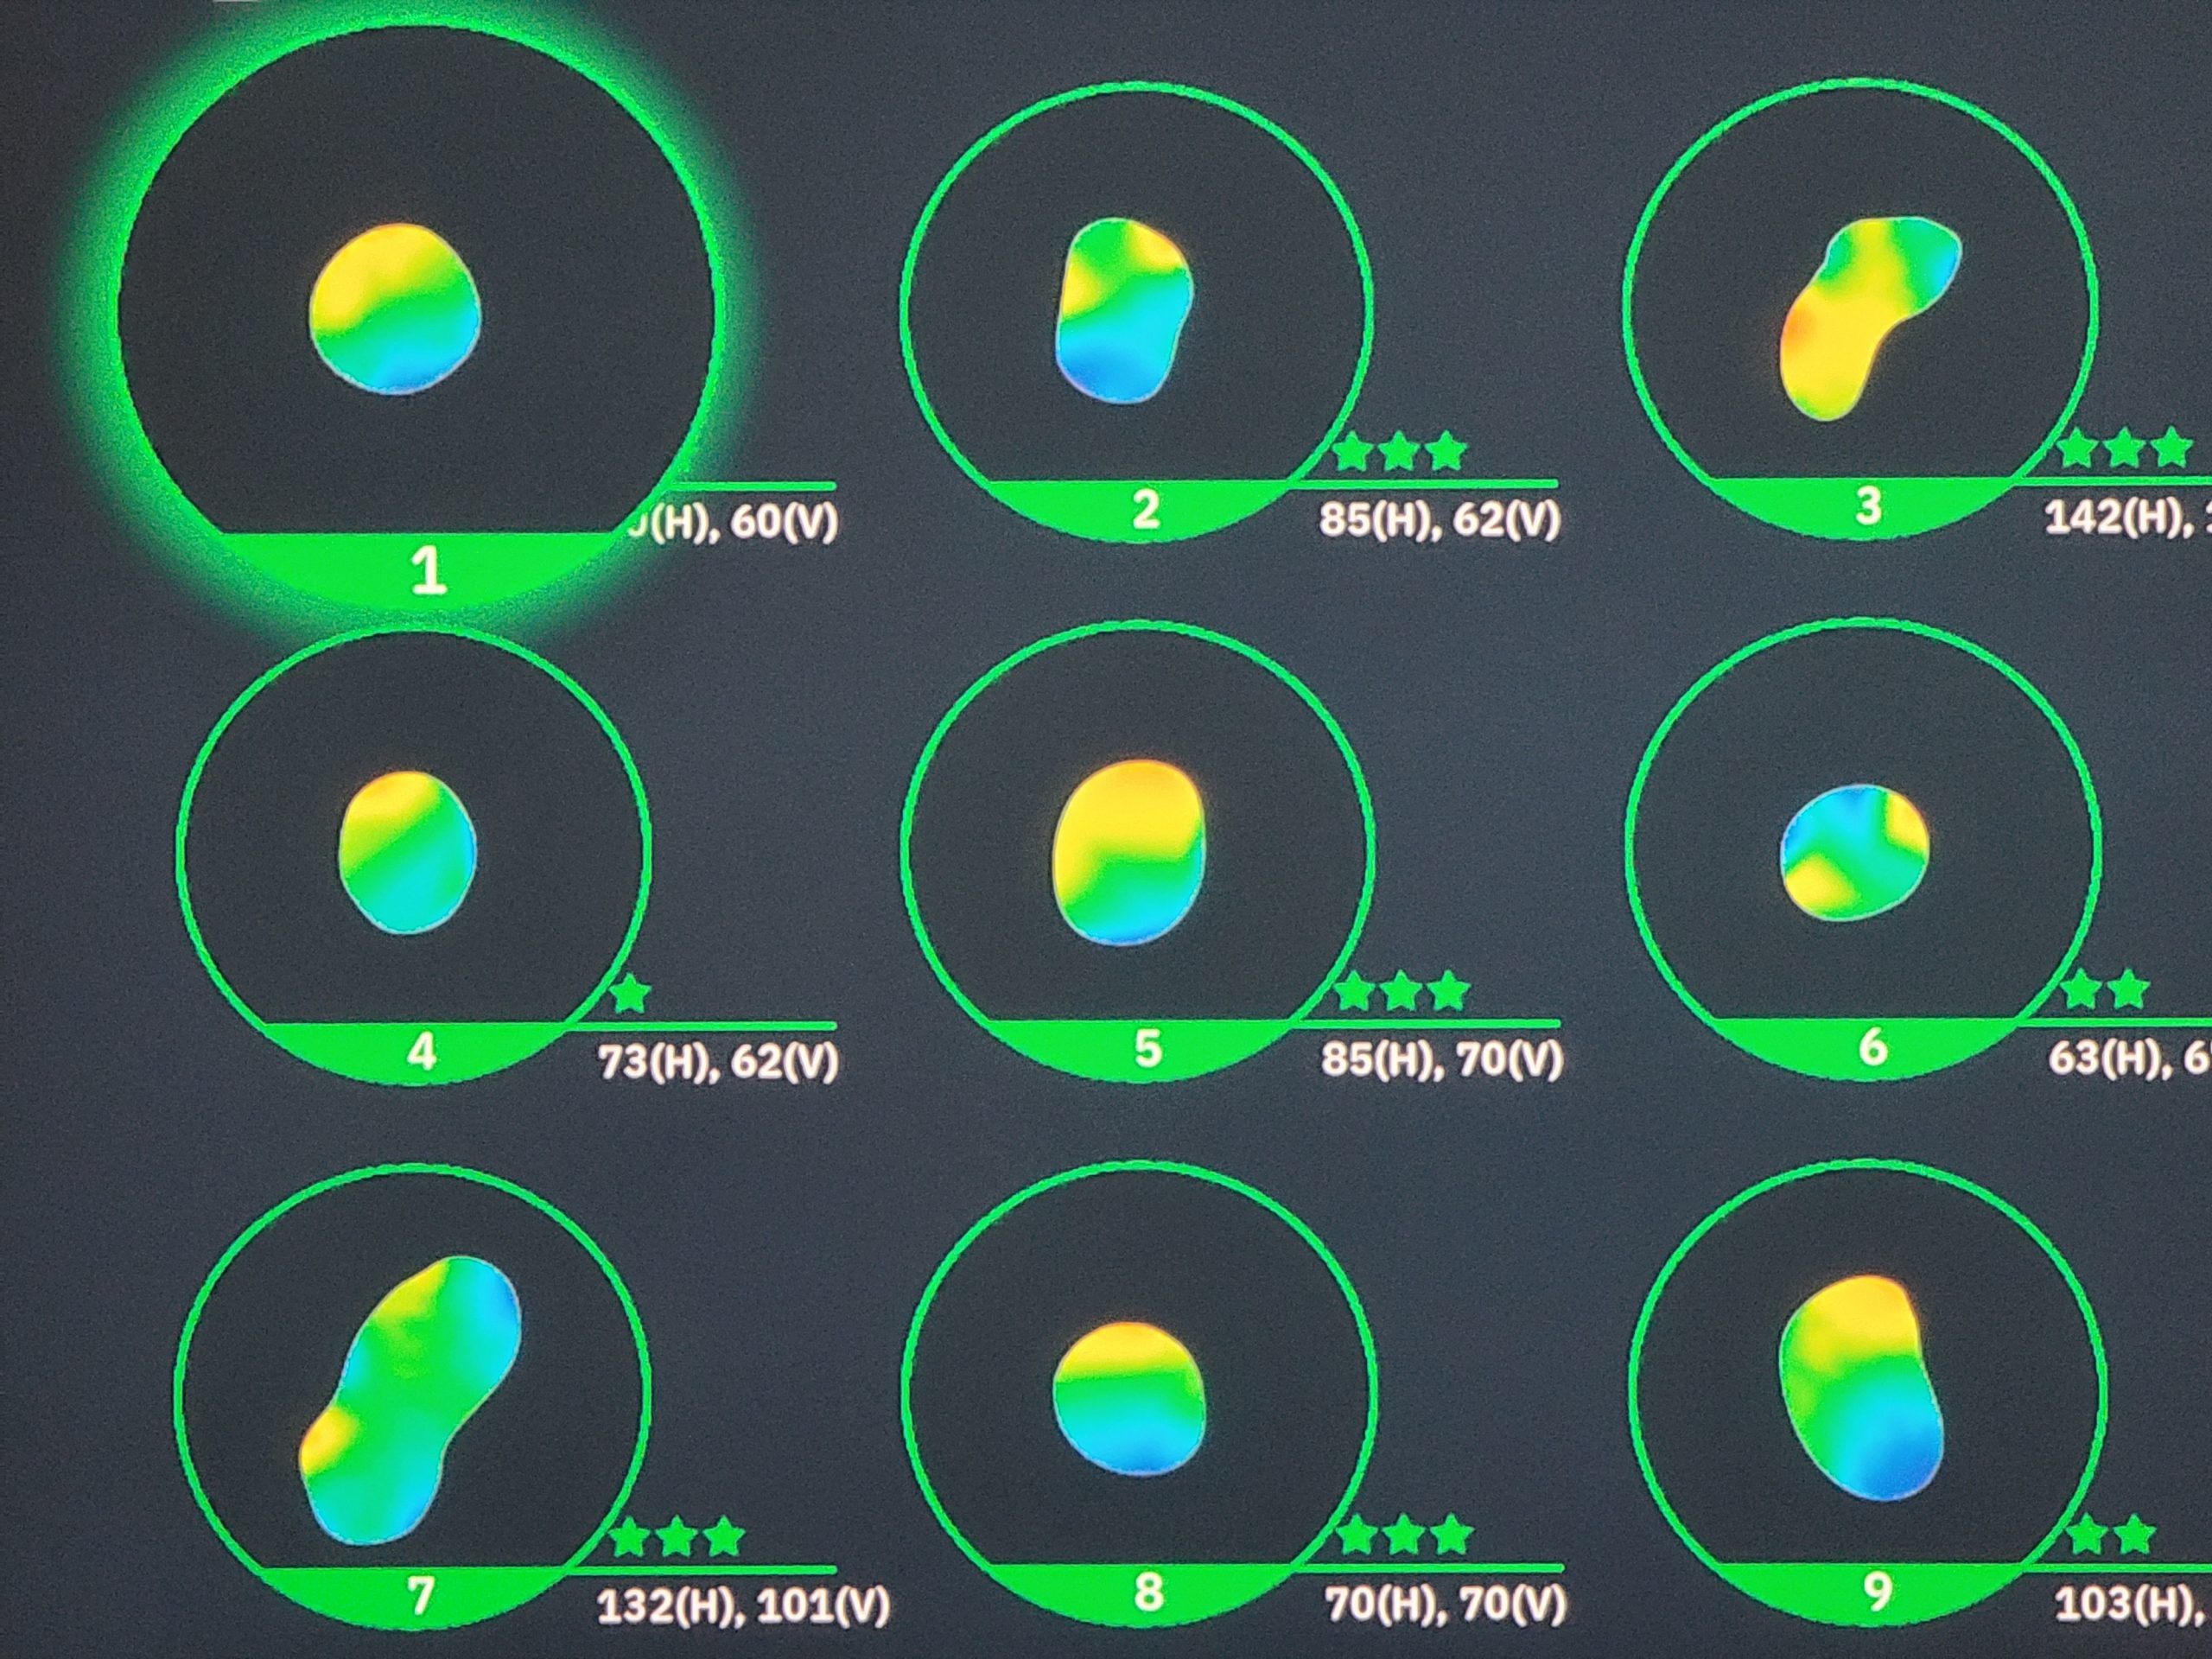
Note: More stars are harder greens
Select a green, change flag and / or hole location

Videos
These are videos that peaked my interest in purchasing the EXPUTT RG. Please note that these all were produced a year ago when the new product was just introduced.
These are all well done and helpful.
A couple of the videos indicate they believe there is a Bluetooth connection. It turns out the connection is a Wi-fi connection similar to a wireless printer on your network.
The camera needs to be connected to whatever Wi-fi you are using. It remembers connections and will reconnect automatically.
In the case of the mobile interface, both the mobile device and camera need to be on the same Wi-fi connection.
Scott Hogan Golf
Golf Putting Simulator: The New ExPutt RG!
The Indoor Golf Shop
Unboxing: ExPutt RG – the next generation of a Wi-Fi enabled indoor putting simulator
Second Chance Limited
ExPutt RG Putting Simulator with PGA Pro Chris Ryan
Golf Simulator Videos
EXPUTT RG – NEW Putting Simulator – Unboxing, First Look, & Review!
Online Article from Golf Insider
ExPutt Putting Simulator Review – Is It Worth It?
Conclusion
Well, this turned out to be a much longer article than I usually do. I believe it was necessary in this case.
I would definitely buy the EXPUTT RG again.
You could say it is expensive. It cost $469 dollars.
However, if you move up ladder, the next closest option is around $1,500 and other options go over $10,000.
There are no other putting simulators in this price range that I know of.
Something that really is helping me out is selecting “increasing” distance in practice mode.
It starts out at 5 feet and changes in 5 foot increments up to 50 feet.
It helps my distance control and path.
This is the only putting training aid I own that allows me to make putts over 10 feet and tracks critical metrics.
If you want to stay sharp and become a better putter, buy the EXPUTT RG.
After thoughts
I tried to use my Wright Putting Dynamics Laser Optics V3 for a laser line to putt along with the EXPUTT RG.
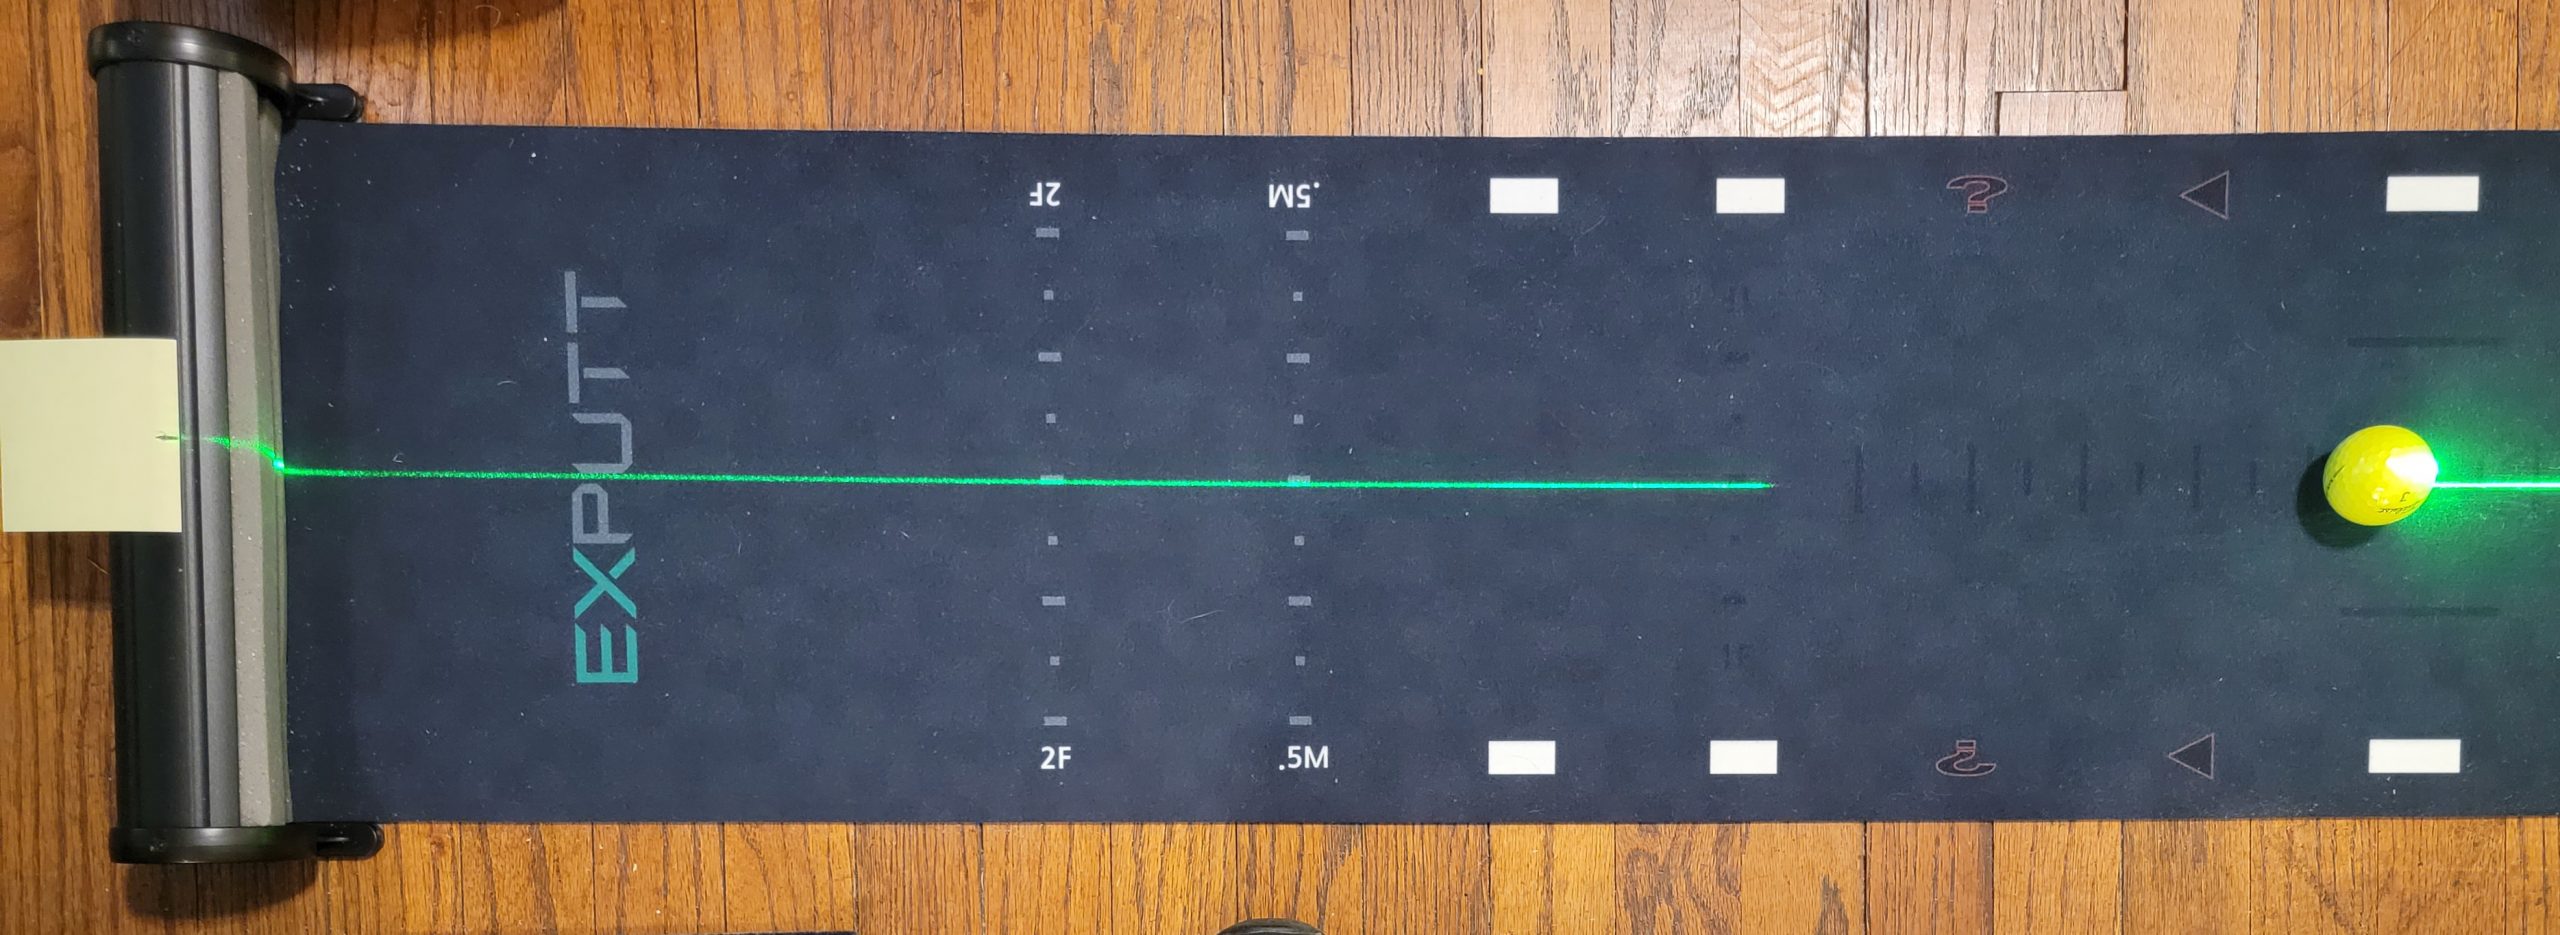
The green laser works, but it interferes with the camera system.
So, I took a sticky note and centered it on the laser line. I just drew a simple line in the middle.
It gives you an intermediate aim point
The effect you get is that it gives you something to aim at.
I find myself looking at the golf hole on the screen.
The sticky note is only 4 feet away. It works as an intermediate aim point.
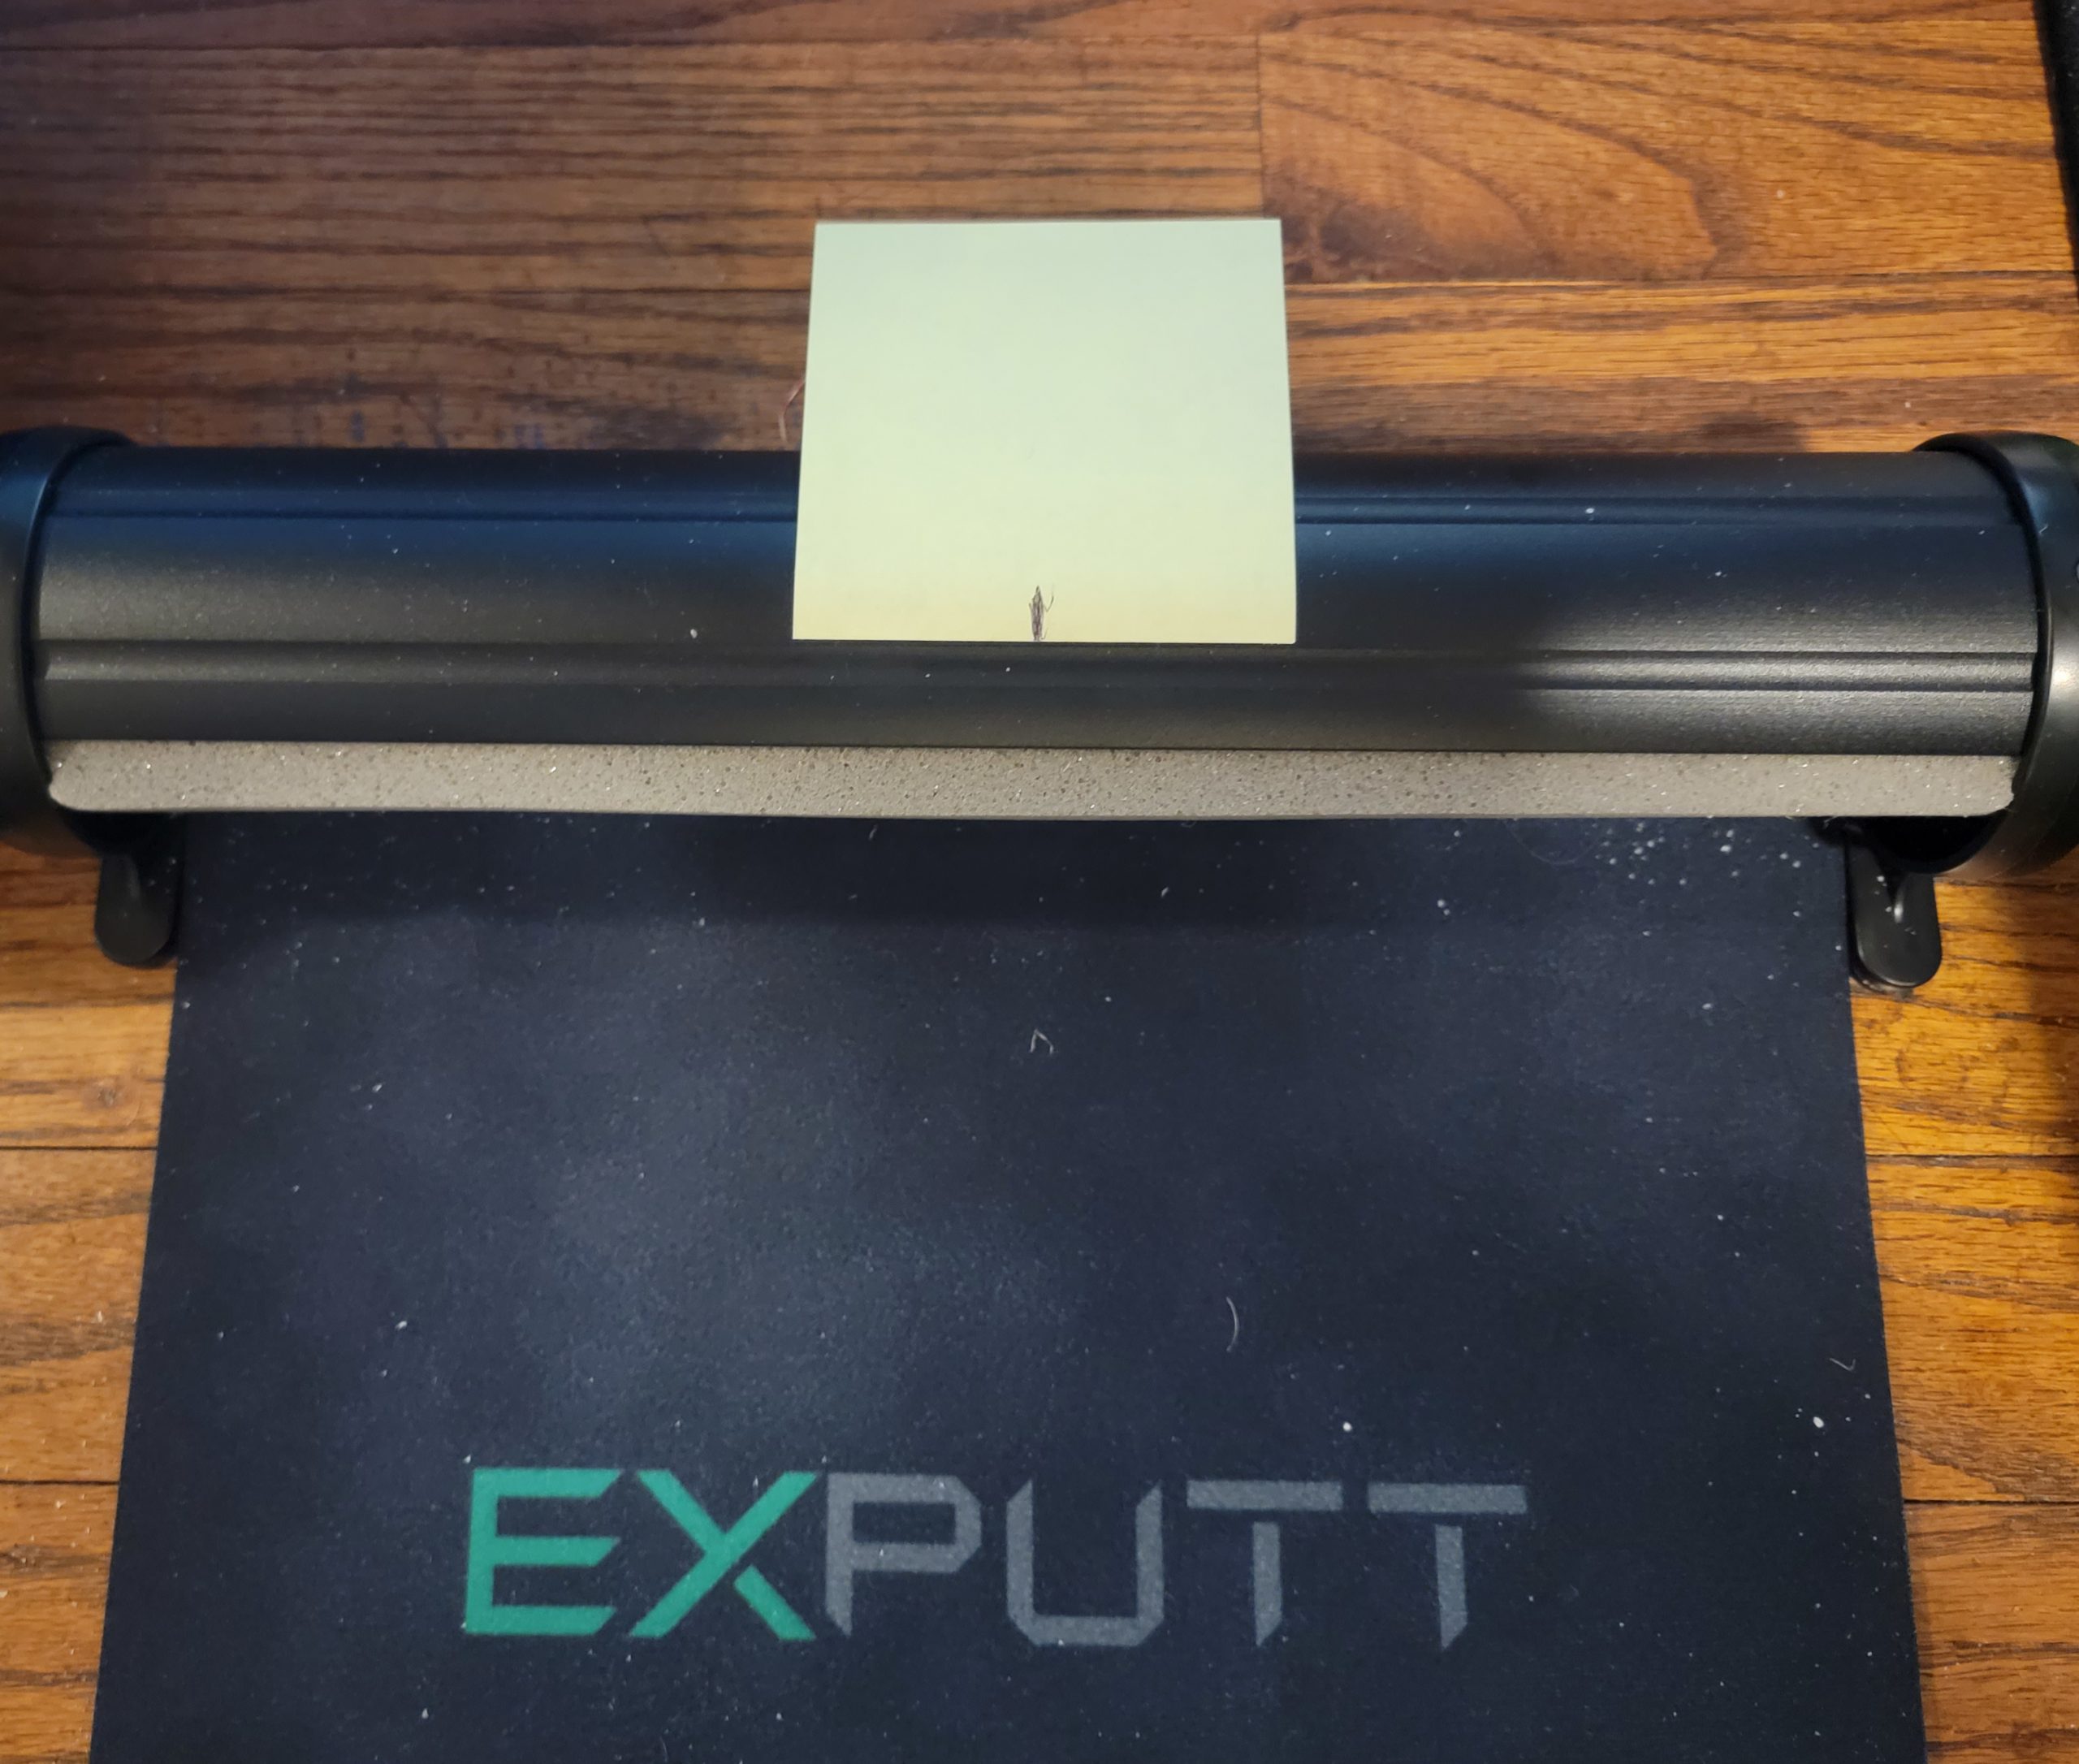
The sticky note is 3 inches wide
The yellow target is smaller than a golf hole
You can tell right away if you have hit a good putt. The sticky note isn’t as big as a golf hole, but if you hit the ball inside the width of the stick note you have a good chance of making the putt or coming close.
It really helps.
Just a thought.