
Indoor putting drills are a great way to keep your golf game in shape. Here are some drills that you can practice indoors at home during the winter or year round. Let’s look at indoor putting drills for aim.
Indoor Putting Drills Series
Aim ← You are here
Speed
Face Angle at Impact
Path
Green Reading
Some people say there are 3 important skills in putting. That would be speed, aim, and path. Others say it is speed, face angle at impact, and green reading.
I like to think speed is most important, then face angle at impact, then your ability to read greens and starting your ball on your intended line.
I’ll break it down into Speed, Face Angle at Impact, Green Reading, Aim / Start Line and Path in this series of articles..
You could spend all day breaking each one of those points down.
Drills Overview
These drills and this series is a more detailed description of indoor practice drills. I’ve tried to include more items, more detail and new items.
All of the drills I practice regularly now are done on putting mats or don’t require a putting surface.
Having said that, for years I practiced on a rug or on the carpet. We had a rug that had a 10 or 11 stimp reading. Carpeting maybe a little slower depending on the carpet type.
What you are able to accomplish depends upon how much space you have.
I don’t use everything everyday.
I usually practice on the putting mats using Blast Motion Golf to measure my putting metrics. Then I add in other training aids to change things up over time.
Indoor Putting Drills: Aim
Face Angle at Setup / Aim / Start Line
The object of these indoor practice drills is to perfect your aim and start line before the season starts or to maintain confidence in your putting during the season.
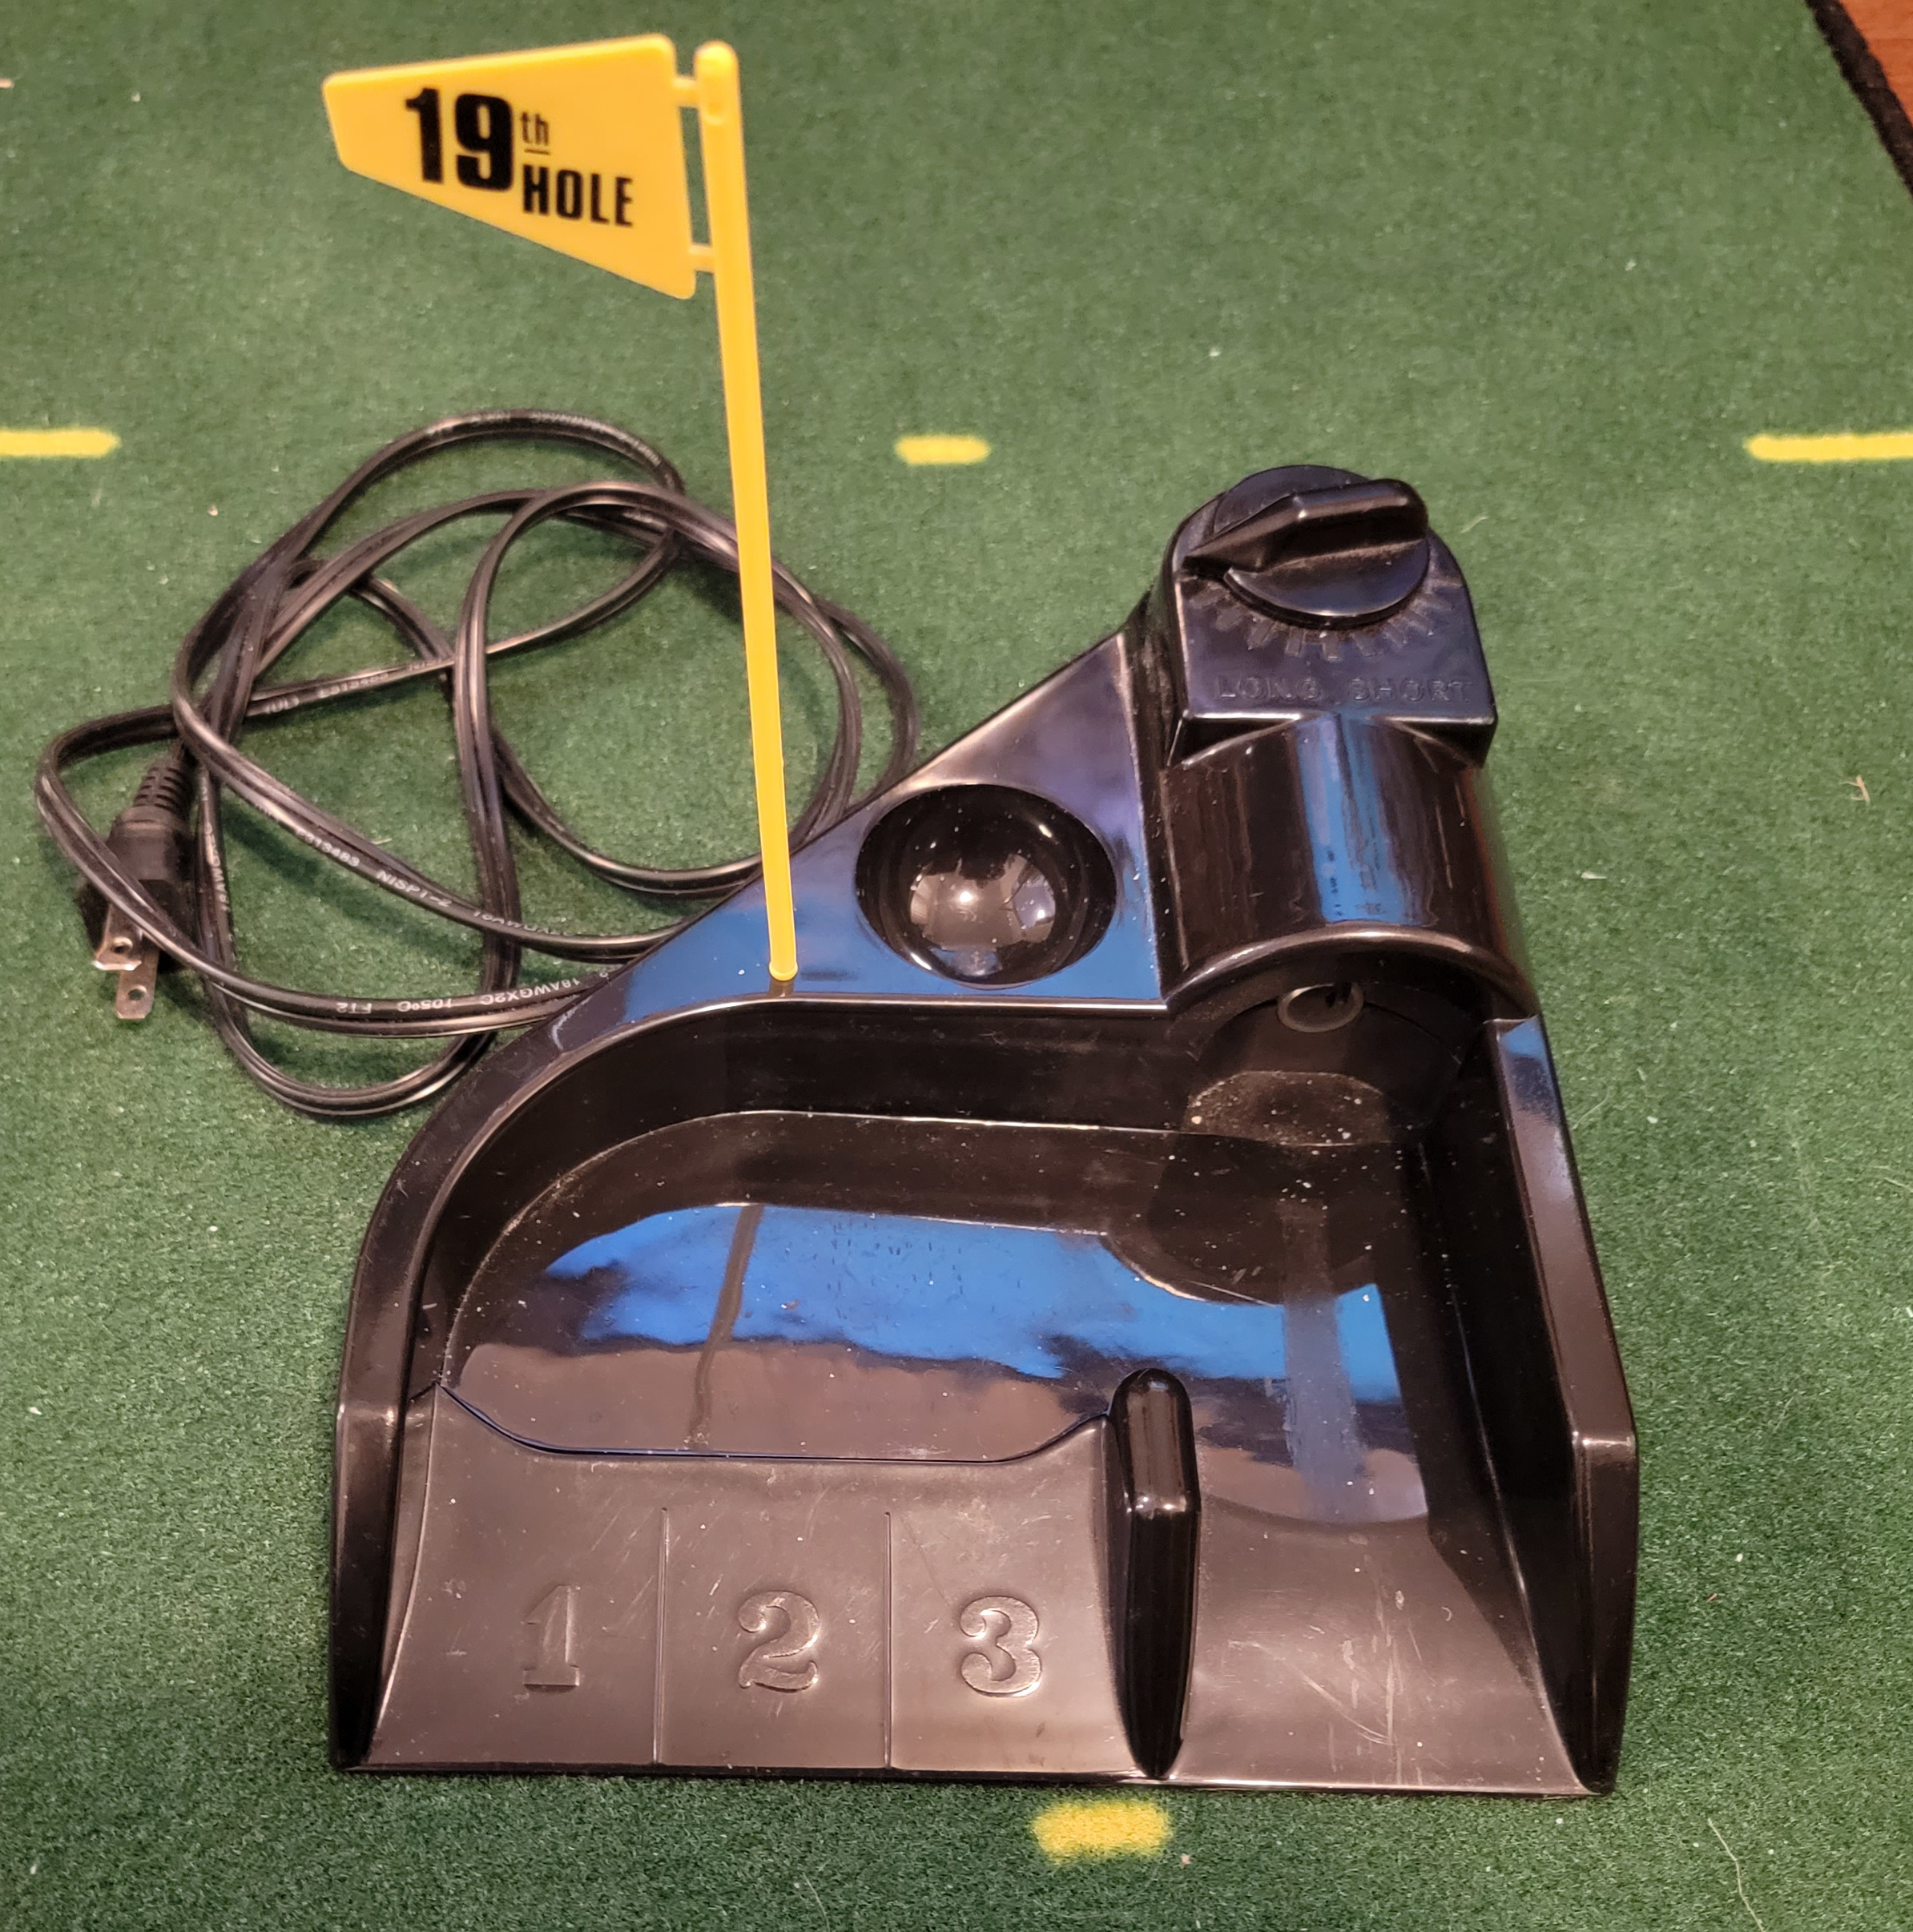
For years, I used an electric ball return on the living room carpet for indoor putting practice.
Indoor Putting Drills: Aim
Electric Putting Cup / Return
These are good for practice indoors. I guess you could say it measures aim, start line, speed and whether or not you make the putt.
Indoor Putting Drills: Aim
Lined Golf Balls
Using lined golf balls is something I use year round. I do not use these for playing.
During a round, I use the markings already on the ball.
The purpose of these practice balls is to line the ball up with your start line. Then try to perfect an end over end roll. No wobble equals a square putter face at impact.
The balls with a T shape are meant to square your putter face to your intended start line. In addition, some have a dot on them to practice Quiet Eye or focusing on the golf ball as you initiate the putt.
and black, red and blue Sharpies
Indoor Putting Drills: Aim
Laser Aimer and Aim Boards
Using a laser aimer doesn’t require you to hit the ball. It’s simply a face angle at setup drill.
The one I purchased allows you to hit balls with it attached to your putter. I don’t find this particularly useful.
The Smart Golfer laser alignment system.
Note: Do not point a laser at yourself or anyone else. Follow the manufacturers directions. Do not shine them on reflective surfaces.
I don’t like putting two sided tape on my putter
Rubber bands seem to work fine
To set this indoor practice drill up you need something to aim the laser at. The one I have came with an aiming card that stands up by itself. The card has a target at the proper level to aim at.
How far away you stand from the “cup” is up to you. I usually practice aiming from 5 feet, 10 feet and 15 feet. You may be surprised where you are aiming at the beginning.
Aim Boards
I purchased Wright Putting Dynamics aim boards (3) and one Visio aim board.
Set up the Wright Putting Dynamics aim boards in a semicircle so you don’t aim in the same place all the time.
Wright Putting Dynamics target backboard
These are two sided giving you a stable base
I leave the Visio aim board set up all the time, I have a back up putter dedicated to laser aiming. For this one, I just grab my putter when I walk by and aim at the aim board about 5 or 10 times periodically.
This aim board shows you the golf hole and maximum allowable “degree of face variance” for that length putt. The farther away you get, the more precise you need to be.
Example of the drill value: If you are not aiming inside the hole for straight putts of a given distance, your chances of making the putt are not good.
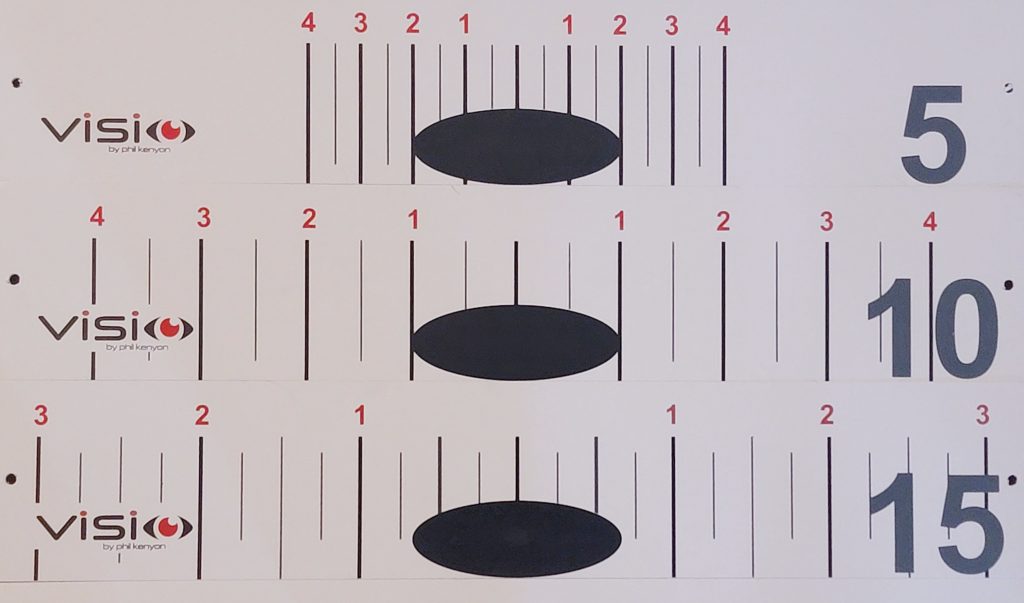
The aim board folds into a stable triangle
Indoor Putting Drills: Aim
Laser Line – Skil, Black and Decker, Wright Putting Dynamics
My preferred color of laser is green because they work inside and outside. Red is just not easy to see. Even indoors. I would recommend the green line laser from Wright Putting Dynamics.
Note: Do not point a laser at yourself or anyone else. Follow the manufacturers directions. Do not shine them on reflective surfaces.
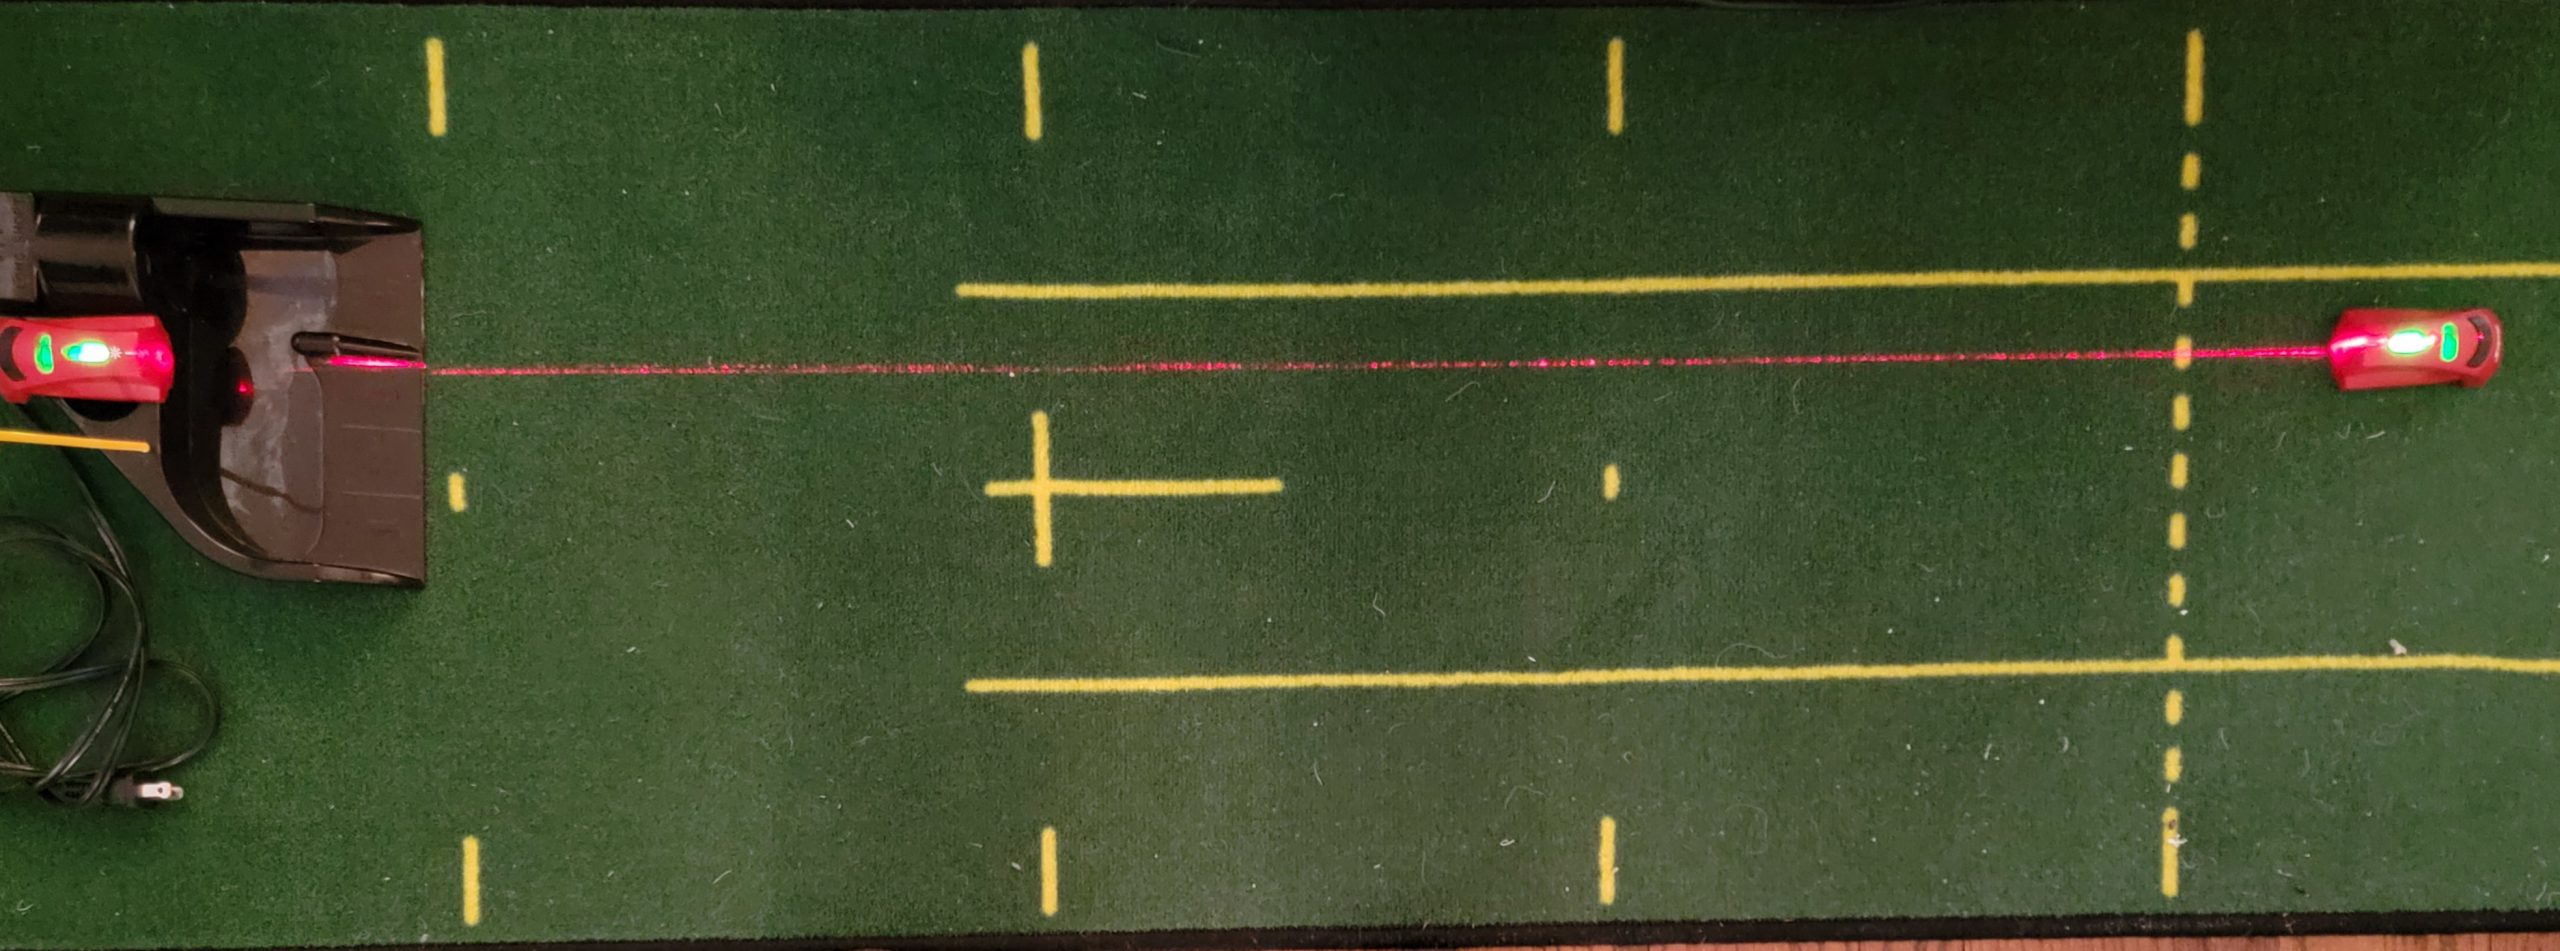
The idea here is using two red lasers pointed at each other. They shine on the front and back of your putter.
The green one shines right over the top of your putter from behind toward your aim point or it can be set up at your aim point shining back at the ball.
Use the red or green laser to line up your putter.
I have a white line on the back of my putter. I make sure the laser shines right over that white line.
The indoor practice drill is making putts like you were lining up with an elevated aim line.
3 Options
The image below is of all 3 options I tried. The difference is obvious. The photo was taken with the overhead light on and a table lamp on.
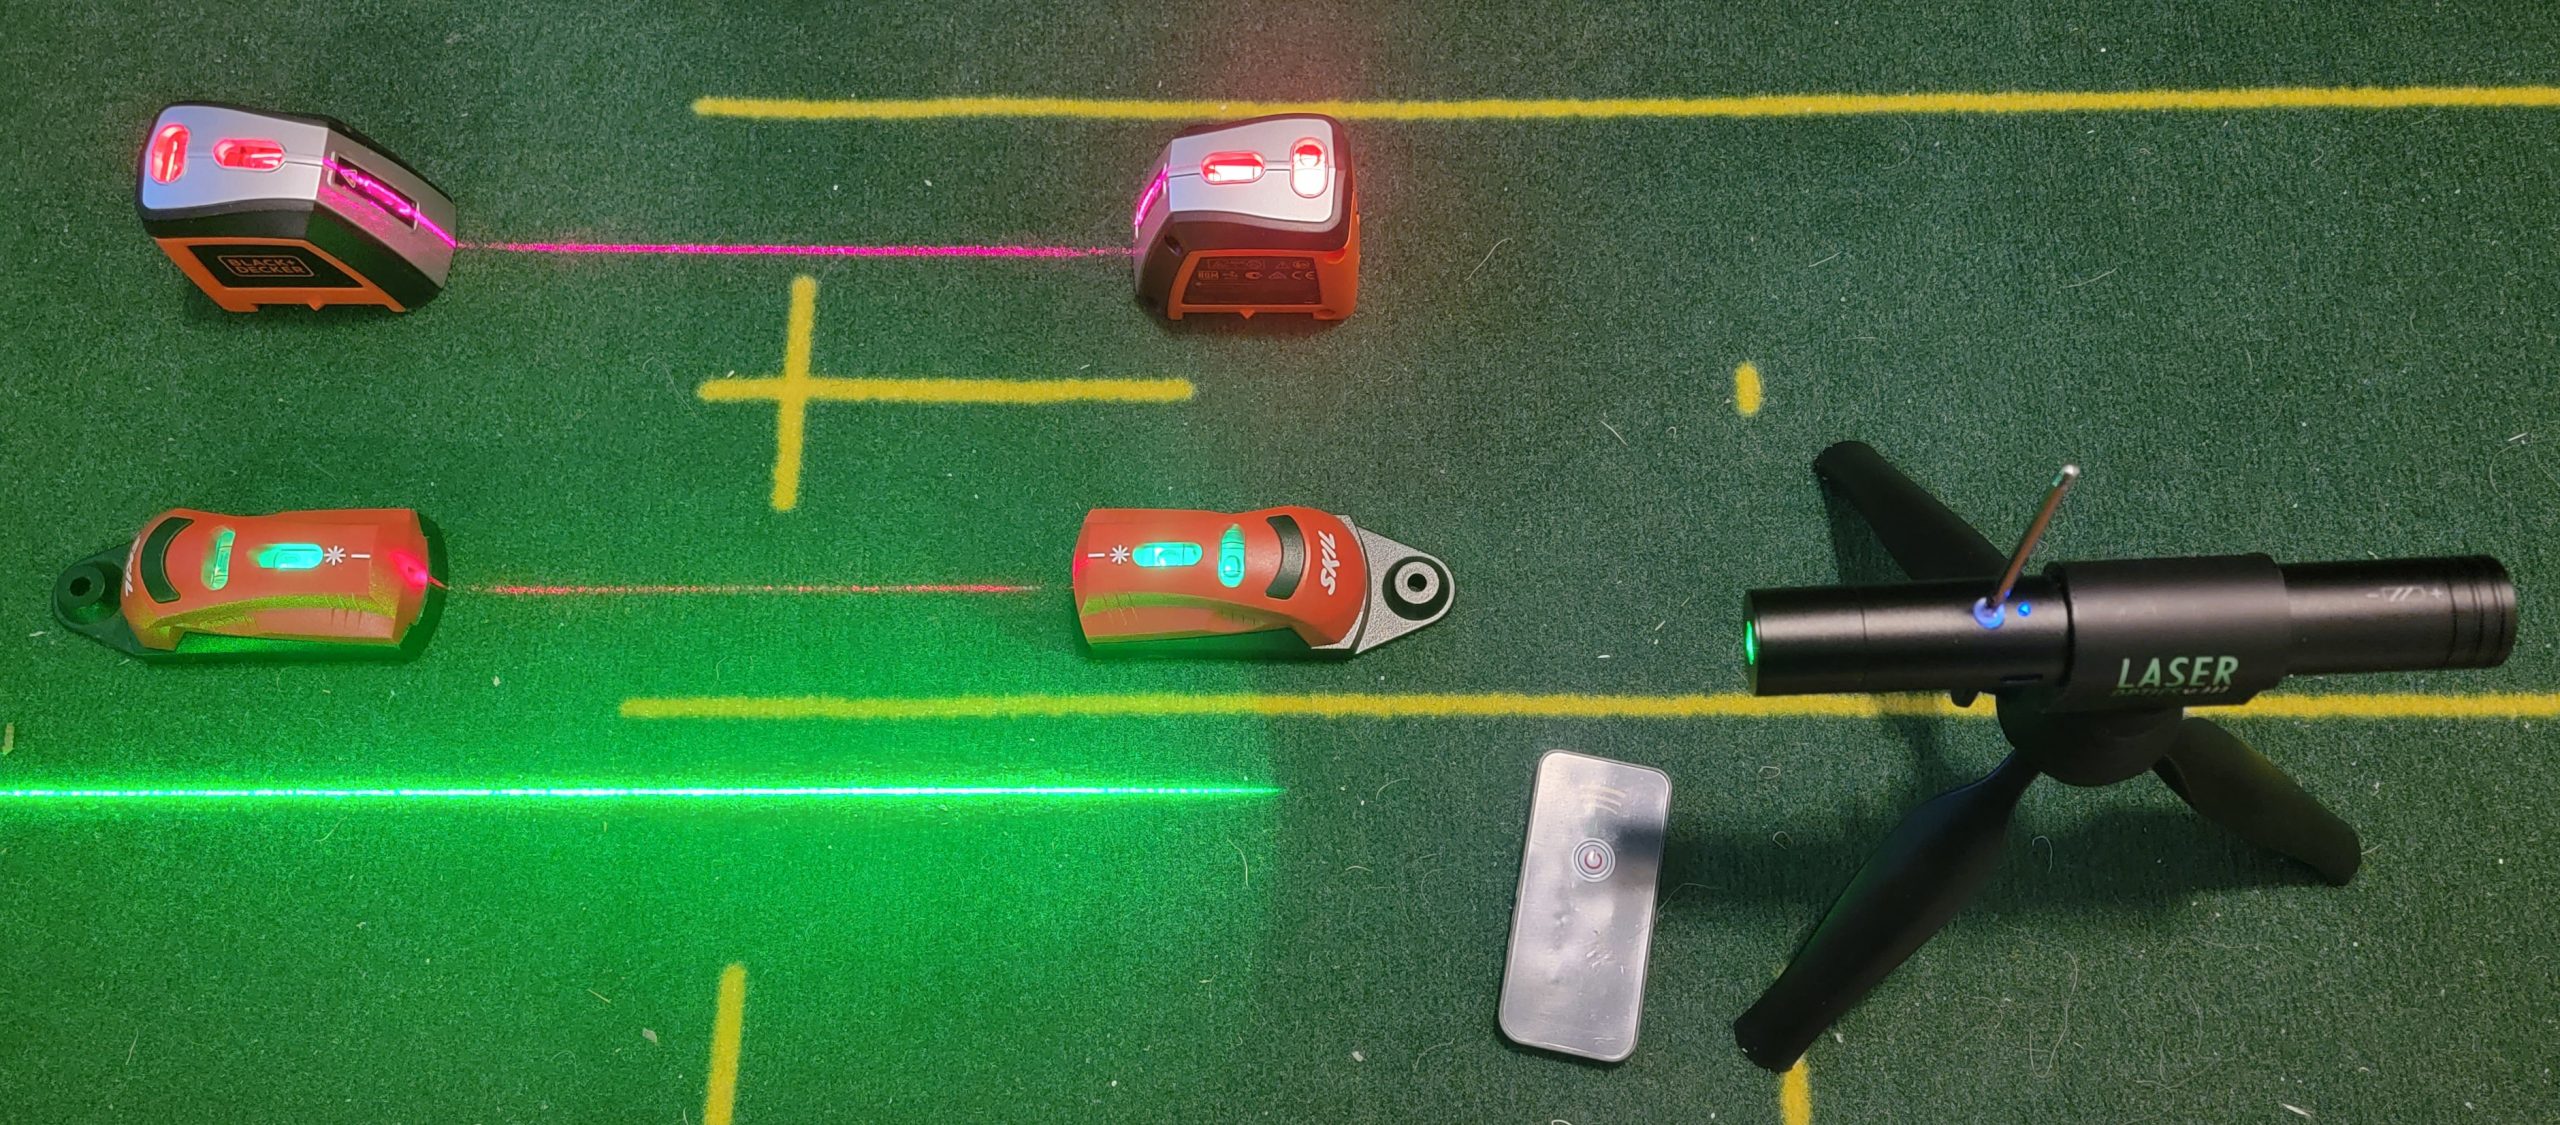
The first two I bought were Skil Laser Levels at the local hardware store. I putted on the rug into my ball return and used my tennis shoes for a putting gate.
The idea is to aim them at each other to create a brighter aim line on the floor.
Each laser required 3 batteries that did not last long, but it worked.
My second attempt was using two Black and Decker Laser Levels from the local hardware store.
These are a little brighter and have two AA batteries in each.
They work, but using red lasers in low light is not great.
Laser Optics v.III Training Model
Finally, I bought a Wright Putting Dynamics Laser Optics V3. It’s a very bright green laser and works inside and outside.
It comes with a nice carry bag, a remote control, tripod, USB charging cable and a rechargeable battery. The battery lasts a long time.
I usually just leave it on the whole time while I’m setting up and putting.
You can turn it on or off with the remote to remove the line. The idea there is to give yourself the line and then turn the laser off for the putt.
To completely shut the laser down, there is a main power push button the back of the laser.
Note: I still carry a Pelz Elevated Aim Line for outside practice on bright sunny days. The Laser Optics V3 works best outside on shorter putts in bright sunlight, on overcast days, later in the day or in the shade.
Indoor Putting Drills: Aim
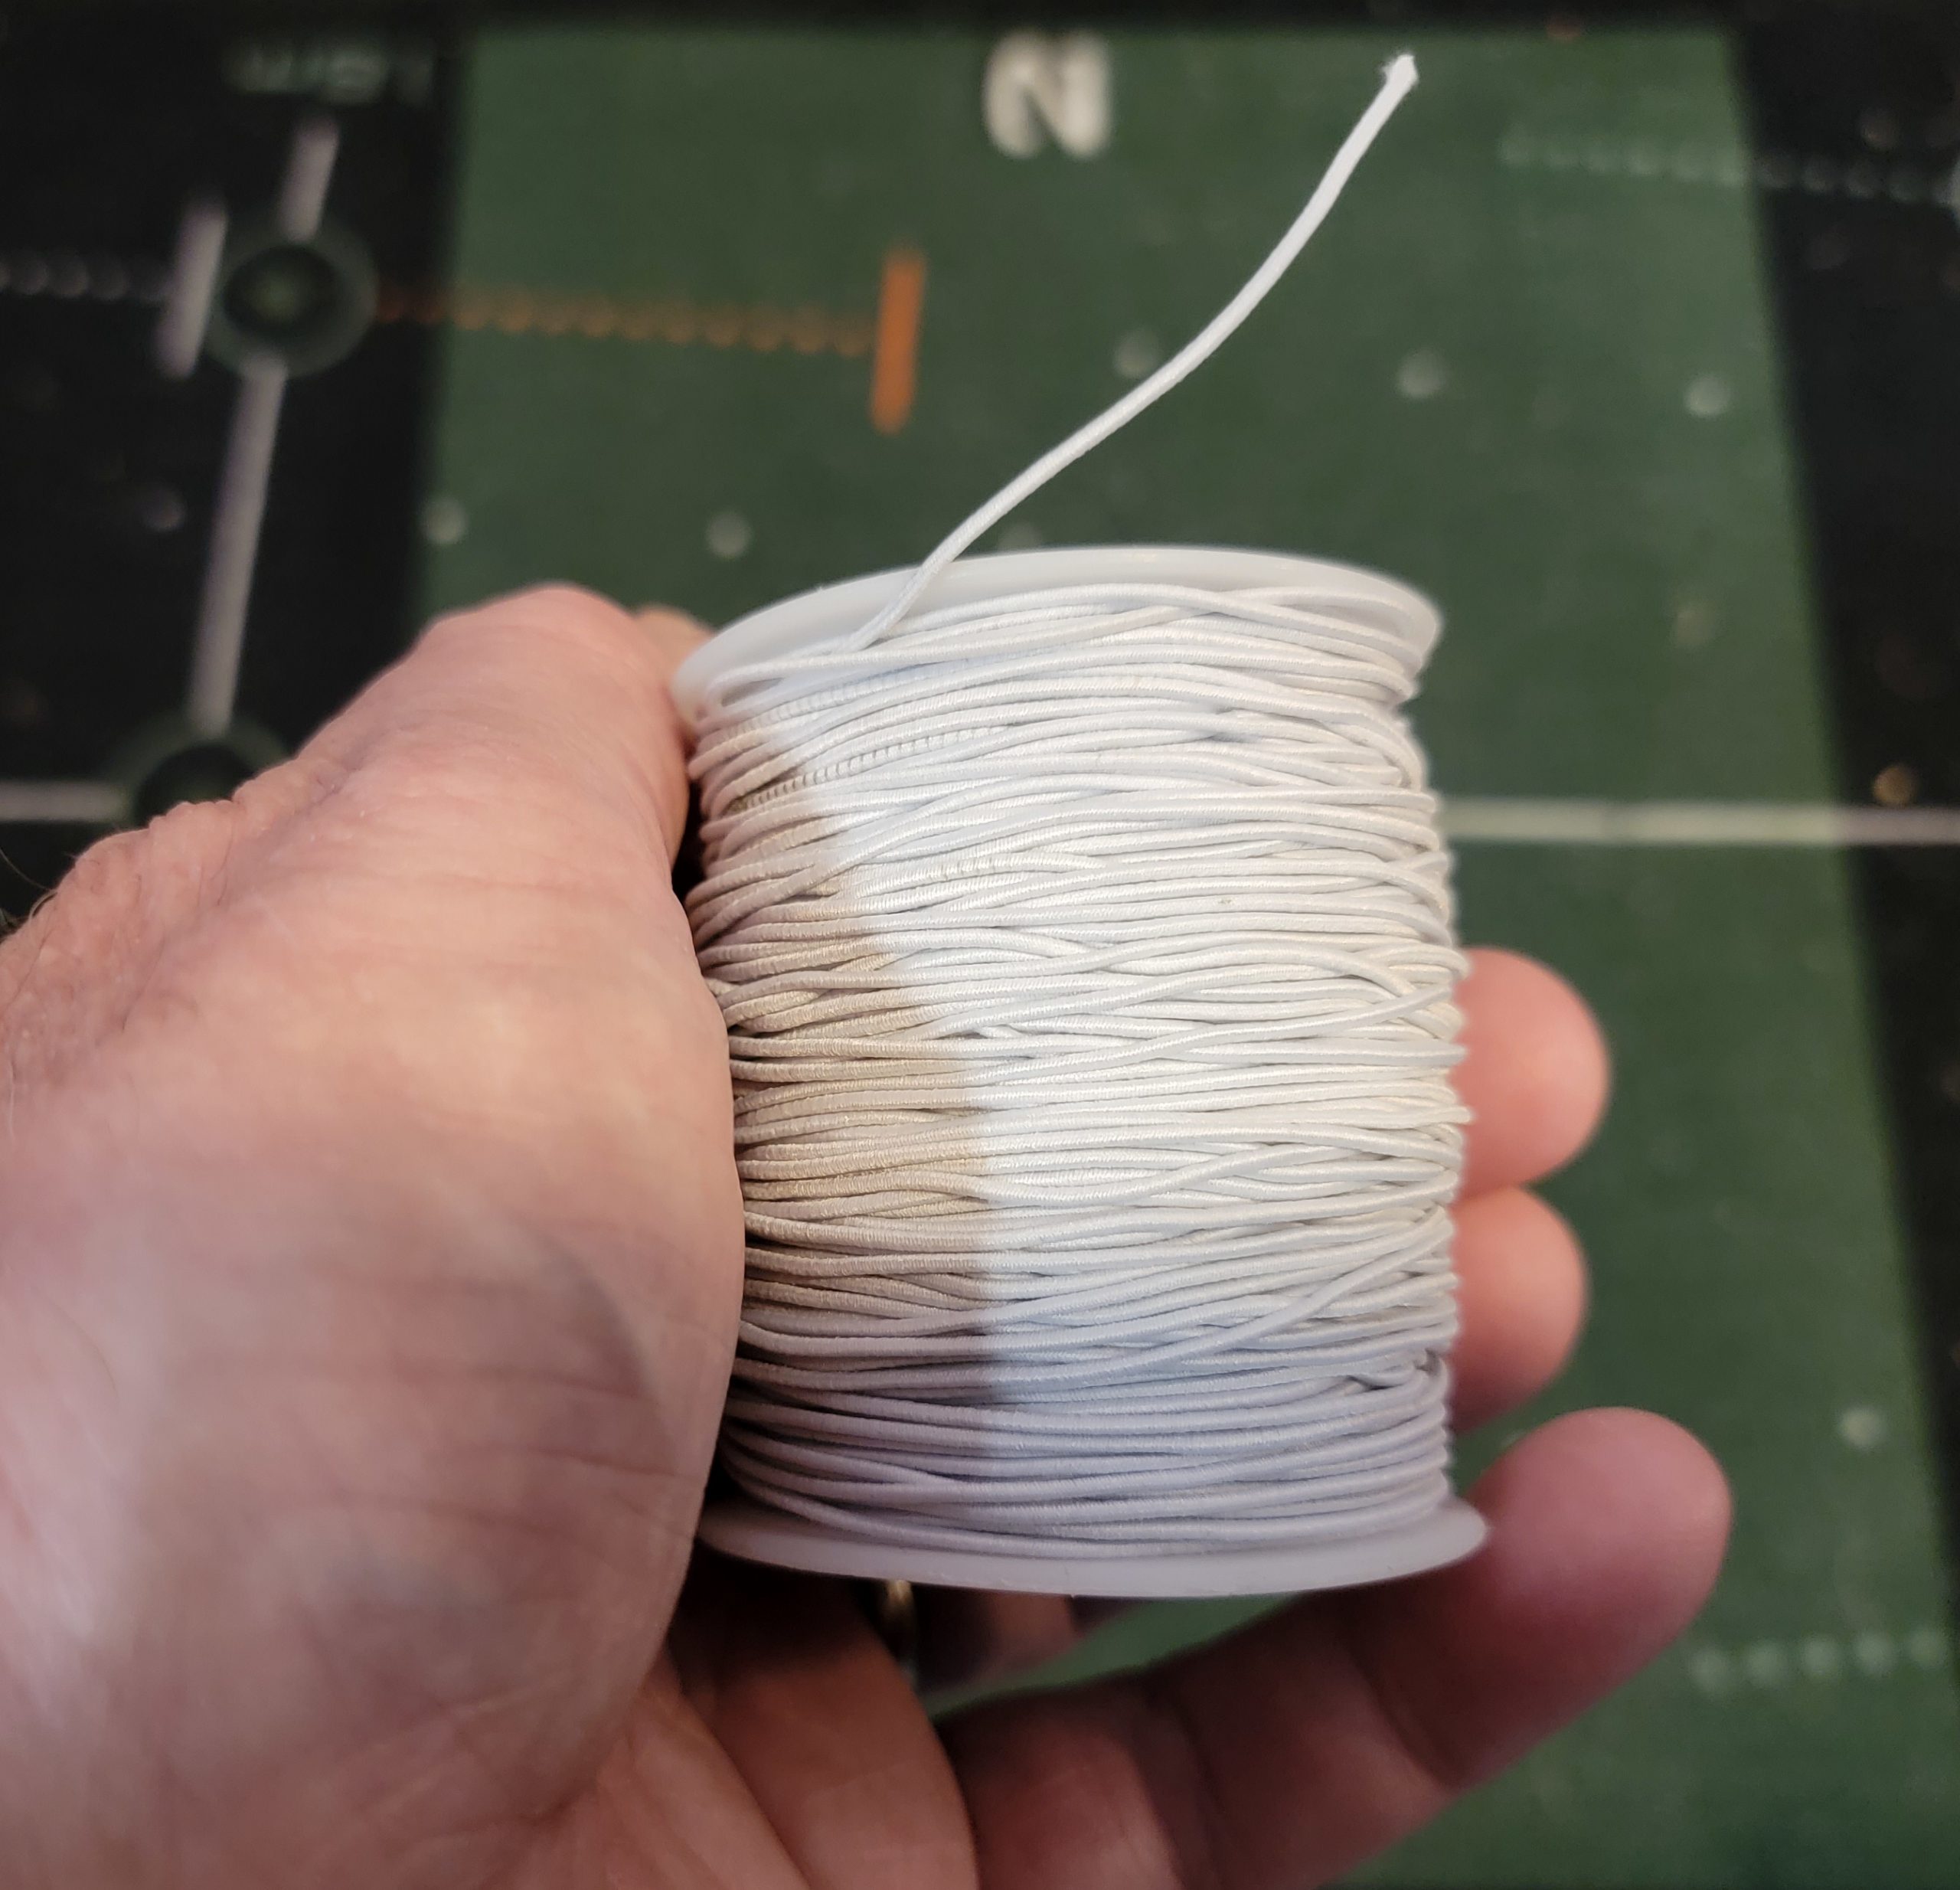
Elastic Line
The idea with this indoor practice drill is to putt underneath the string line to give yourself the line to the hole.
When I was younger, I always tried to make my putting training aids.
So for years I used two pieces of a coat hanger (approximately 6 inches each) and a string for an elevated aim line.
I really thought a newer version should be made from elastic line so I could stretch it. So, I bought a spool of elastic line.
with some of the products I have
Diameter is 1 mm or .039 inches
I cut up a coat hanger, attached the elastic line and took it to the course. It’s a little too thin for outside use.
Why? It isn’t great in the wind.
However, I can attach it to my PuttOUT ramp which has a hole in it just for that reason and a PuttOUT putting gate to achieve an aim line using my putting mat.
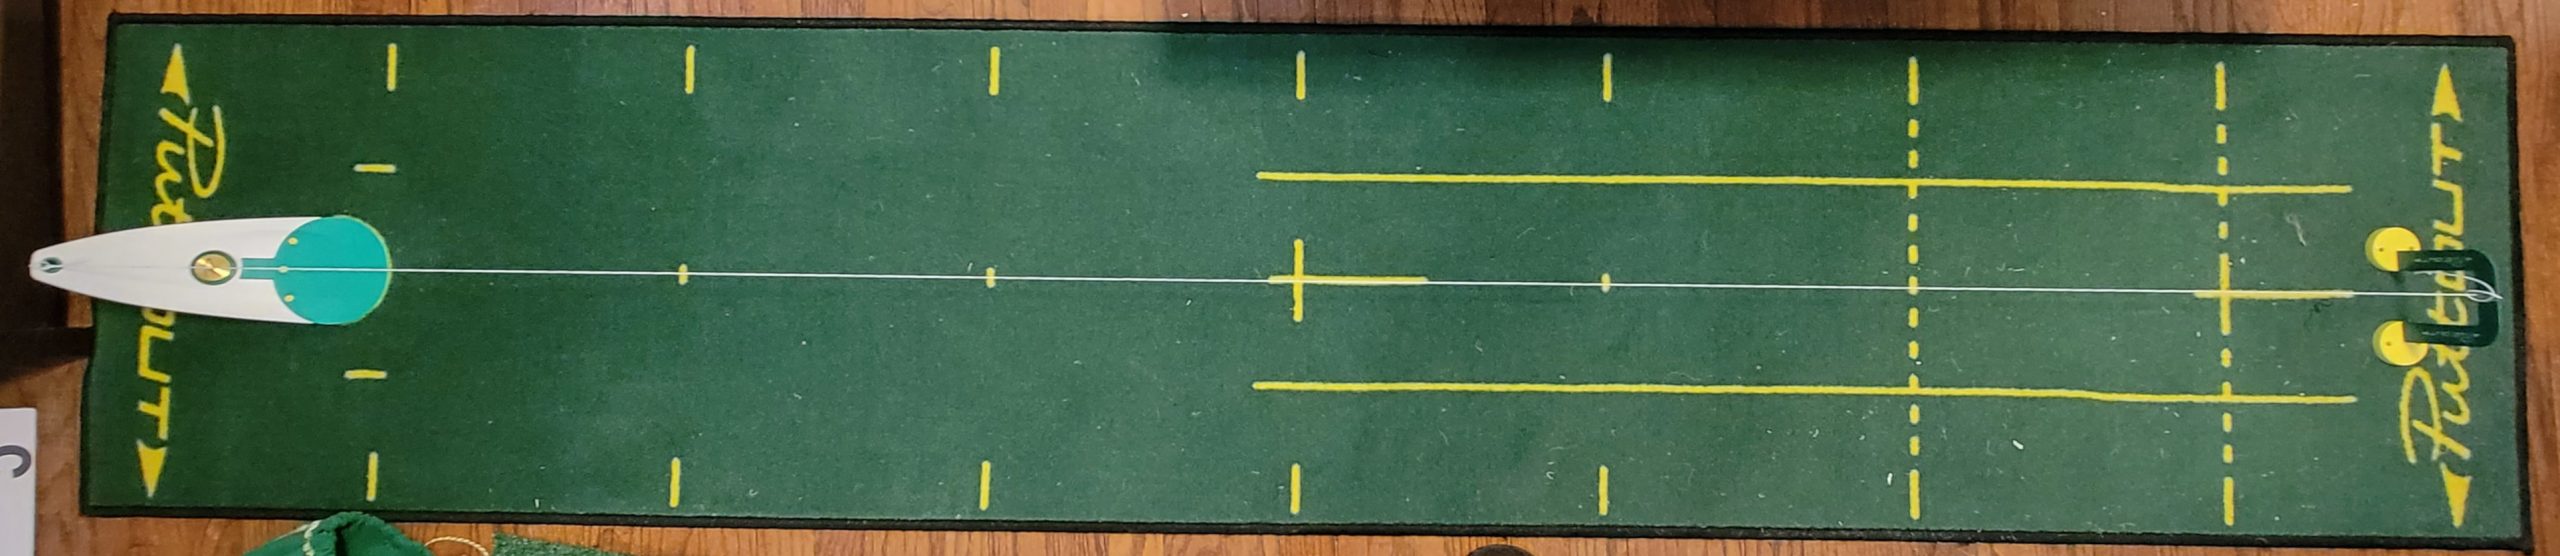
PuttOUT ramp and putting gate
The elastic holds loosely when tied up. That just means it’s easy to undo. I tie it like a shoelace.
I don’t like using the green laser over the top of my putting mirror on the PuttOUT academy setup.
You could also use cans or jars to accomplish the same thing and stretch it out as far as needed.\
Indoor Putting Drills: Aim
I also have a Dave Pelz Elevated Aim Line. I use it outside. It’s just handy.
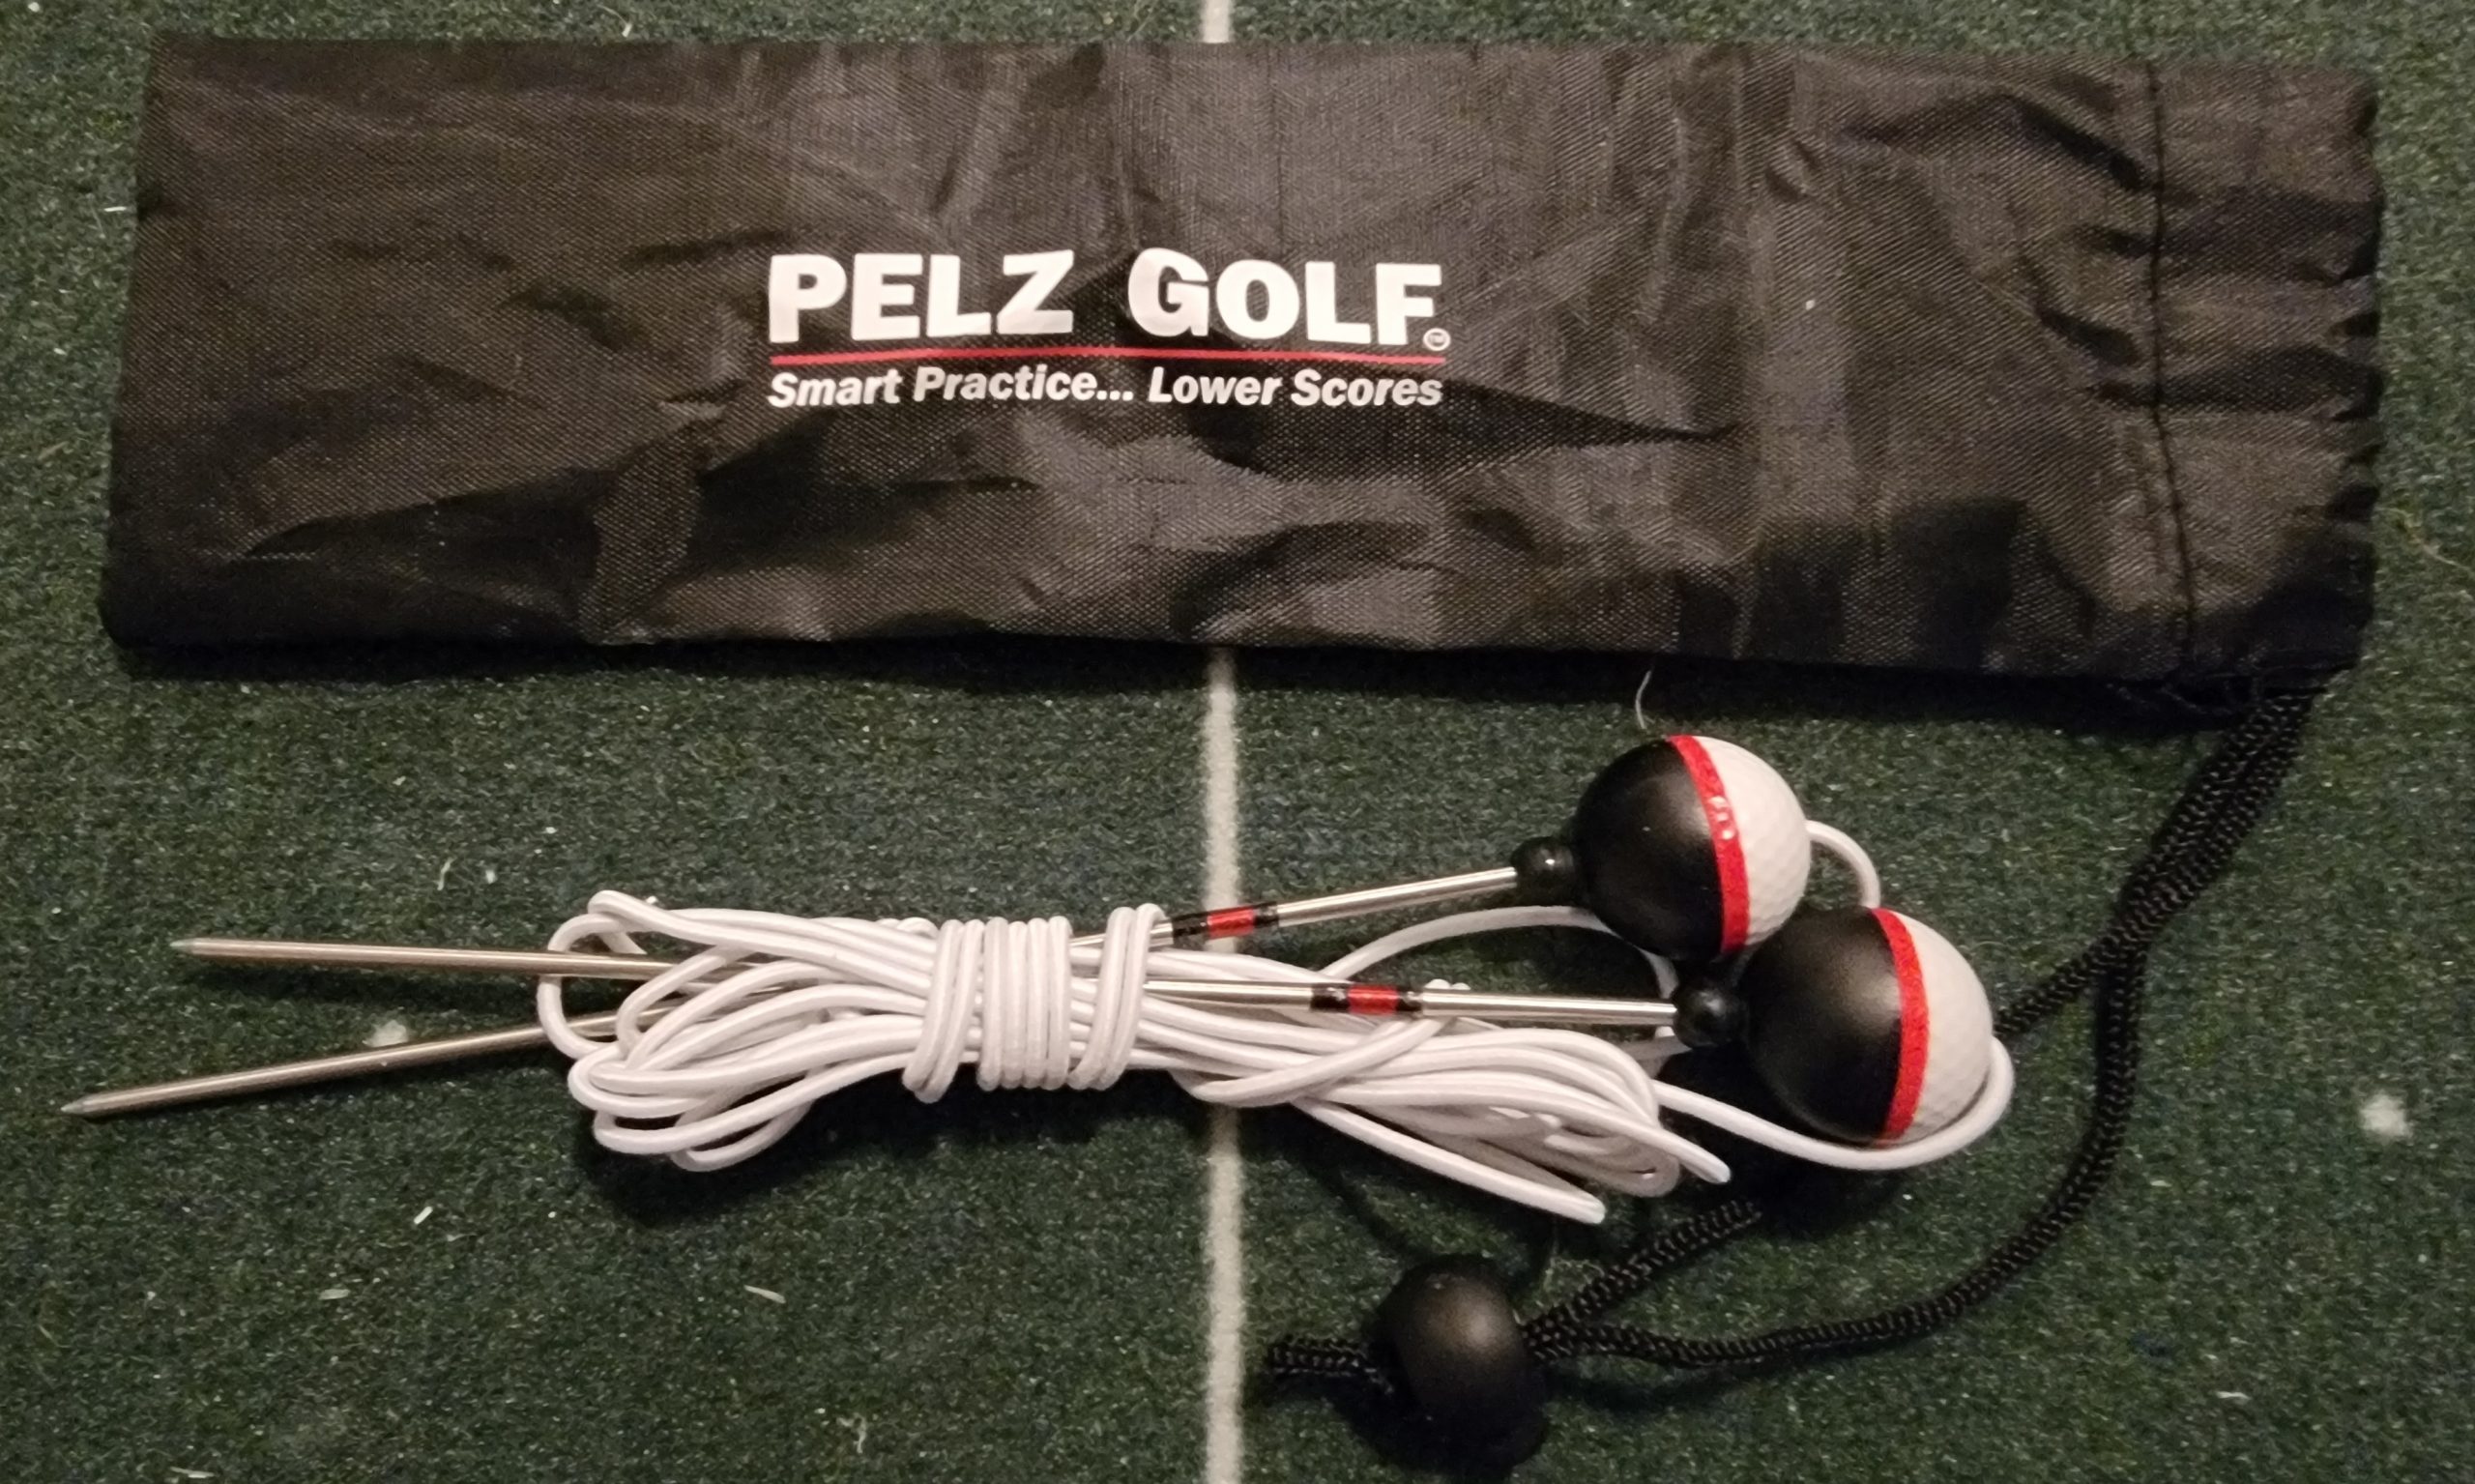
Truthfully, I don’t use it inside yet. However you could just set the stakes in a jar or glass. Another option would be to drill holes in a couple pieces of 2×4 to set the spikes in.
Indoor Putting Drills: Aim
The PuttOUT Tournament Inspired Studio is one of my favorite putting aids because it offers so much all in one package.
This setup offers multiple indoor practice drills separately or all at the same time.
Putts can be made from 1 foot to 6 feet. I putt down the middle only.
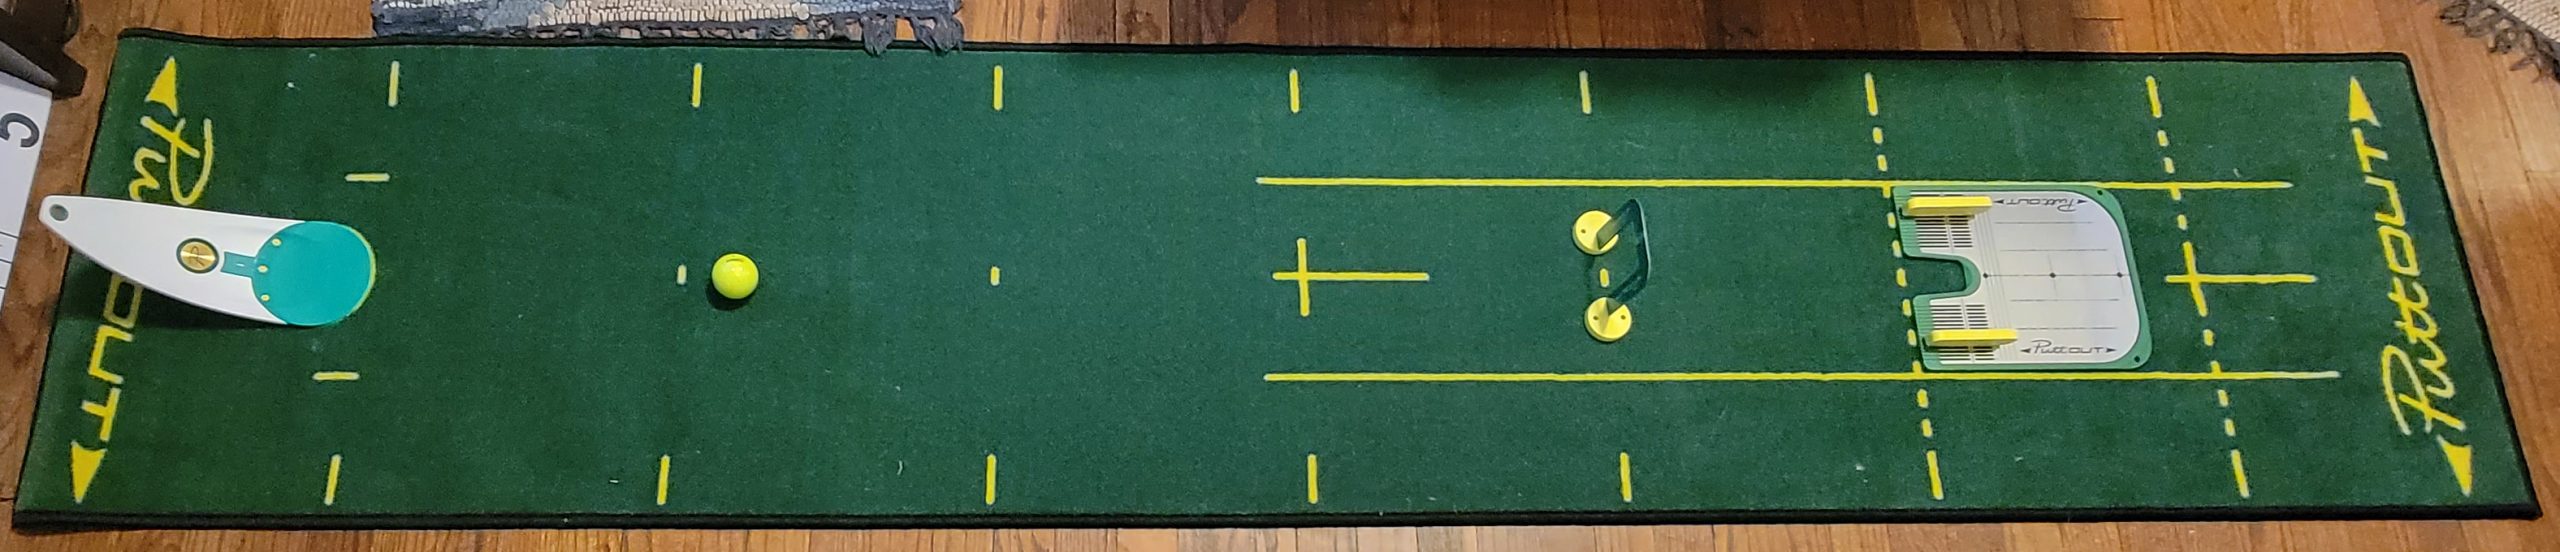
There are lines on the mat to help you line up the ramp, ball gate and mirror. The mirror and ball gate need to be pretty square and in line to start.
Putter Path – The putter gate is adjustable. They are magnetic and stick to the mirror. They fit in shallow grooves as well.
The idea is to make the putter path more difficult over time. If you hit them with your putter, they move.
Face at Setup – There are 4 perpendicular lines on the mirror right behind the ball to help you square your putter face.
Eyeline – You can see your eyes in the mirror when you are over a putt. You can move as necessary and gauge where you eyes need to be.
Start Line – the ball has to be on the correct start line or it won’t go thru the ball gate.
To be honest, not hitting the putter gate and ball gate are my first priorities.
Once you get you get dialed in you can focus on speed. The mirror does have backswing distance indicators on it.
The ramp has a hole in it that you can use or not use (it adjusts closed or open). If you get the ball to stay in the hole, that indicates perfect speed.
They call the ramp a Pressure Putt Trainer.
Notes
The original putting gate is tough. It takes a lot of practice to not hit the putting gate. Why? The small size that comes with the academy studio is 50 mm wide or 1.969 inches.
The diameter of a golf ball is 1.680 inches. My point is it’s a tight fit. The idea here is to keep your putter face square at impact within one half a degree.
At first I was hitting the putting gate every time. Why? I had it too far away from the ball at setup. I emailed customer service and they said move it to no farther than 17 inches away from the ball.
Here are some numbers explaining this. Using the 50 mm gate: 8 inches away allows for 1 degree of putter face variance at impact, 11 inches away allows for .75 degrees of putter face variance at impact and 17 inches away allows for .5 degrees of variance at impact or less.
You need to be a good putter to repeat within a half a degree.
So, I would suggest buying the PuttOUT gate package. It includes a Small, Medium and Large gates or 50 mm, 60 mm and 70 mm.
Start out with more room and try to work your way down to the small gate.
The thing is that it gets frustrating hitting the gate all the time. They move and you need to realign them in the middle of the start line again.
Once you are an ace at the larger size, try a smaller gate.
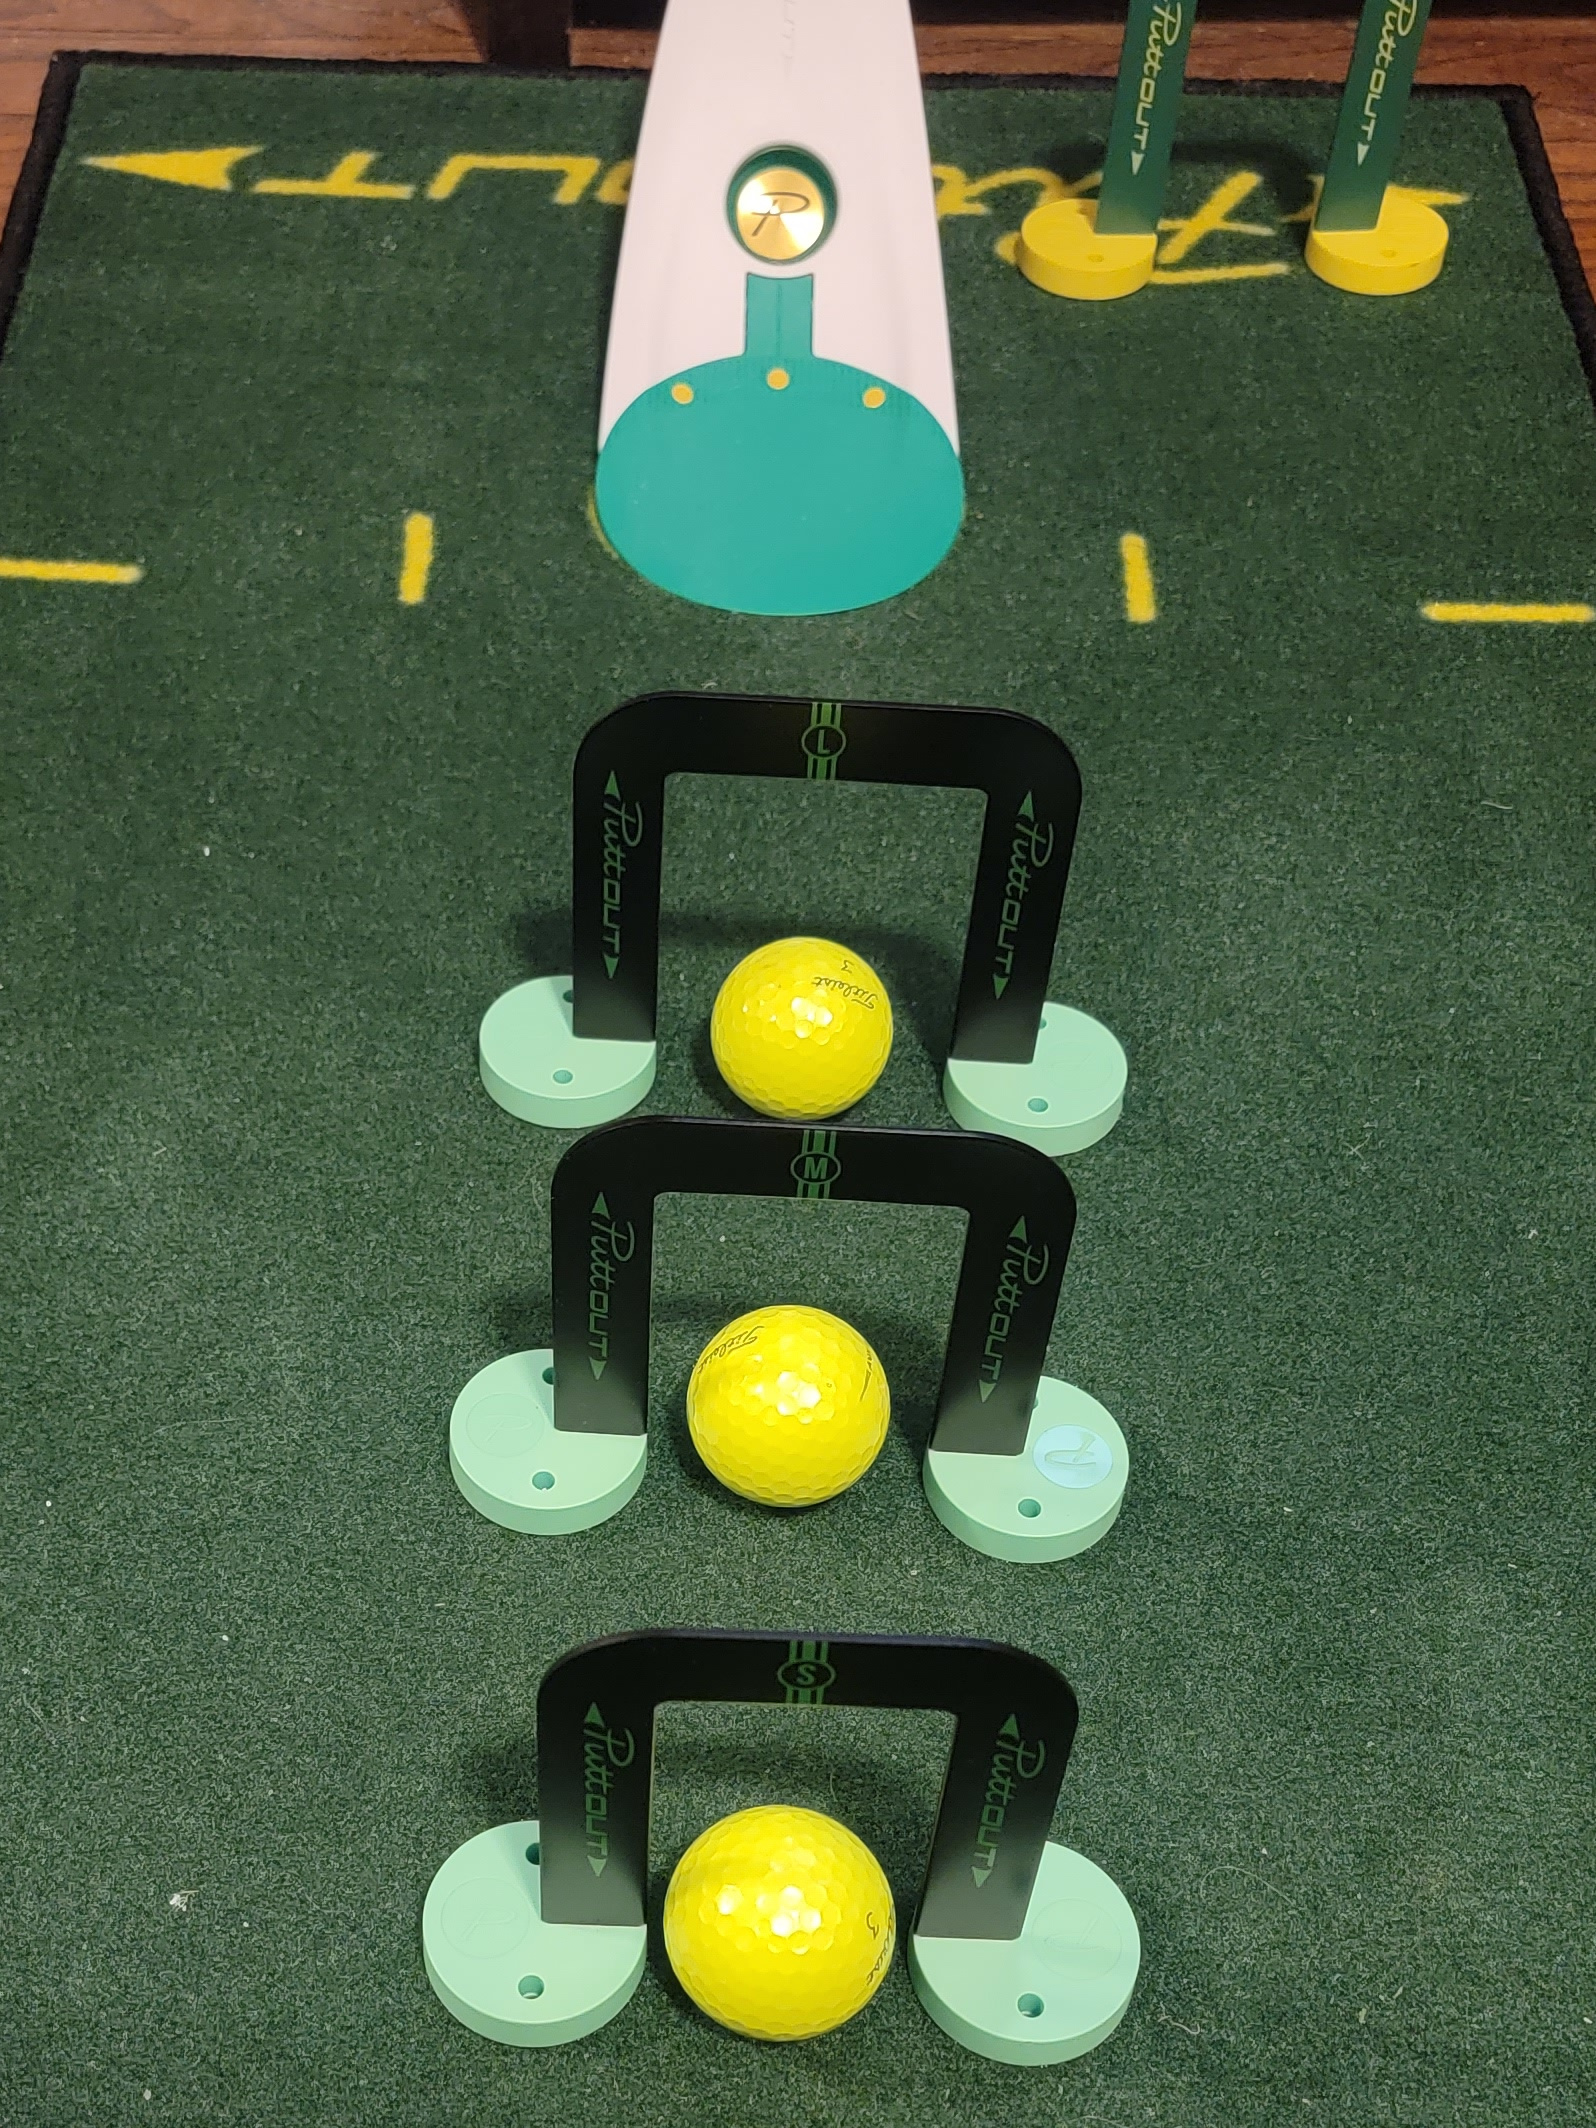
50 mm, 60 mm and 70 mm or
1.96 inches, 2.36 inches and 2.75 inches
Indoor Putting Drills: Aim
The Wellputt Mat is something I use almost every day. This mat offers several indoor practice drills.
They offer a free download of the Wellputt course and Wellputt Games for optional training.

10 ft putts max
I regularly take putts from 10 feet. However, it has putting stations at 3 feet, 4.5 feet, 6 feet and 10 feet.
There are start lines at each station.
The 3, 6 and 10 foot stations have backstroke and forward stroke indicators. In addition, they have lines to square up your putter face at setup.
There are stations down the middle of the mat. You can use those to putt in either direction.
Plus, there are two stations on the far end to putt from the other direction.
Use the different colored sections for speed and distance drills.
There is a long start line right down the middle of the mat.
So for example, from 10 feet and putting down the middle you can clearly look down the start line and see if your eyes are in the right place. The 7 foot long start line makes it easy to see.
Wellputt Indoor Tees
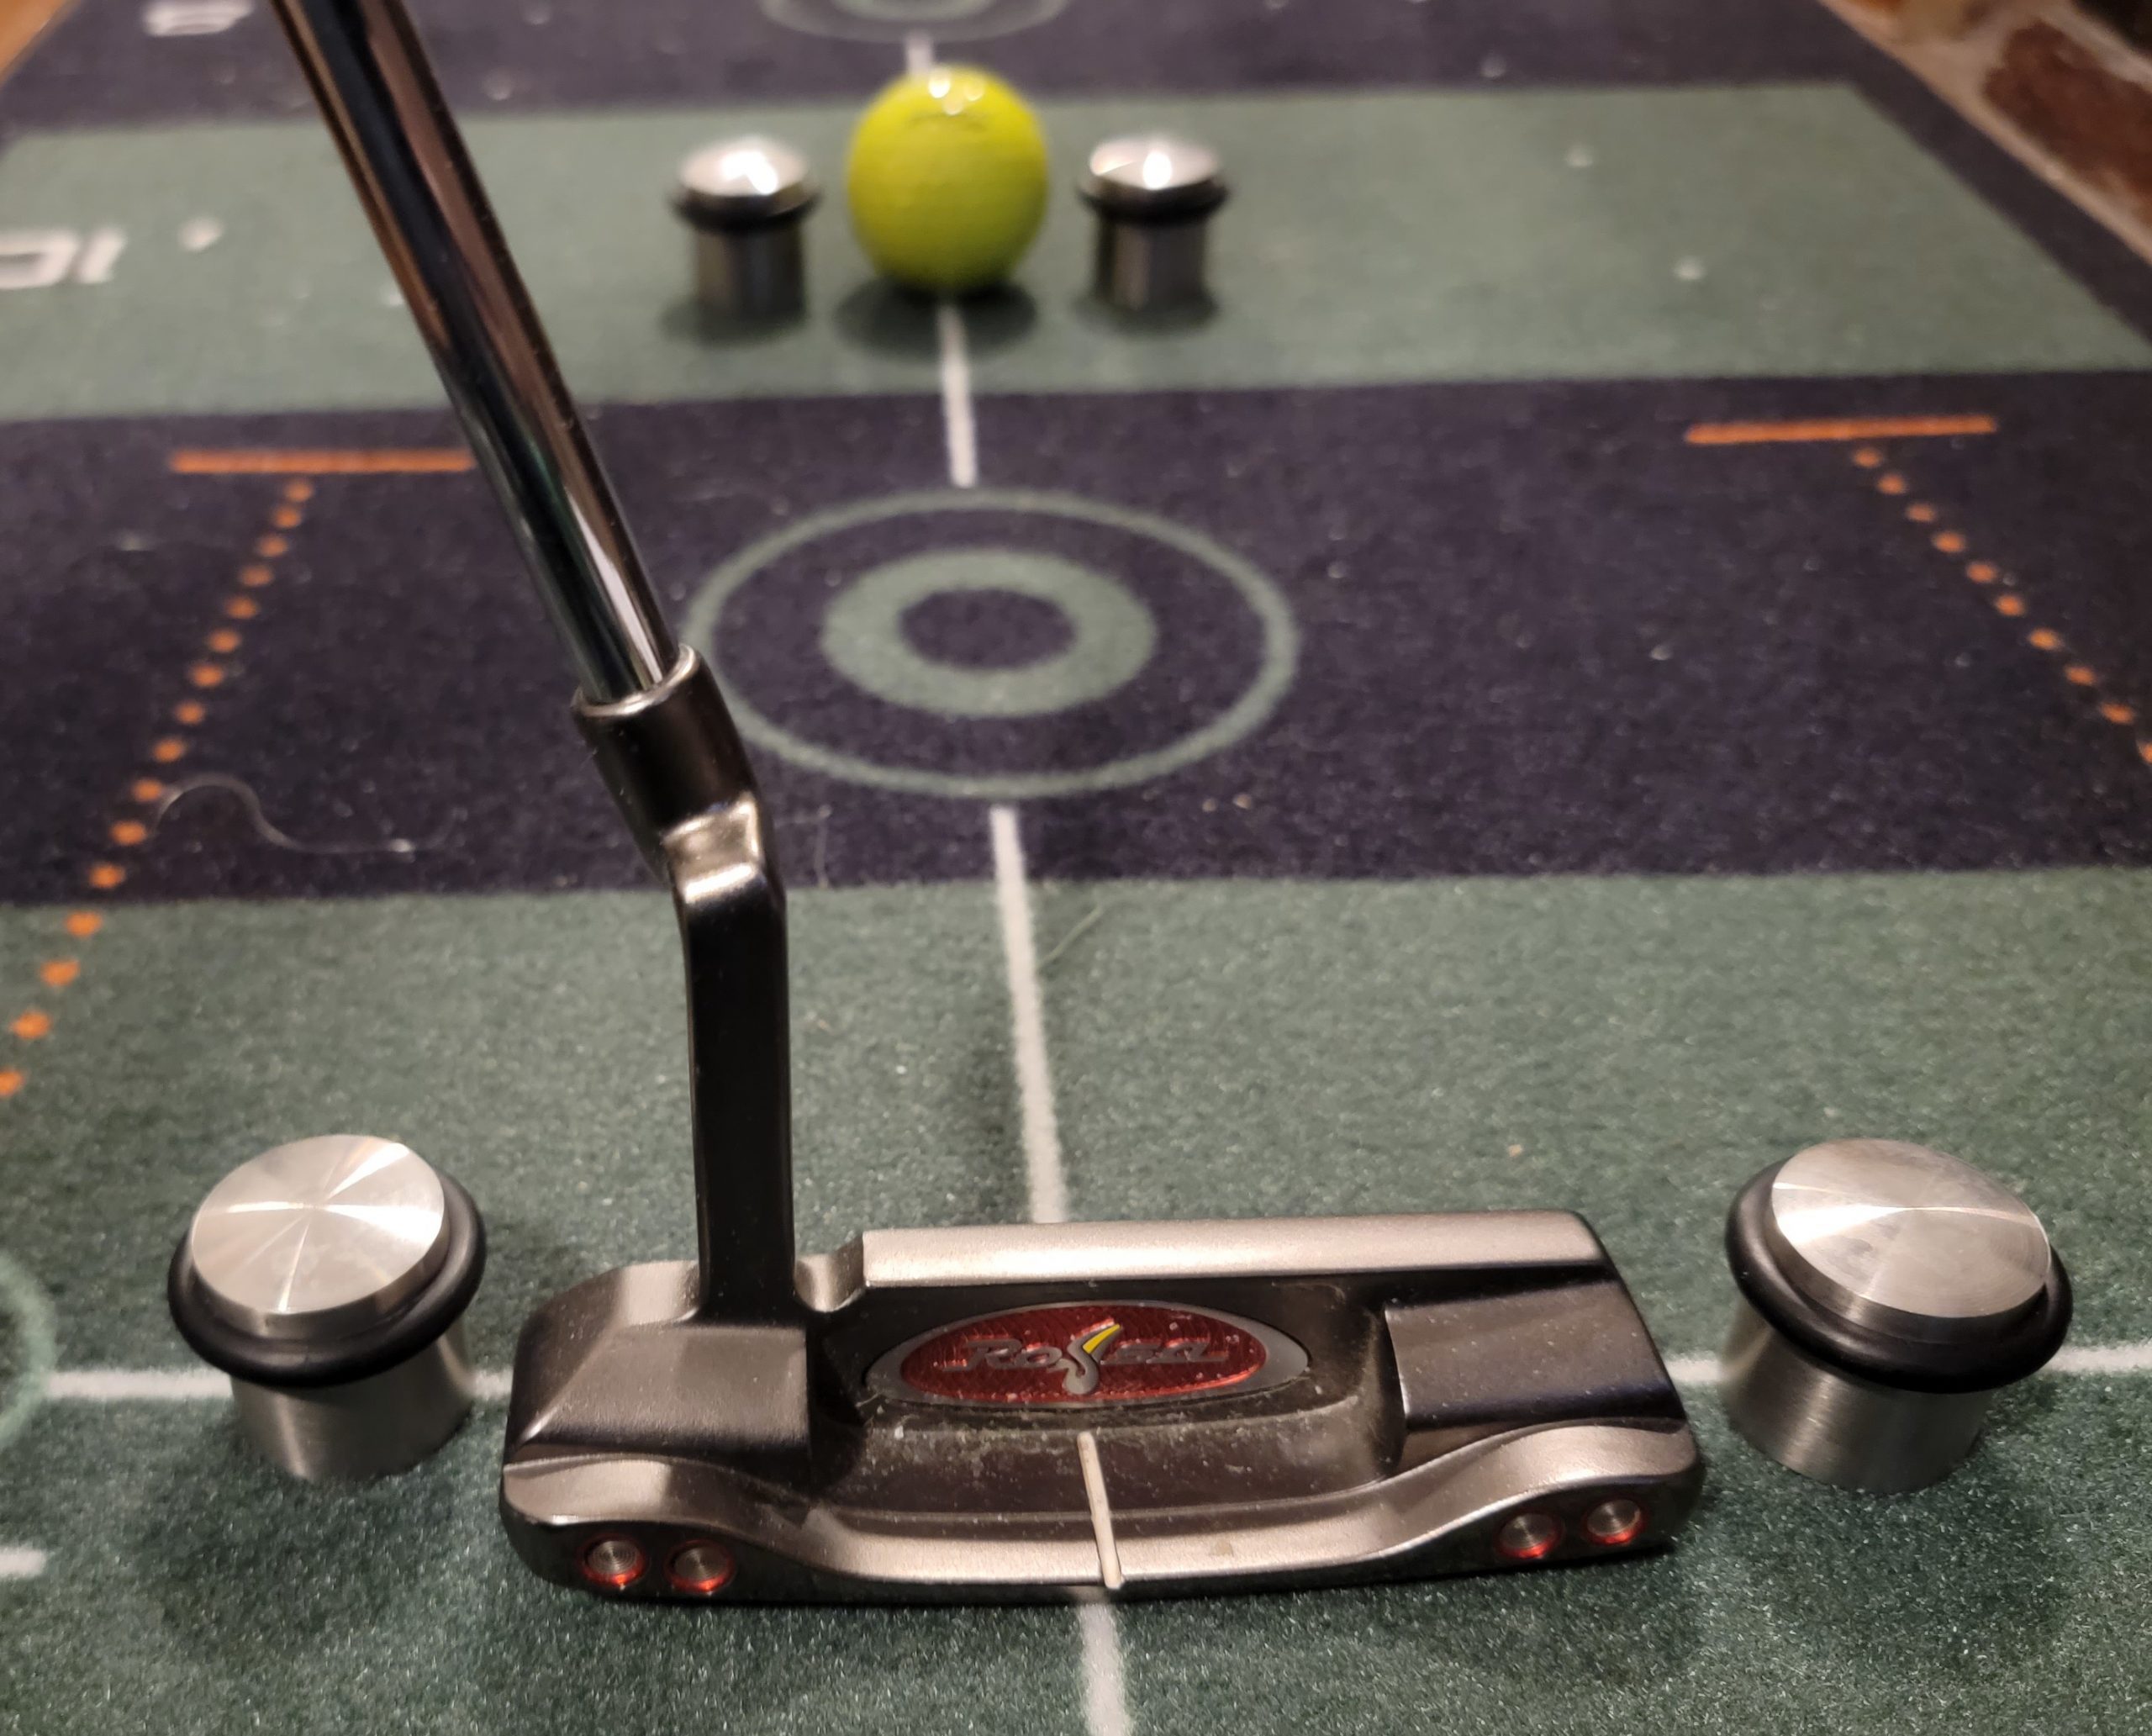
The PuttOUT gates work great with this mat also.
The Wellputt indoor tees are a stainless steel weights with a rubber O-ring at the top.
When you can’t push a tee in the ground, you can make a putter gate and / or ball gate with the four tee set.
The Wellstroke Mat
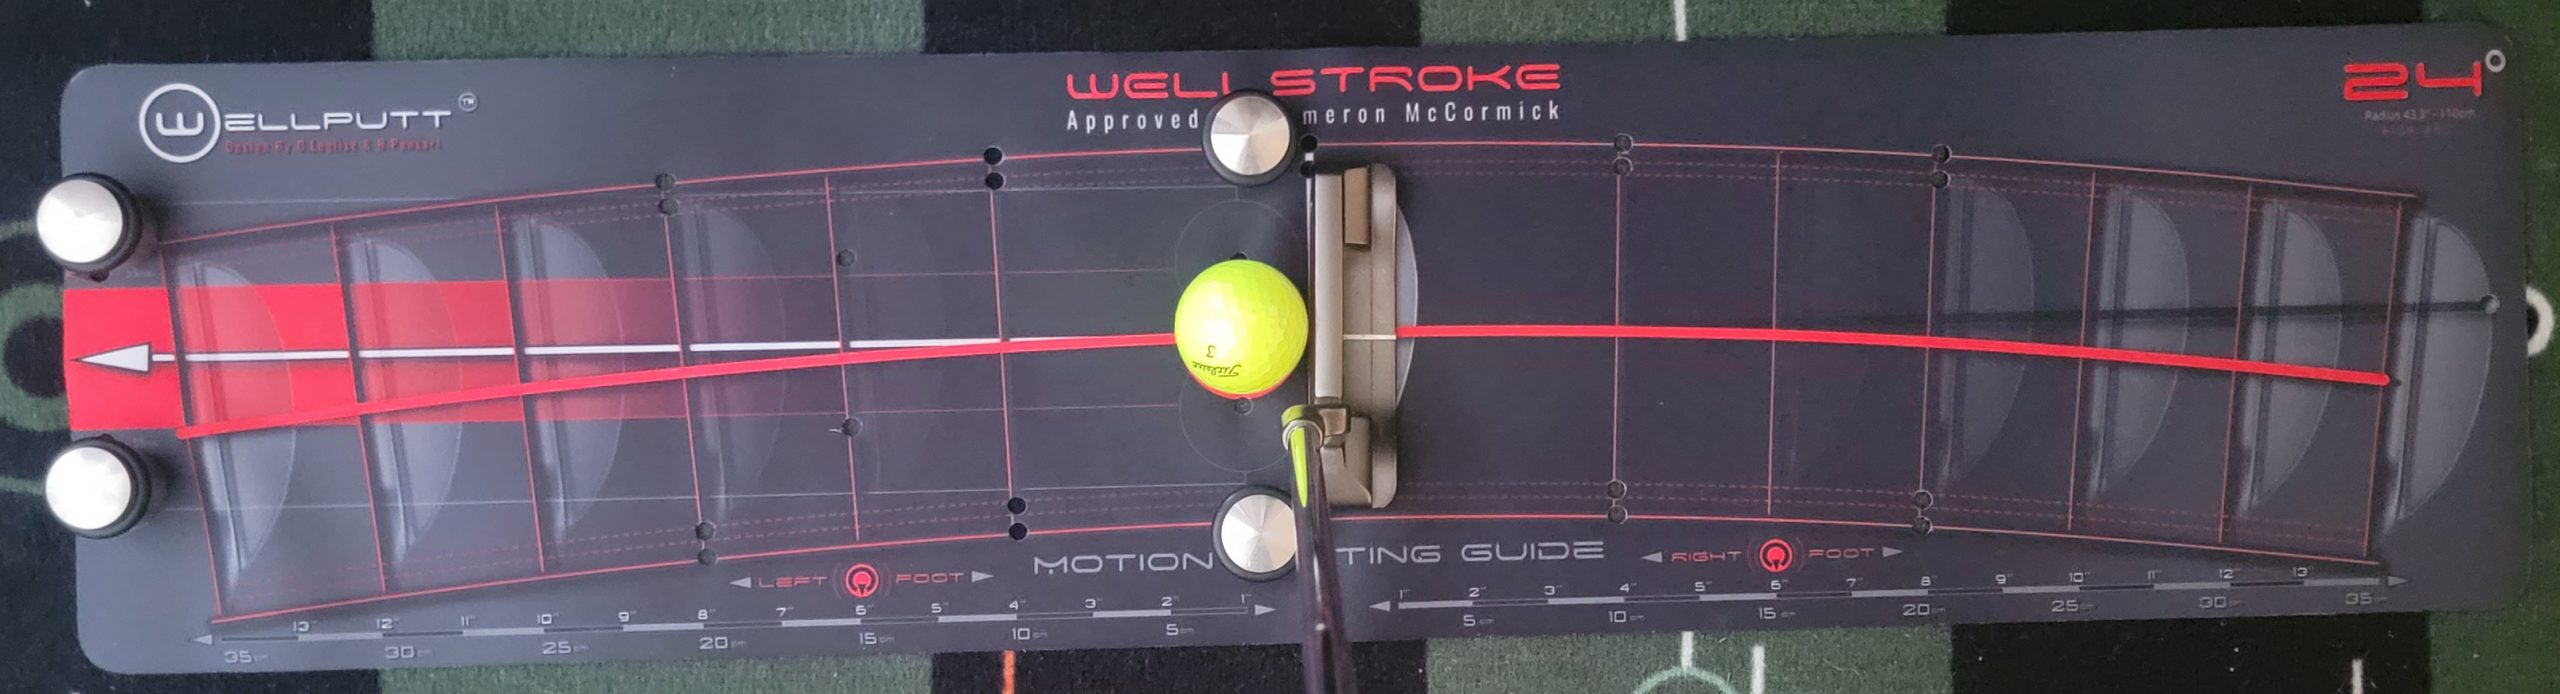
I put it on top of my 13ft Wellputt mat
The Wellstroke Mat by Wellputt is a path trainer. The curved line indicates the putter path.
It works great for face angle at setup, face angle at impact and aim line.
It has holes in it so you can use tees to make putter gates outdoors or you can use the Wellputt indoor tees to make gates.
There is an aim line down the middle of the forward stroke and additional holes to make 3 sizes of ball gates at the front.
I don’t use it for speed training, but there are backstroke and forward stroke guides on it.
Indoor Putting Drills Series
Aim ← You are here
Speed
Face Angle at Impact
Path
Green Reading