
With the current GPS devices, why would you get into mapping your course or greens?
Not every feature of your course shows up in GPS devices. Green maps can show distances, ridges, break direction and amount of slope.
Mapping can be done easily with blank yardage books and a pencil. The other option is to make a map for each hole and / or green using a computer.
Last winter I explored doing both. Let’s take a look at the ins and outs of making yardage books and green maps.
The change in the rules
Mapping was getting out of hand. People were using surveying equipment to make yardage books for the pros. In other words, mapping out every square yard on the green.
I found this out when I made 8 by 11.5 inch maps for each green at the course where I’m a member. I thought, “you know maybe you better look this up.”
To paraphrase the PGA, USGA and the R&A, “You guys are professional golfers. You need to read greens, not green maps.”
I wrote to them for clarification because I thought the rules say you can still put a lot of stuff on a green map.
They responded by saying, “You can put as much detail in as you want, but there are size limitations for your maps.”
What does that mean. Every 5 square yards has to be no larger than 3/8ths of an inch square. There is also a size limit on the document or booklet size.
This means that you have limited space, but can pretty much add details as long as you don’t break the rules.
Rules on mapping
(See PGA Rules) — (See USGA FAQ)
(USGA Info including template)
Summary: Golfers may continue to use a putting-green map or other putting-green information, except that:
- Any image of a putting green must be limited to a scale of 3/8 inch to 5 yards (1:480) or smaller (the “scale limit”).
- Any book or other paper containing a map or image of a putting green must not be larger than 4 ¼ inches x 7 inches (the “size limit”), although a “hole location sheet” that displays nine or more holes on a single sheet of paper may be larger, provided that any image of a single putting green meets the scale limit.
- No magnification of putting-green information is allowed other than a player’s normal wearing of prescription glasses or lenses.
- Hand-drawn or written information about a putting green is only allowed if contained in a book or paper meeting the size limit and written by the player and/or his or her caddie.
The final interpretation also clearly defines that any use of electronic or digital putting-green maps must comply with the same limits. A player is still in breach of Rule 4.3 if the player uses any device not consistent with the purpose of the limits, including:
- Increasing the size of the green’s representation beyond the scale or size limits.
- Producing a recommended line of play based on the location (or estimated location) of the player’s ball (see Rule 4.3a(1)).
The Bottom Line for Me
Does this help my game? Yes.
It really helps with green reading and shot selection. It even helps at other courses.
I made 8 inch by 11.5 inch maps for a large booklet.
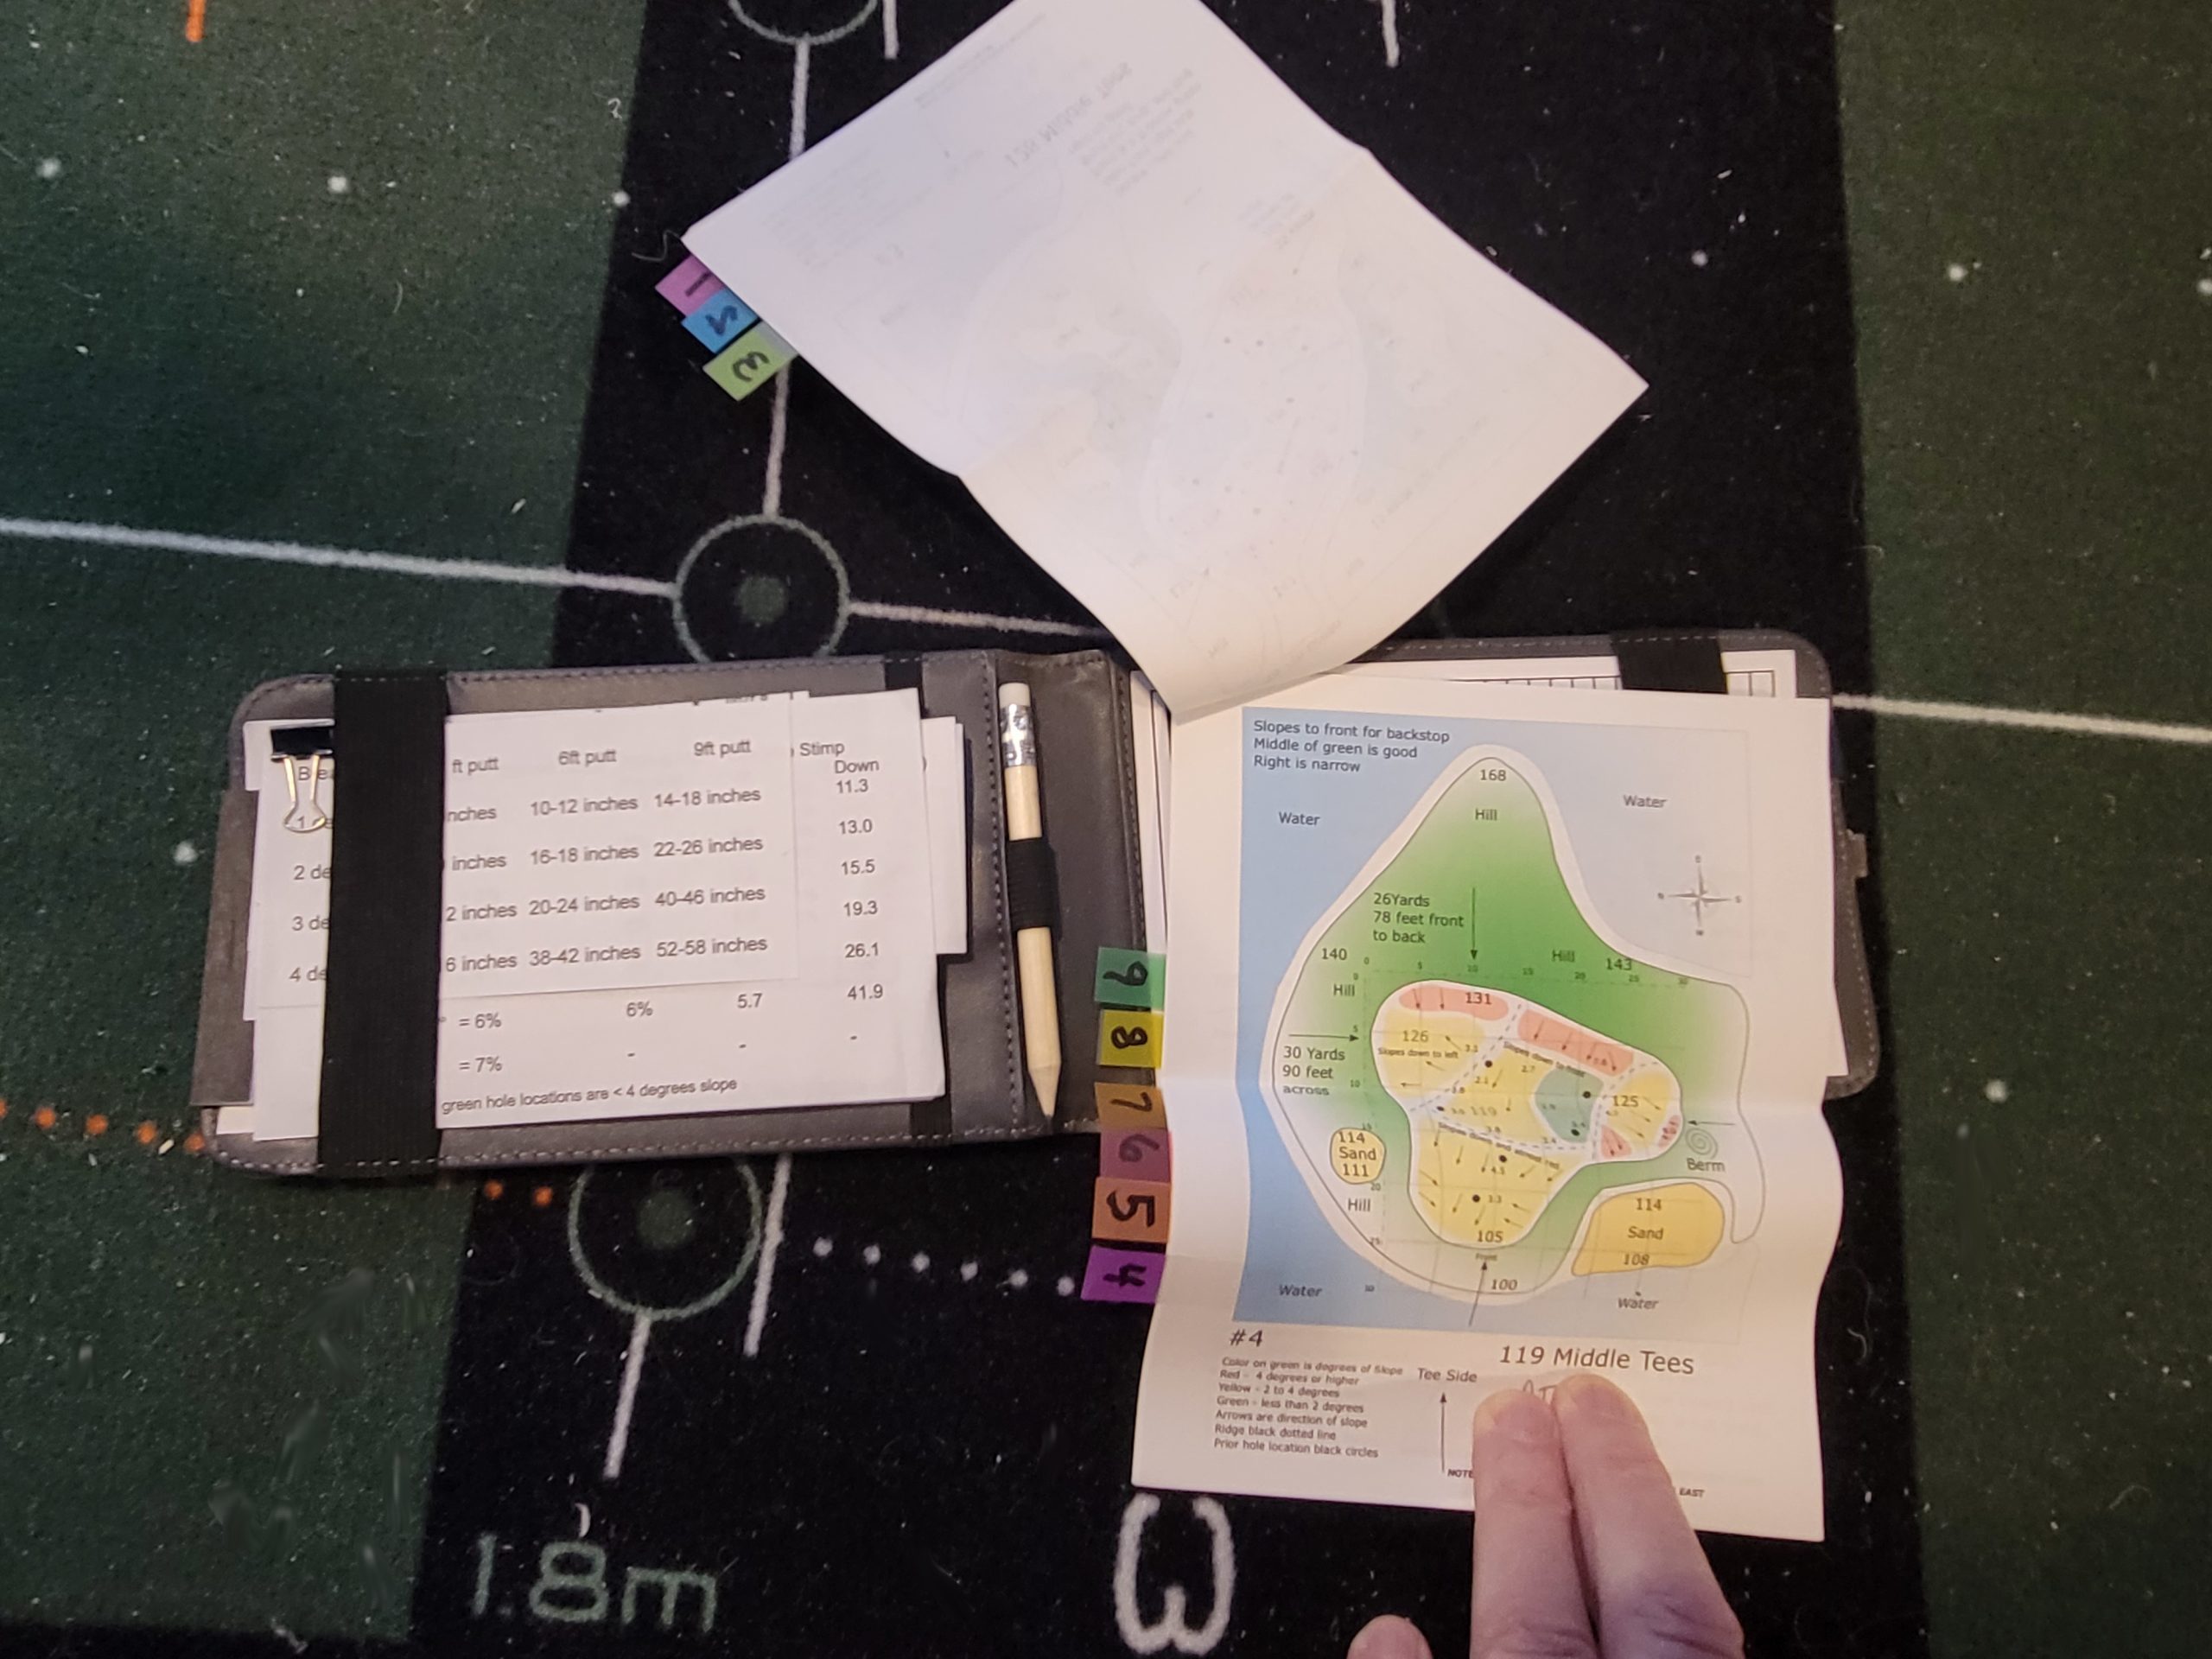
I also purchased a yardage book / scorecard holder and made the maps twice the allowed size and folded them in half.
I’ve posted examples below. Both of these booklets break the rules on size limits.
I’m retired. Not a pro. I use what I made in practice only.
What did that do for me? I can see slope direction and angle more easily.
Why? Because I measured the break on every green. I can see the break in degrees and feel it with my feet.
Occasionally, I get out the maps on the tee to see where I may want to hit approach shots.
How to easily make a yardage book or green map
You can buy blank green books or blank yardage books online. They are not very expensive. You can draw in detail with a pencil for the courses you play.
It still requires quite a bit of work. I would suggest doing a little bit at a time.
Here is what I did. On a very hot days when no one was playing, I checked the slope on our greens in about 20 places per green.
Previous hole locations were obvious where the grass had not completely healed.
I got measurements for critical distances like false fronts, ridges in the green. etc. by walking them off to the edge of the green.
I made diagrams and wrote down break info in a notepad with a pencil.
So I had most of the data.
(View this article on Digital Green Reading for device info.)
What to include
Draw a rough outline of the fairway, green and traps. Put in hazards. Add distances to the front, middle and back of the green.
On the green, You could use a single line for elevation changes. a double line for significant elevation changes, small arrow for gradual break direction, large arrows for significant break direction and then add break amounts and previous hole locations. Include green width and depth.
NOTE: Use the Exelys Breakmaster to record the break on your greens in degrees of slope. To measure Percentage of Slope / or Degrees use the Breakmaster free app or buy a digital level.
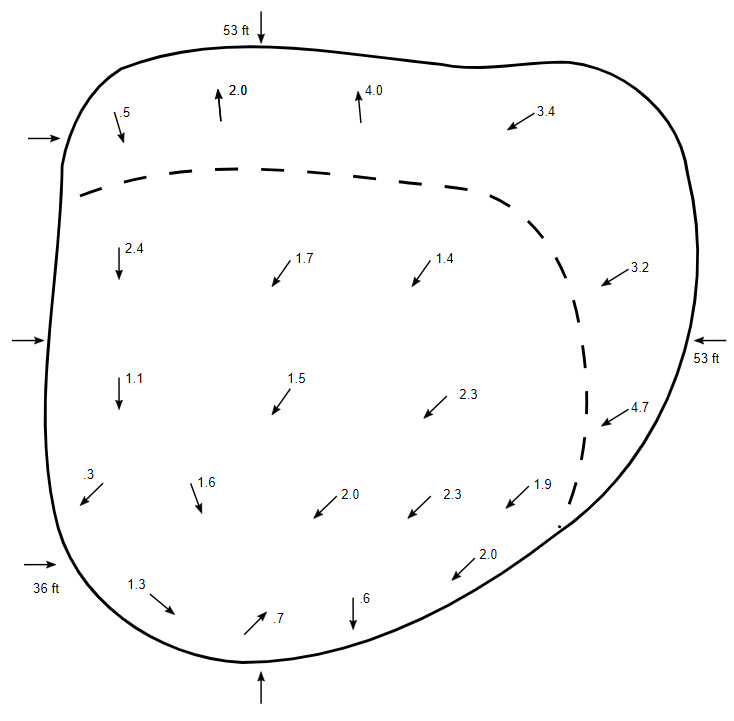
Here is an example of the initial pencil drawing I would make – this is our practice green so I didn’t put in previous hole locations
Using a computer to make maps
This is not for everyone. Map making was part of my job before I retired. Doing this was a challenge and it took quite a long time for the 9 holes at my local course.
I used Google Earth Pro for the images of the course. Then I used Inkscape to make outlines of all the greens with traps and green detail. I put a 5 yard square grid over the top of the green.
Inkscape is a program similar to Adobe Illustrator. Also, I used Gimp as a program similar to Adobe Photoshop.
This is a print screen from Google Earth Pro cropped to the green size.
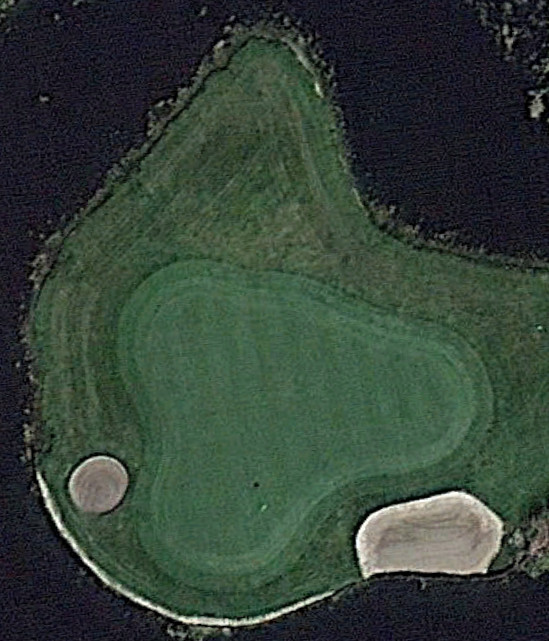
Use for Yardage measurements
A brief tutorial
Just a brief description of the work detail.
1.) Locate your course on Google Earth Pro,
2.) Zoom in to the green you want to copy and do a “Print Screen” of the close up view
3.) Paste the image from clipboard into Gimp and crop to size
4.) Open the cropped image in Inkscape
5.) Draw an outline around all the detail you want to keep (Green and traps)
6.) Delete the background image from Google Earth Pro
7.) You are left with the outlines to fill in with the detail you want.
It’s difficult to put all the different steps into this article. If you have specific questions send me a message. Here is a link to a YouTube video on this process. NOTE: Use the free software above and Exelys Breakmaster to record the break on your greens in degrees of slope. To measure Percentage of Slope / or Degrees use the Breakmaster free app or buy a digital level.
(View this article on Digital Green Reading for device info)
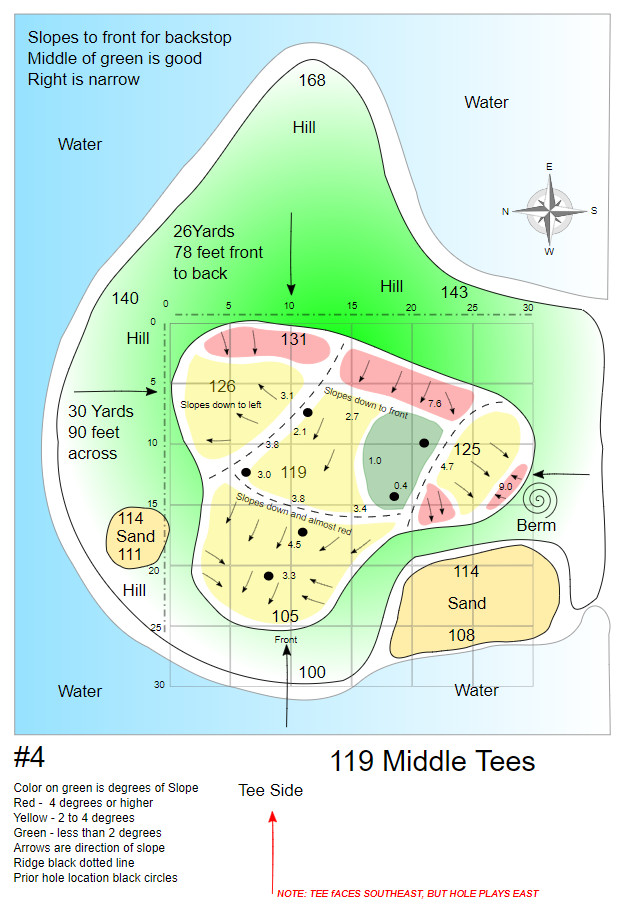
Example of finished 8×11.5 inch green map. Grid over green is in 5 yard increments.
green maps and cheat sheets for break
I’ve made yardage books also. Here is a YouTube video on making a yardage book.
Again, you can buy correct sized yardage books and draw in the detail with a pencil.